Quarky Robotic Arm

Robotic-Arm
Extension Description
Control the 3DOF Robotic Arm with Gripper.

Introduction

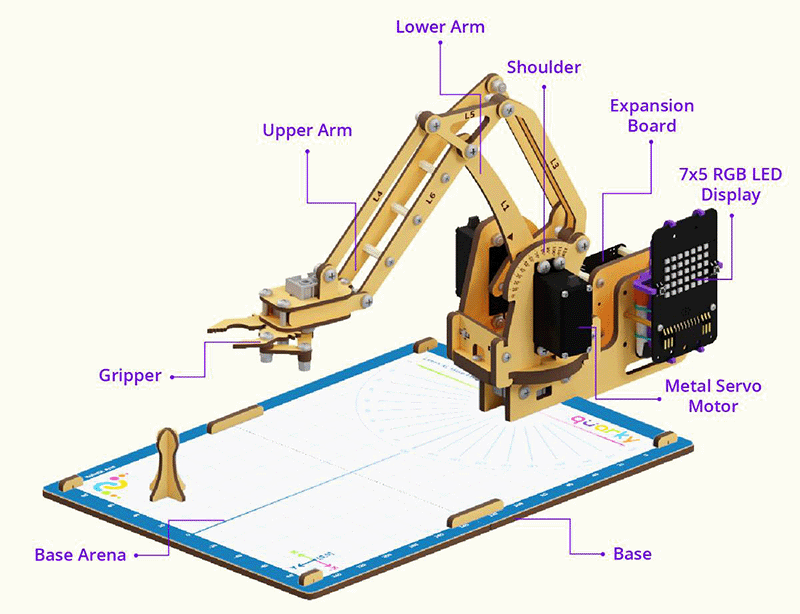
The extension allows you to control the Quakry 3DOF (Degree of Freedom) Robotic Arm with Gripper using blocks and Python functions.

Read More

PictoBlox Blocks

This block initializes a Robotic Arm connected to a Quarky Expansion Board. The user can select the specific pin connected to the servo motors from a dropdown menu. Once initialized, the robotic arm will respond to code and be ready for further instructions.
This block is a calibration process for the robotic arm. It is used to measure and save the offset angle of the servo motors in the memory of the Quarky.
This block adds the offset on the end effector position along the specified length direction i.e. the direction in which the robotic arm is facing and the Z direction.
This block resets all the servo motors of the robotic arm to their default angle which is commonly referred to as the ‘home’ position.
This block is used to move the end-effector of the robotic arm to a desired point in space, specified by the X, Y, and Z coordinates in the specified time.
This block is used to move the robotic arm from its current position to a specific X, Y, and Z coordinate position over a specified period of time. This block breaks up the motion into smaller line segments for the robot to more accurately and efficiently reach the desired end position.
This block is used to move the robotic arm from its current position to a specific X, Y, and Z coordinate position over a specified period of time. This block first moves in the X axis, then the Y axis, and lastly Z axis to reach the desired point.
This block is designed to program the robotic arm to move in a circle in the specified Y plane over a period of time. The user must specify the circle’s center position along the X and Z axes, as well as the radius of the circle. The robot arm then calculates all the points it needs to travel in the XYZ coordinates and travels to them one by one.
This block is used to control an end-effector of the robotic arm to move in an arc.
This block is used to move the end-effector to the specified position of the selected axis, while the other two positions remain the same.
This block allows the user to control the end-effector of a robotic arm to move in a specified axis by a set value, with all other axes remaining constant.
This block sets the value of the chosen servo to the specified angle in the specified amount of time.
This block defines the angles at which the gripper of the robotic arm will open and close. The block ensures that the robotic arm will open and close the gripper at the specified angles.
This block is used to open and close the gripper on a robotic arm by setting the gripper servo motor to specific opening and closing angles set by the user.
This block is used to get the angle of a selected servo connected to a robotic arm.
The block reports the current position of the end effector along the X, Y, and Z axes.
All articles loaded
No more articles to load

Block Coding Examples

All articles loaded
No more articles to load

Python Functions

This function performs the calibration process for a robotic arm by taking in the error angles of each of its three servos (link 1, link 2, and base). It then stores the offset angle for each servo to the memory of the Quarky, ensuring that the robotic arm is functioning correctly at all times.
Syntax: roboticArm.calibrate(Link1 Offset = 0, Link2 Offset = 0, Base Offset = 0)
The function takes the current end–effector position and adds an offset value to it. It then updates the end–effector position in the length and Z directions according to the specified direction. The function also normalizes the end–effector position, ensuring that the calculated offset is applied consistently.
Syntax: roboticArm.setoffset(length Offset = 0, Z Offset = 0)
This function sets all servo motors of a robotic arm to their default angle, referred to as the “home” position.
Syntax: roboticArm.sethome()
This function moves the end-effector of a robotic arm to a desired point in 3-dimensional space. The X, Y, and Z coordinates must be specified, as well as a parameter to set the time of movement. The function takes these inputs and sends commands to the robotic arm to move to the specified location in the desired time period.
Syntax: roboticArm.movetoxyz(XPOS = 0, YPOS = 150, ZPOS = 70, TIME = 1000)
This function takes four input parameters, the X, Y, and Z coordinates of the desired end position, and the amount of time to reach that position. It then divides the motion into smaller line segments, allowing the robotic arm to accurately and efficiently reach the specified location. The function then moves the robot arm from its current position to the specified end position within the given time frame.
Syntax: roboticArm.movexyzinline(XPOS = 0, YPOS = 150, ZPOS = 70, TIME = 1000)
This function is used to move a robotic arm from its current position to a specific X, Y, and Z coordinate position over a specified period of time. It takes in multiple parameters, such as the current position of the arm, the coordinates to move to, and the interval in which to move. The function then determines how many steps must be taken in each axis to reach the destination point, and moves in the X axis first, then the Y axis, and lastly the Z axis before returning the successful result.
Syntax: roboticArm.movexyzonebyone(XPOS = 0, YPOS = 150, ZPOS = 70, TIME = 1000)
This function creates a clockwise circle trajectory in the Y plane for a robotic arm, given the center position in the X and Z axes, and the radius of the circle. The function calculates the points on the trajectory and sends instructions to the arm to travel to each point sequentially.
Syntax: roboticArm.moveincircleclockwise(XPOS = 0, ZPOS = 80, RADIUS = 50, YPOS = 180, TIME = 4000)
This function creates a anti-clockwise circle trajectory in the Y plane for a robotic arm, given the center position in the X and Z axes, and the radius of the circle.
Syntax: roboticArm.moveincircleanticlockcise(XPOS = 0, ZPOS = 80, RADIUS = 50, YPOS = 180, TIME = 4000)
This function is used to control an end–effector of the robotic arm to move in an arc.
Syntax: roboticArm.moveinarc(XPOS = 0, ZPOS = 80, RADIUS = 50, START = 90, END = 270, YPOS = 180, TIME = 4000)
This function moves the end-effector to the specified position of the chosen axis while keeping the other two axes in their current positions.
Syntax: roboticArm.gotoinoneaxis(POSITION = 150, AXIS = “x”, TIME = 1000)
This function moves a robotic arm’s end-effector along a given axis by a specified amount over a given time. All other axes will remain constant.
Syntax: roboticArm.movebyinoneaxis(DISTANCE = 10, AXIS = “x”, TIME = 1000)
This function takes in a servo type, an angle, and a time value as inputs and sets the servo to the given angle in the specified amount of time.
Syntax: roboticArm.setservoangleto(SERVO = “link1”, ANGLE = 90, TIME = 1000)
This function takes two parameters – a value for the angle at which the gripper should open and a value for the angle at which the gripper should close – and sets the angles for the gripper on a robotic arm.
Syntax: roboticArm.setgripperangle(OPEN = 0, CLOSE = 50)
This function used to control the opening and closing of the robotic arm gripper.
Syntax: roboticArm.gripperaction(STATE = “open”)
This function takes the servo motor as the input parameter, and it returns the corresponding angle of the servo as an output.
Syntax: roboticArm.getcurrentservoangle(SERVO = “link1”)
This function takes a single parameter as input and returns the current position of the end effector along a specified axis.
Syntax: roboticArm.getcurrentposition(AXIS = “x”)
All articles loaded
No more articles to load
Table of Contents