Introduction
Quarky 2-wheel drive horizontal robot is the standard configuration that is provided in the Quarky Innovator Kit and Quarky Ultimate Kit.
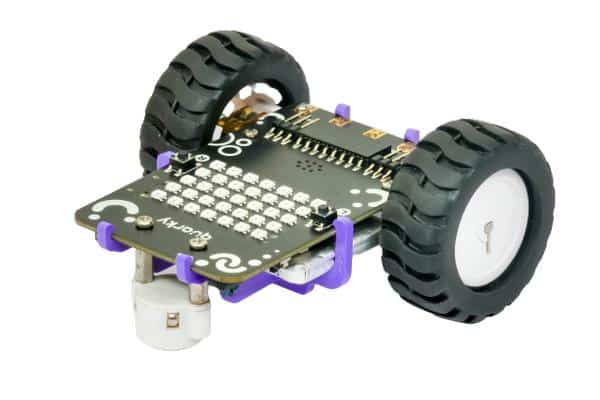
In this robot, 2 active motors are controlling the wheels and one passive castor wheel. Using the motors, you can make the robot go forward, backward, left, and right easily.
Assembly
Follow the steps to assemble the 2 Wheel Horizontal Robot:
- We will start with the bare Quarky board. Mount the Motor to the Quarky board on the back side using M2 bolts and Motor Bracket as shown in the image:
 Note: Tighten the Bolts using the Screwdriver provided in the kit.
 - Connect the Motor Connectors to Quarky’s motor ports, located on the backside. Note the following port designations:- Motor Left: Blue arrow and Motor Right: Red arrow. Ensure the connectors are securely attached to the corresponding ports.
Note: Make sure to keep the red wire towards the right side.
- Attach the wheels to the motor as shown in the image:
- Attach the Castor Wheel using two Spacers and the M2.5 Bolt.
- Insert the Battery in the Battery Connector of Quarky and place it on the backside. Keep the red wire on the right side (just like the motor wires).
- Assemble the Plastic Mounting Parts.
- Snap the Battery Holders (A1) on the Bottom of the Robot as shown in the image.
- Snap the Battery Holder Lock (A2) on top of the Battery Holder matching the lock as shown in the image.
- Snap the Battery Holders (A1) on the Bottom of the Robot as shown in the image.
Your 2-wheel Horizontal Robot is ready!
Programming Blocks for the Robot
We will use the Robot palette from Quarky to control the robot.
The following programming blocks can be used for the Horizontal Robot in PictoBlox block coding mode:


Python Functions for the Robot
We will use the Quarky class to program the robot. The following Python Functions can be used for the Horizontal Robot in PictoBlox Python coding mode:
Wirelessly Controlled Robot Project – Block Coding
The example demonstrates how to control the motion of the robot using keyboard keys:
Script
The following script makes the Robot go forward, backward, left, and right according to the key pressed on the keyboard or the PictoBlox mobile App.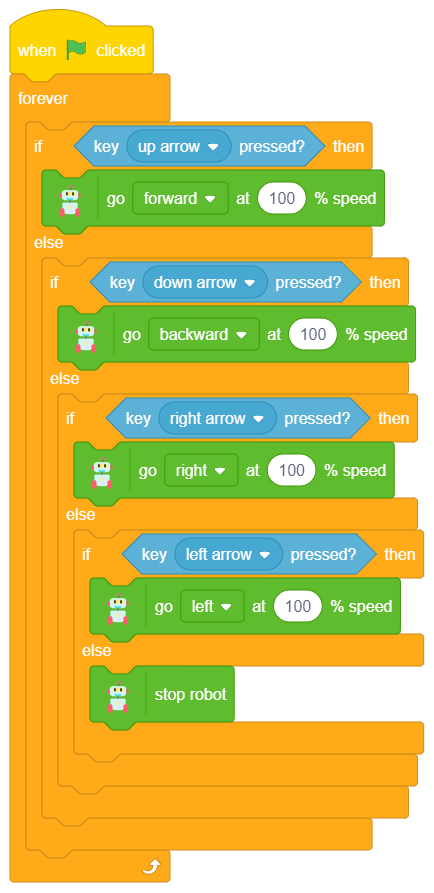
Download Program: Wirelessly Controlled Robot
Wirelessly Controlled Robot – Python Coding
The example demonstrates how to control the motion of the robot using keyboard keys in the Python Coding Environment.
Python Code
sprite = Sprite('Tobi')
quarky = Quarky()

while True:

  if sprite.iskeypressed("up arrow"):
    quarky.runrobot("FORWARD", 50)
  elif sprite.iskeypressed("down arrow"):
    quarky.runrobot("BACKWARD", 50)
  elif sprite.iskeypressed("left arrow"):
    quarky.runrobot("LEFT", 50)
  elif sprite.iskeypressed("right arrow"):
    quarky.runrobot("RIGHT", 50)
  else:
    quarky.stoprobot()
Download Code: Wirelessly Controlled Robot – Python
Conclusion
In conclusion, the Quarky 2–wheel drive horizontal robot is an easy-to-assemble and programmed robot that can be used to easily move forward, backward, left, and right. Through block coding, it is possible to control the robot‘s movements with keyboard keys, while Python coding allows for more complex programming. With the Quarky robot, users can explore the world of robotics and create exciting projects.