Introduction
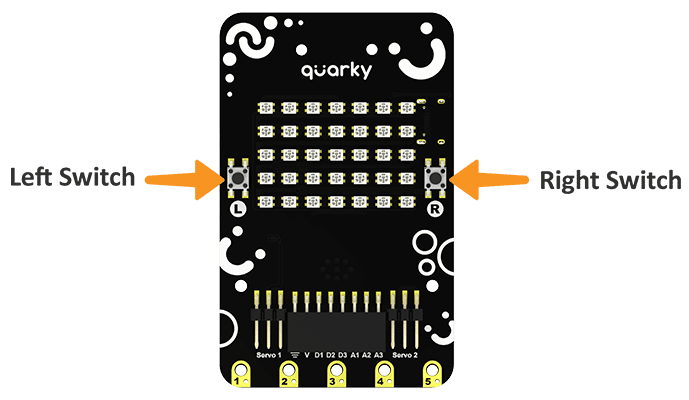
Quarky has two tactile switches on the top side. The Switch is labeled L (Left Switch) and R (Right Switch) as shown below.
The switches can be used as game input and many other applications.
How Tactile Switch Works
Pressing the left and right switches on Quarky sends analog values to PictoBlox. Pictoblox checks the range in which this value falls and based on that it declares if the left or right push button is pressed.
If push buttons are not working on Quarky, you can check the same in Quarky Setting: https://ai.thestempedia.com/docs/quarky/quarky-toubleshooting/quarky-settings-in-pictoblox/
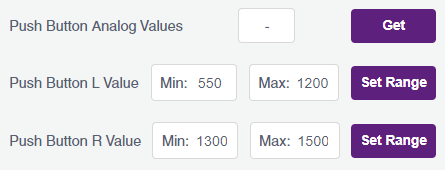
You can configure the switches using these options.
- Push Botton Analog Values: You can check if the pushbutton on Quarky is working properly using this option. Click on the Get button, this will start filling the box with the analog values of the pushbutton. If the value is shown as just -, it means the board is not responding (check if the firmware is uploaded on Quarky properly), if the value is stuck at 0, it may suggest a problem with the hardware.
- Push Button L & R-Value: The analog values may differ between boards and the user may wish to change this range for L and R push buttons. You can do the same using this option. Add the min and the max analog reading and click on Set Range.
Block Coding
In PictoBlox, you have the following blocks available for the tactile switches:
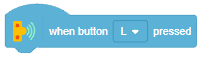
- when button () pressed: The block is a hat block and starts the execution of the script added under it when the specified push button is pressed.
- is button () pressed?: The block returns the state of the specified push button. If the button is pressed it returns True or else False.


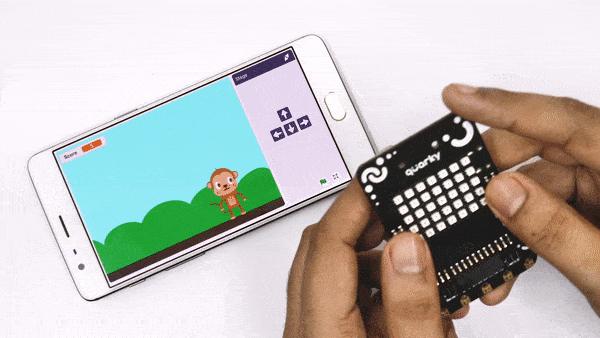
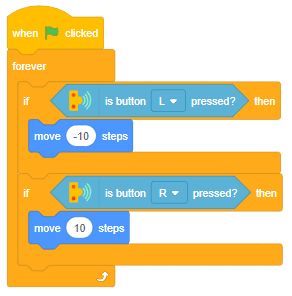
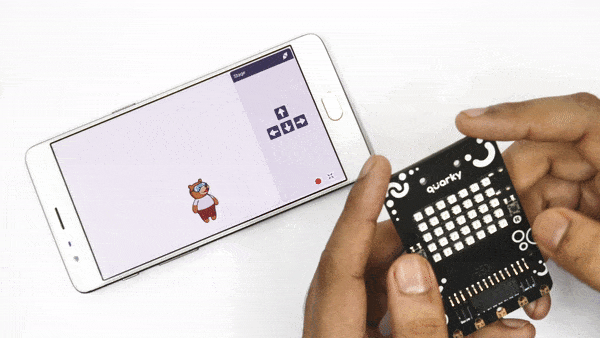
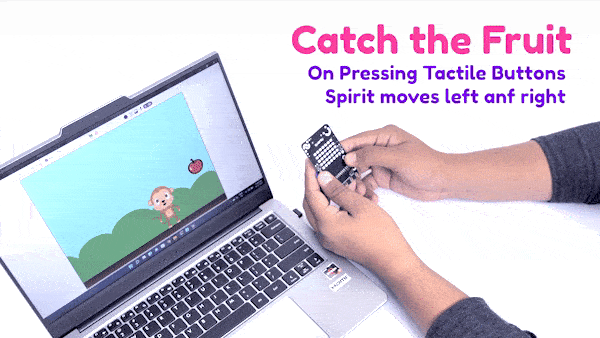
Example 1: Making Tobi move with Quarky Switches (Stage Mode)
The example demonstrates how to make the sprite movement with Quarky buttons in Stage Mode.
Script:
Output:
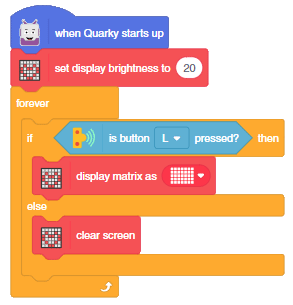
Example 2: Torch with Quarky (Upload Mode)
The example demonstrates how to make the lights of Quarky turn ON when the Quarky left switch is pressed in Upload Mode.
Script:
Python Coding
In PictoBlox, you have the following Python function available for the tactile switches:
- readpushbutton(button = “L”): The function returns the state of the specified push button. If the button is pressed it returns True or else False.
Example 1: Making Sprite move with Quarky Switches (Stage Mode)
The example demonstrates how to make the sprite movement with Quarky buttons in the stage mode.
sprite = Sprite('Tobi')
quarky = Quarky()

while True:
  if quarky.readpushbutton("L"):
    sprite.move(-10)
  elif quarky.readpushbutton("R"):
sprite.move(10)Output:
Example 2: Torch with Quarky (Upload Mode)
The example demonstrates how to make the lights of Quarky turn ON when the Quarky left switch is pressed in Upload Mode.
from quarky import *

quarky.setbrightness(20)
while True:
  if quarky.readpushbutton("L"):
    quarky.drawpattern("aaaaaaaaaaaaaaaaaaaaaaaaaaaaaaaaaaa")

  else:
    pass
    quarky.cleardisplay()
Conclusion
In conclusion, Quarky‘s tactile switches can be used to control movement, lights, and more with Pictoblox. The tactile switches can be configured in Quarky Settings and can be used in both Stage Mode and Upload Mode. The blocks and functions are available in Pictoblox make it easy to program the Quarky tactile switches.