Introduction
Touch sensors, as the name suggests, sense, or detect a touch, i.e. a physical contact made by something, typically a human. Unlike a button or switch, touch sensors are more sensitive, and are often able to respond differently to different kinds of touch, such as tapping, and swiping.
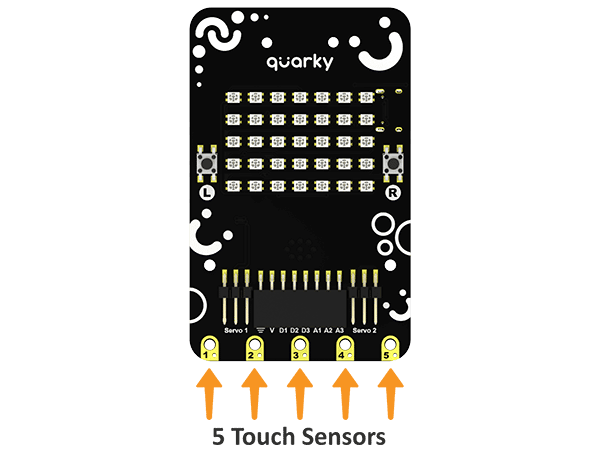
Quarky has 5 touch inputs. PictoBlox provides easy-to-use, and you can just plug wire from the outputs to any conducting surface, and get a touch-sensitive surface!
Working Principle
A touch sensor works in a way similar to a tactile (momentary) switch. When someone or something touches the sensor, there is contact between the touch surface and the lower surface of the sensor and the circuit is complete. As a result, current flows through the circuit. When there is no contact between the two surfaces the circuit is open and no current flows.
Capacitive touch sensors are one of the most commonly used types of touch sensors. They are widely used in portable electronic devices such as Smartphones and MP3 players. The capacitive touch sensors are designed keeping in mind the fact that human beings have a certain amount of free charge. The sensor, when not touched has a certain amount of charge that is the reference. Whenever you touch the surface of the sensor, the amount of charge at the surface goes beyond the set reference and the sensor is activated.
Block Coding
In PictoBlox, you have the following blocks available for the touch sensors:
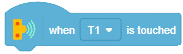
- when () is touched: The block is a hat block and starts the execution of the script added under it when the specified touch sensor of Quarky is pressed.
- is () touched?: The block returns the state of the specified touch sensor of Quarky. If the touchpad is touched it will return True, else False.


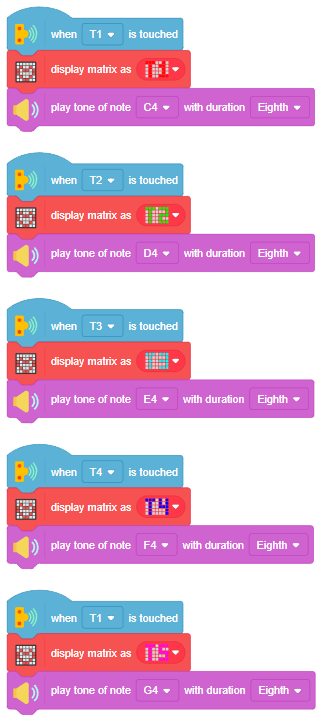
Example 1: Touch Piano (Stage Mode)
The example demonstrates using the Quarky touch display to make a touching piano in stage mode.
Script:
Output:

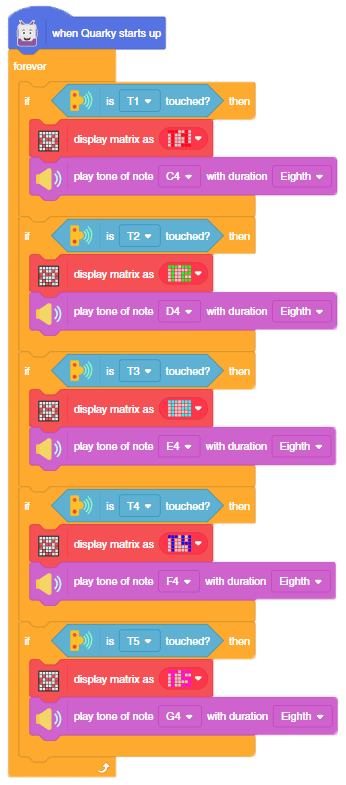
Example 2: Touch Piano (Upload Mode)
The example demonstrates using the Quarky touch display to make a touching piano in upload mode.
Script:
Python Coding
In PictoBlox, you have the following Python function available for the touch sensors:
- ispadtouched(): The function returns the state of the specified touch sensor of Quarky. If the touch pad is touched it will return True, else False.
Example 1: Touch Piano (Stage Mode)
The example demonstrates using the Quarky touch display to make a touching piano in stage mode in Python Environment.
Code:
sprite = Sprite('Tobi')
quarky = Quarky()

while True:
  if quarky.ispadtouched("T1"):
    quarky.drawpattern("bbbjjbjjbjjbbjjbjjjbjjbjjjbjjbjjbbb")
    quarky.playtone("C4", 8)

  if quarky.ispadtouched("T2"):
    quarky.drawpattern("cccjcccjcjjjjcjcjjcccjcjjcjjjcjjccc")
    quarky.playtone("D4", 8)

  if quarky.ispadtouched("T3"):
    quarky.drawpattern("fffjfffjfjjjjfjfjjfffjfjjjjfjfjjfff")
    quarky.playtone("E4", 8)

  if quarky.ispadtouched("T4"):
    quarky.drawpattern("dddjdjdjdjjdjdjdjjdddjdjjjjdjdjjjjd")
    quarky.playtone("F4", 8)

  if quarky.ispadtouched("T5"):
    quarky.drawpattern("gggjgggjgjjgjjjgjjgggjgjjjjgjgjjggg")
quarky.playtone("G4", 8)Output:
Example 2: Touch Piano (Upload Mode)
The example demonstrates using the Quarky touch display to make a touching piano in upload mode.
Code:
from quarky import *

# imported modules
from quarkyConstants import *

while True:
  if quarky.ispadtouched("T1"):
    quarky.drawpattern("bbbjjbjjbjjbbjjbjjjbjjbjjjbjjbjjbbb")
    quarky.playtone("C4", 8)

  if quarky.ispadtouched("T2"):
    quarky.drawpattern("cccjcccjcjjjjcjcjjcccjcjjcjjjcjjccc")
    quarky.playtone("D4", 8)

  if quarky.ispadtouched("T3"):
    quarky.drawpattern("fffjfffjfjjjjfjfjjfffjfjjjjfjfjjfff")
    quarky.playtone("E4", 8)

  if quarky.ispadtouched("T4"):
    quarky.drawpattern("dddjdjdjdjjdjdjdjjdddjdjjjjdjdjjjjd")
    quarky.playtone("F4", 8)

  if quarky.ispadtouched("T5"):
    quarky.drawpattern("gggjgggjgjjgjjjgjjgggjgjjjjgjgjjggg")
    quarky.playtone("G4", 8)
Calibrating Touch Sensors
If touch sensors are not working on Quarky, you can check the same in Quarky Setting: https://ai.thestempedia.com/docs/quarky/quarky-toubleshooting/quarky-settings-in-pictoblox/
For configuring the touch sensors, you have the following options:
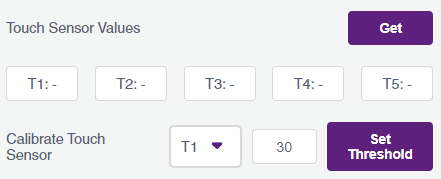
- Touch Sensor Values: You can check if the touch pads on Quarky are working properly using this option. Click on the Get button, this will start filling the T1, T2, etc. fields with the analog values of the touch pins that are being communicated to PictoBlox by Quarky. Try touching the pads and notice the drop in the readings.
- Calibrate Touch Sensor: You can then set the touchpad threshold accordingly using this option. Select the Touch sensor, write the value and click on Set Threshold.
Conclusion
In conclusion, touch sensors are an easy and intuitive way to interact with hardware like Quarky. Through PictoBlox, you can access the touch sensors either through the block coding area, or the Python environment. You can also calibrate the touch sensors in the Quarky Settings in Pictoblox. This can be done to ensure that the touch sensors are working properly. With these tools, you can create a variety of interactive projects using the Quarky touch sensors.