Table of Contents

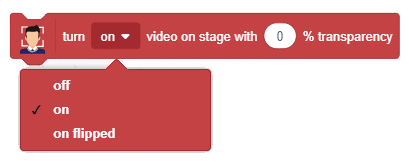
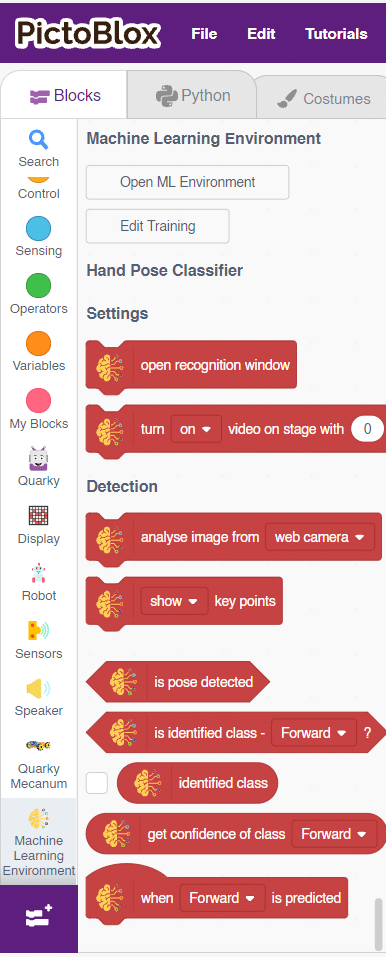
turn () video on stage with () % transparency

Description

Turn () video on stage with () % transparency block controls the control the camera feed on the stage.

turn () video on stage with () % transparency

You can change the following parameters of the block:

  1. Camera state:
    1. OFF – The video feed on the stage will stop.
    2. ON – The video feed on the stage will start.
    3. ON flipped – The video feed on the stage will start with the video mirrored. So, your right hand will show left and vice versa.
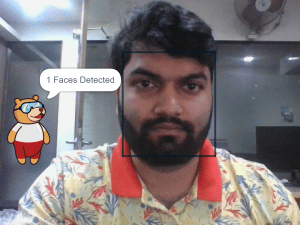
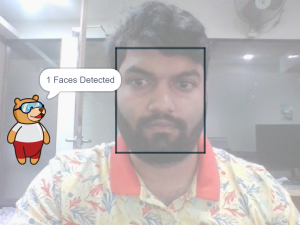
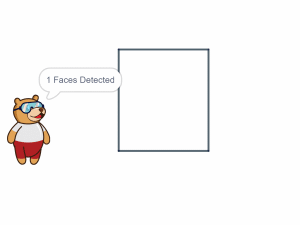
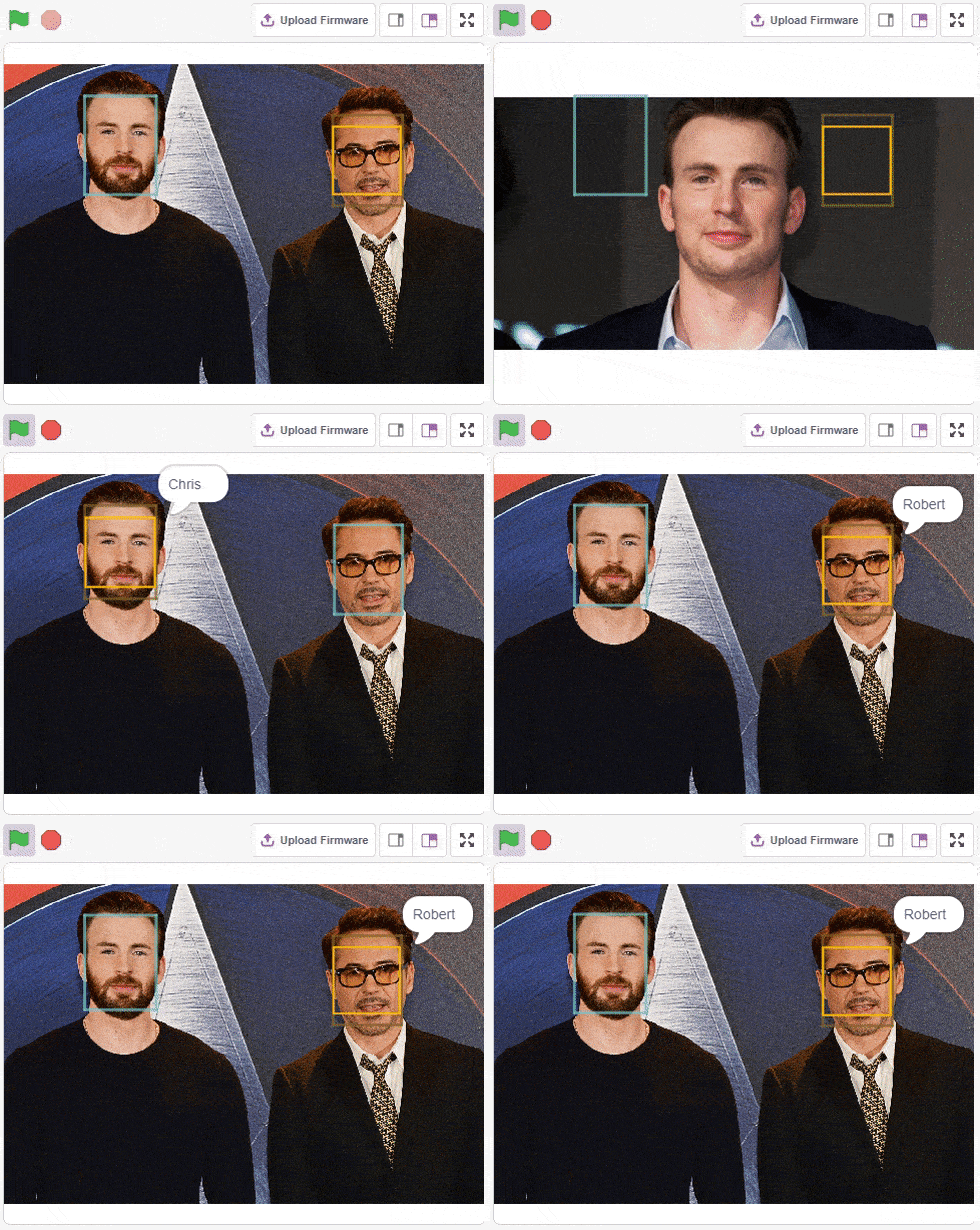
  2. Transparency: This parameter makes the video translucent. O is defined as the camera feed shown on the stage, and 100 is the video that will fade out entirely from the stage.
    1. o:
    2. 50:
    3. 100:

Example

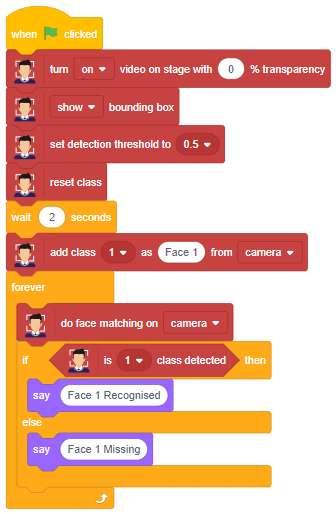
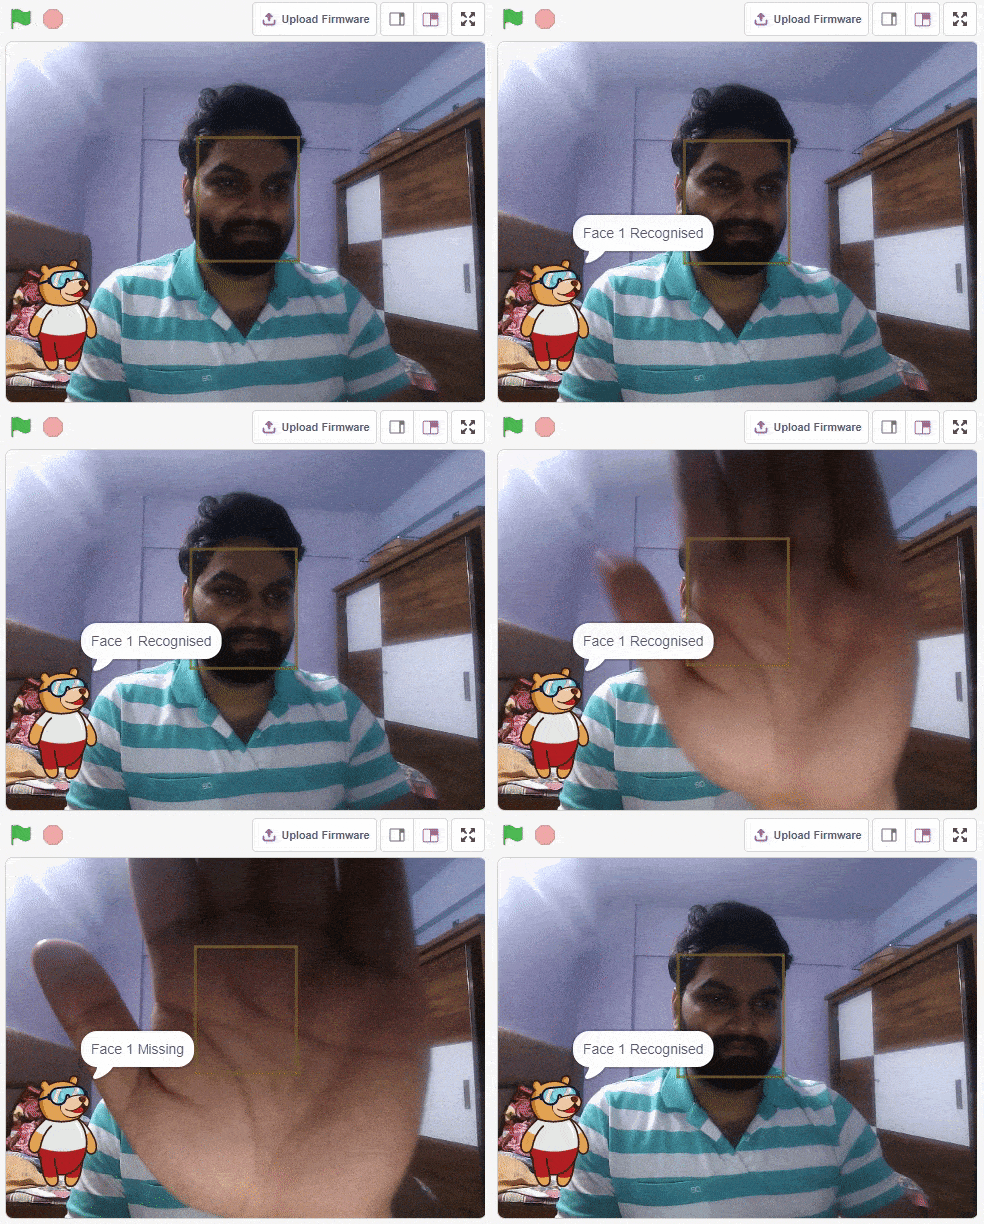
The example demonstrates how face recognition works with analysis on the camera.

The example demonstrates the application of face recognition with a camera feed. Following are the key steps happening:

  1. Initializing the program with parameters for the sprite and face detection library.
  2. Saving the face showing in the camera as class 1.
  3. Running face recognition and reporting whether class 1 is detected or not.

Script

Output

Read More
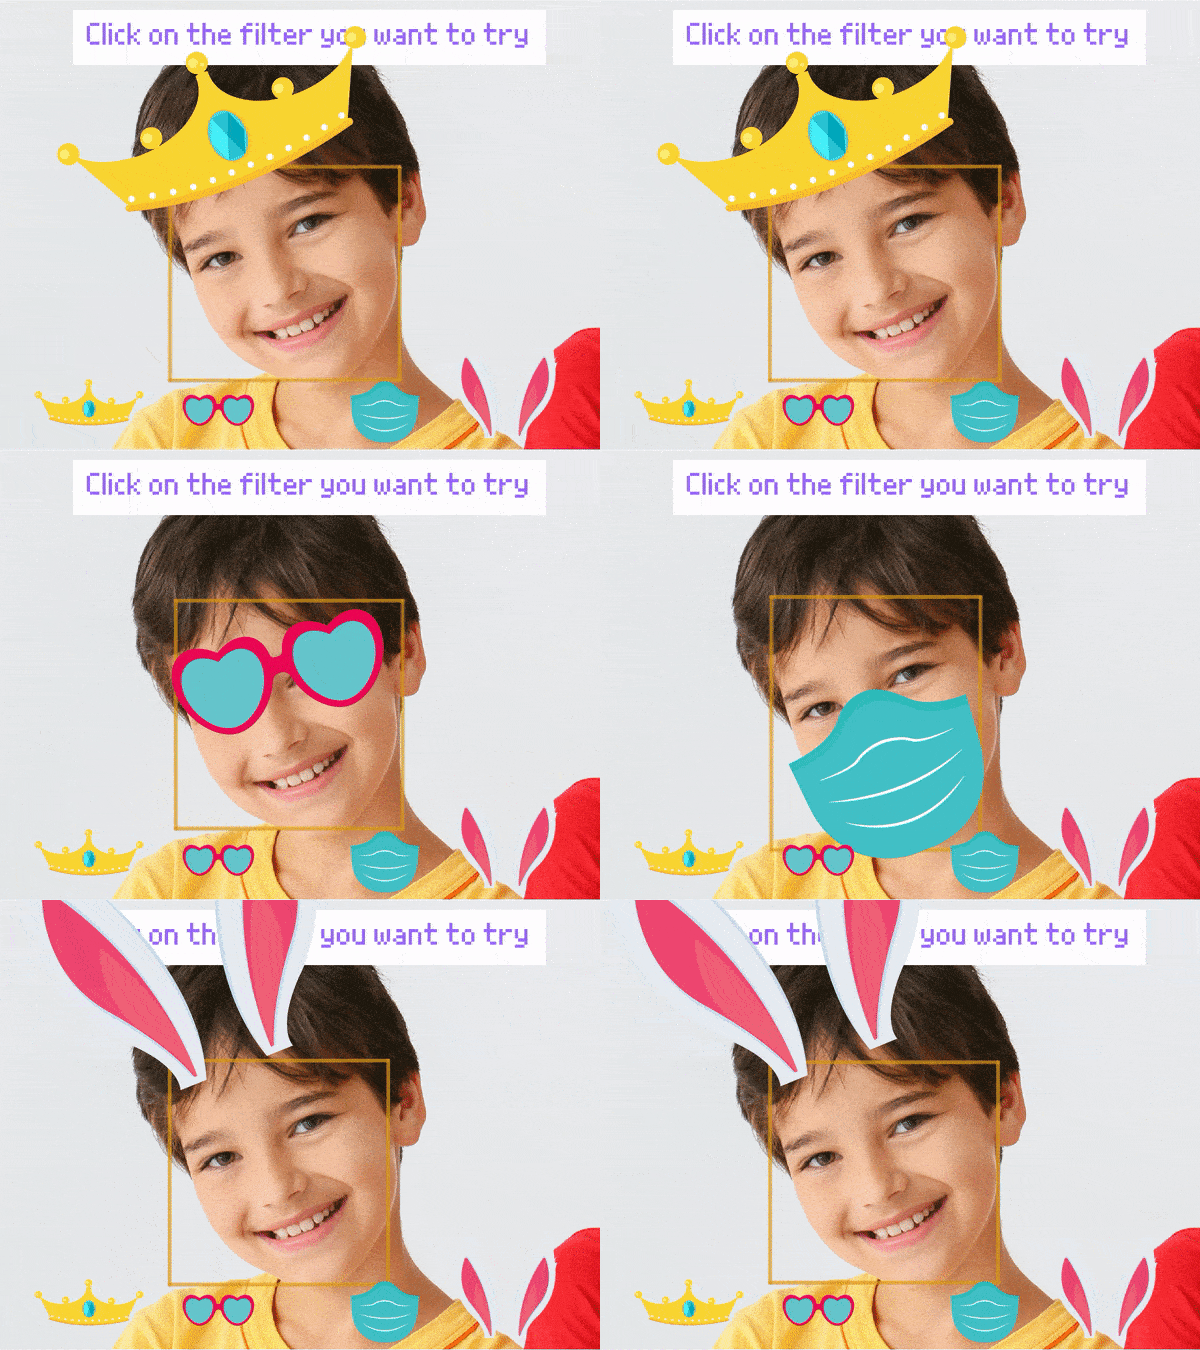
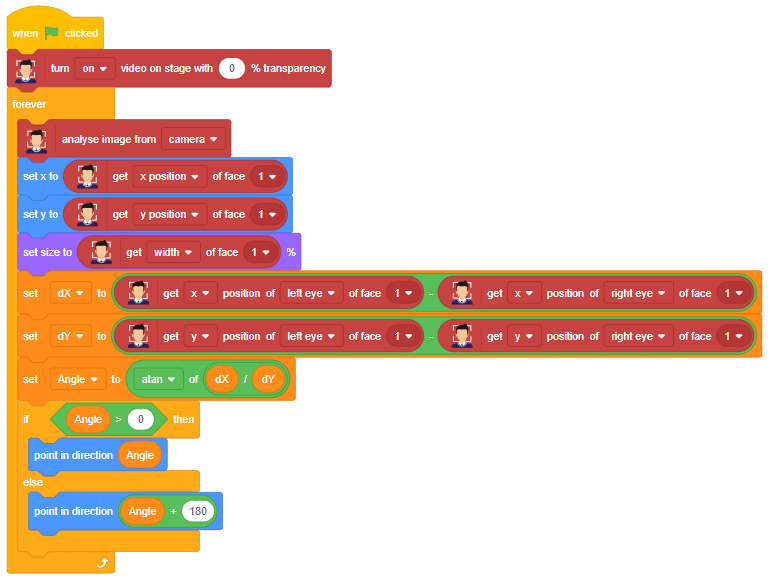
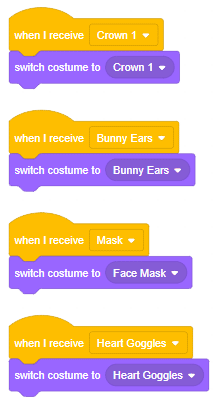
The example shows how to create a face filter with Face Detection. It also includes how to make the filter tilt with face angles.

Script

Exmaple

Read More
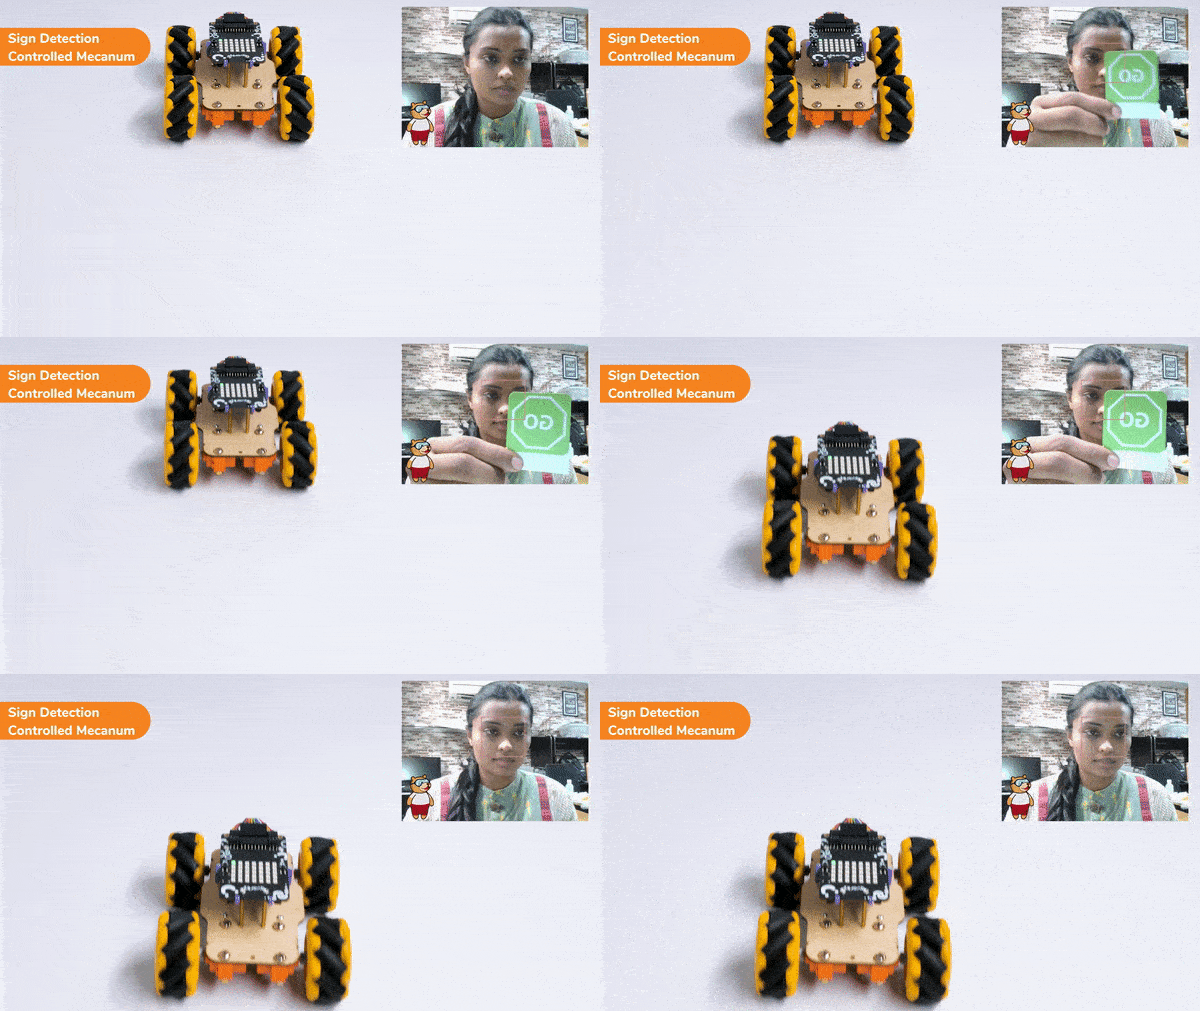
Learn how to code logic for video input detection with this example block code. You will be able to direct your own Mecanum easily by just showing signs through the camera input.

Introduction

A sign detector Mecanum robot is a robot that can recognize and interpret certain signs or signals, such as hand gestures or verbal commands, given by a human. The robot uses sensors, cameras, and machine learning algorithms to detect and understand the sign, and then performs a corresponding action based on the signal detected.

These robots are often used in manufacturing, healthcare, and customer service industries to assist with tasks that require human-like interaction and decision making.

Code

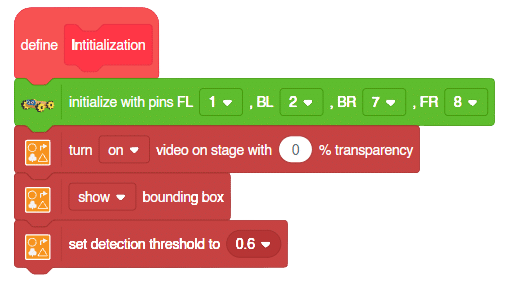
Initialization:

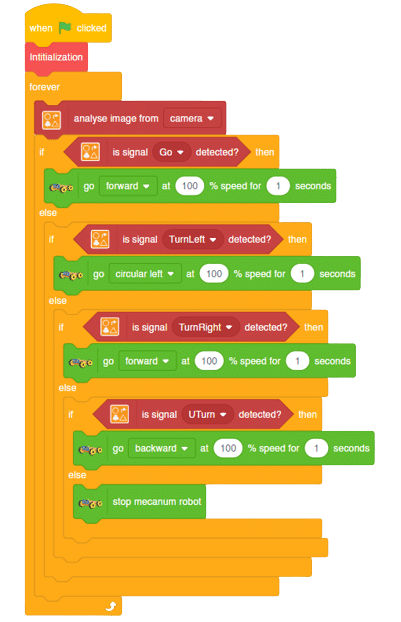
Main Code

Logic

  1. Firstly, the code sets up the stage camera to look for signs and detects and recognizes the signs showed on the camera.
  2. Next, the code starts a loop where the stage camera continuously checks for the signs.
  3. Finally, if the robot sees certain signs (like ‘Go’, ‘Turn Left’, ‘Turn Right’, or ‘U Turn’), it moves in a certain direction (forward, backward, left, or backward) based on the respective signs.
  4. This can help the Mecanum to manoeuvre through the terrain easily by just showing signs on the camera.

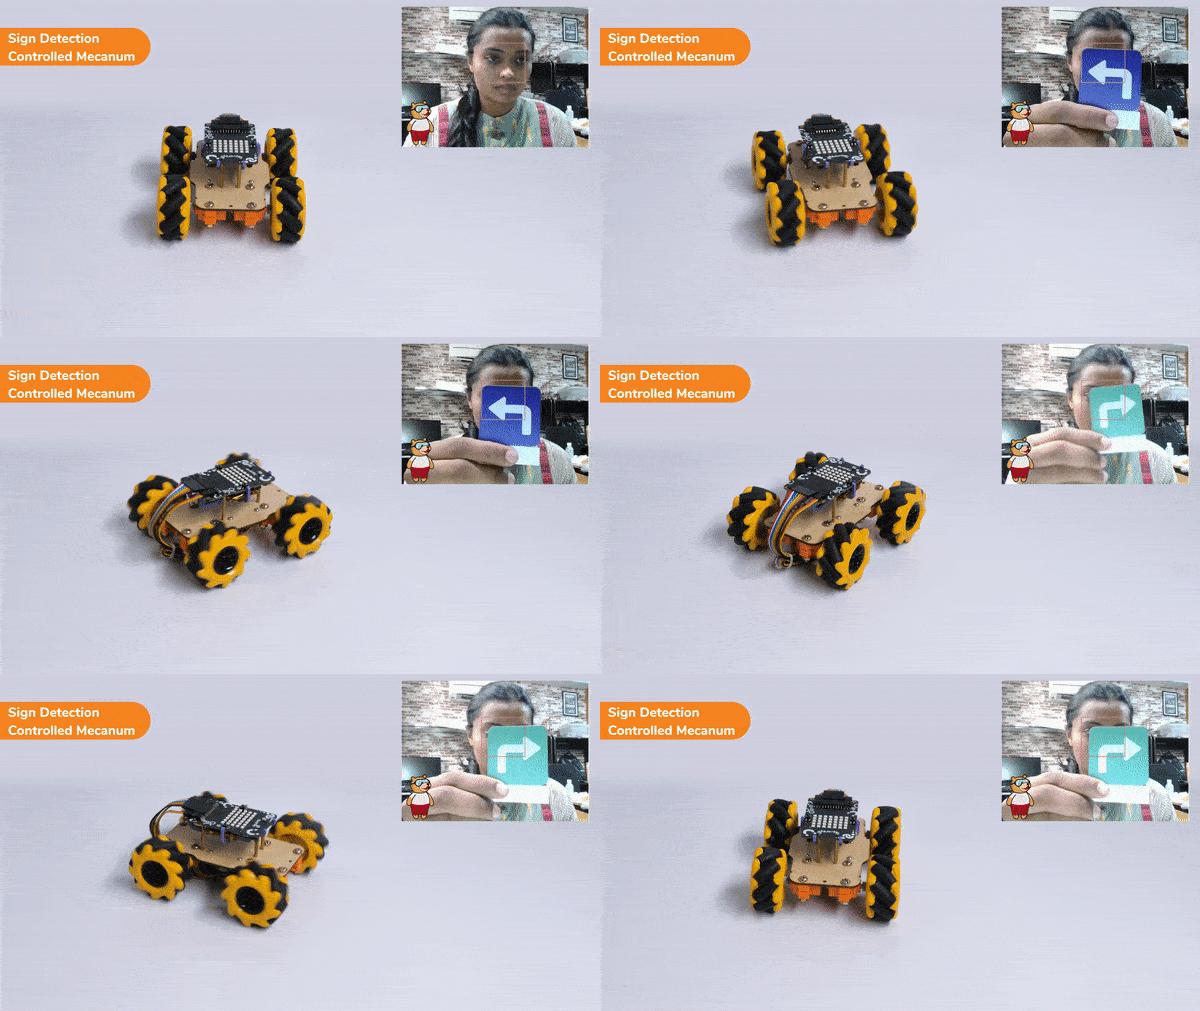
Output

Forward Motion:

Right-Left Motions:

Read More
Discover how gesture-controlled robotic arms revolutionize robotics with intuitive control. Learn about their applications in manufacturing, healthcare, and virtual reality.

Introduction

A gesture-controlled robotic arm is a robotic arm that can be controlled using hand or body movements instead of traditional buttons or joysticks. It uses sensors and algorithms to interpret the gestures made by a user and translates them into commands for the robotic arm.

The user wears or holds a device with sensors, such as a glove or wristband, that captures their hand movements or body gestures. These movements are processed by a computer or microcontroller, which analyzes them and recognizes specific gestures using algorithms and machine learning techniques.

Once the gestures are recognized, the system generates commands for the robotic arm to move accordingly. The arm can have multiple joints and degrees of freedom to perform complex movements. The user’s gestures are mimicked by the robotic arm, allowing them to control its actions.

Gesture-controlled robotic arms are used in various fields, including manufacturing, healthcare, and virtual reality. They provide a more intuitive and natural way of controlling robotic systems, eliminating the need for complex input devices and extensive training.

Hand Gesture Classifier Workflow

Follow the steps below:

  1. Open PictoBlox and create a new file.
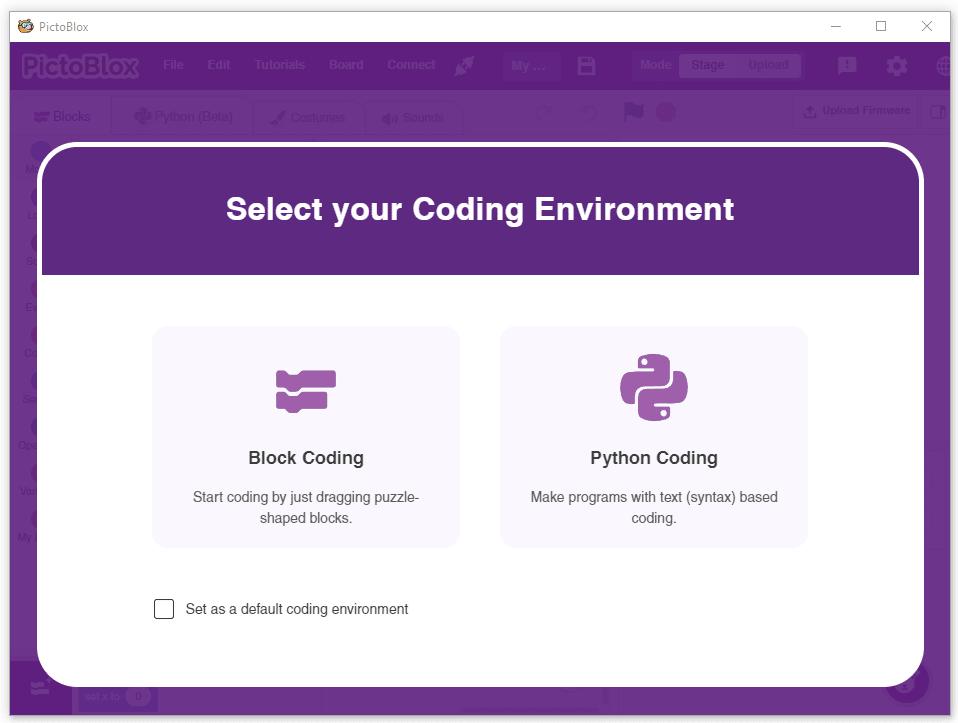
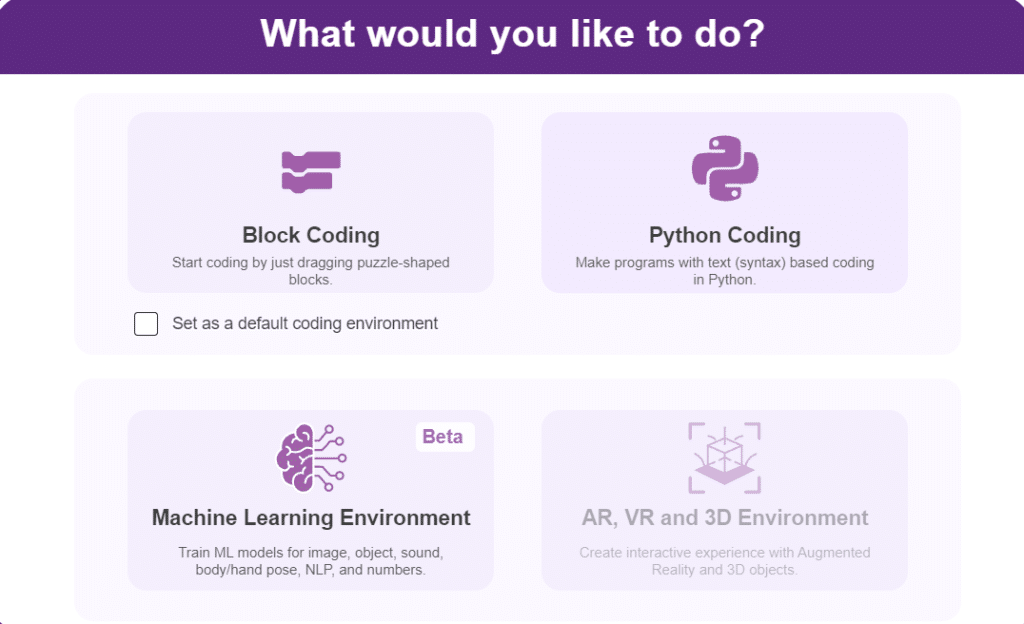
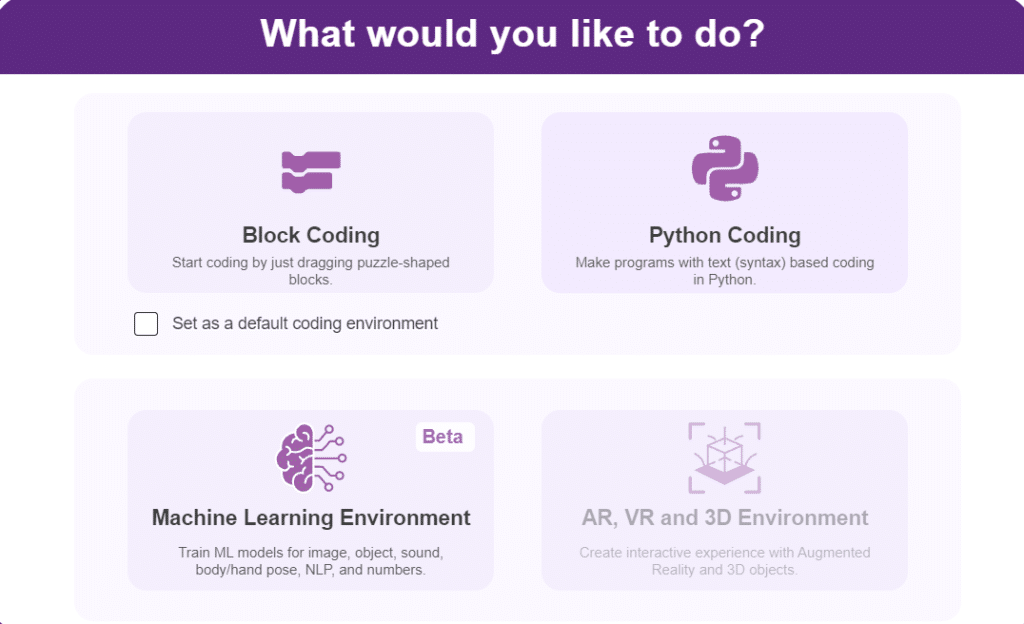
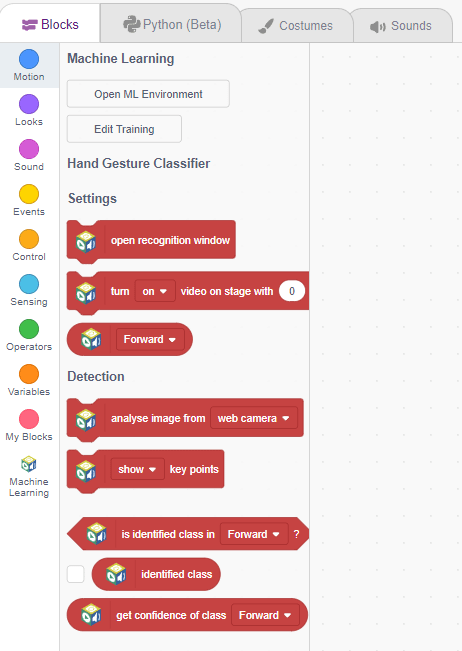
  2. Select the coding environment as appropriate Coding Environment. you can click on “Machine Learning Environment” to open it.
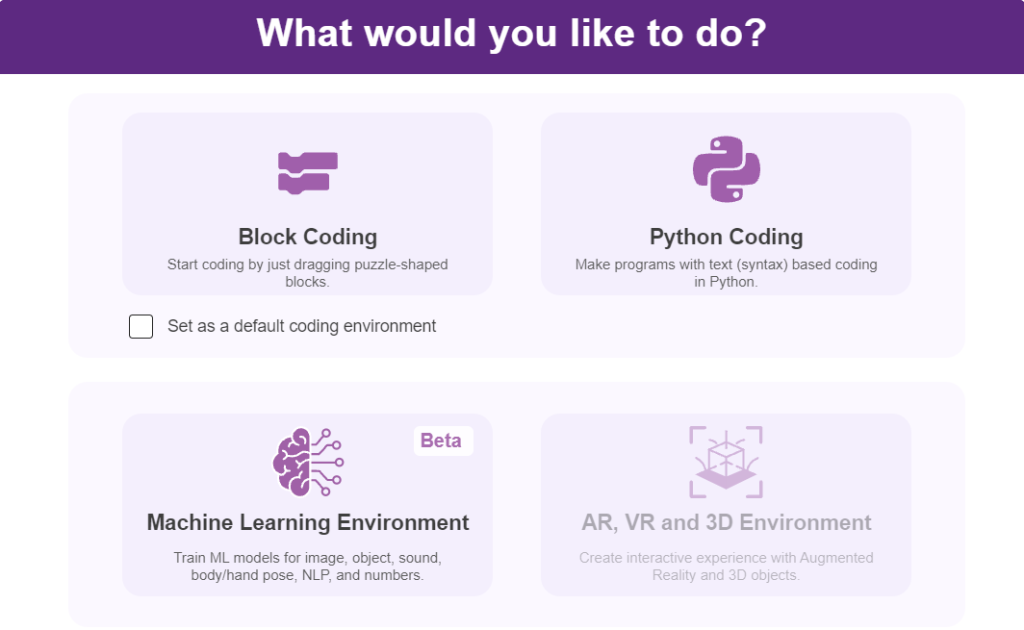
  3. Select the “Open ML Environment” option under the “Files” tab to access the ML Environment.
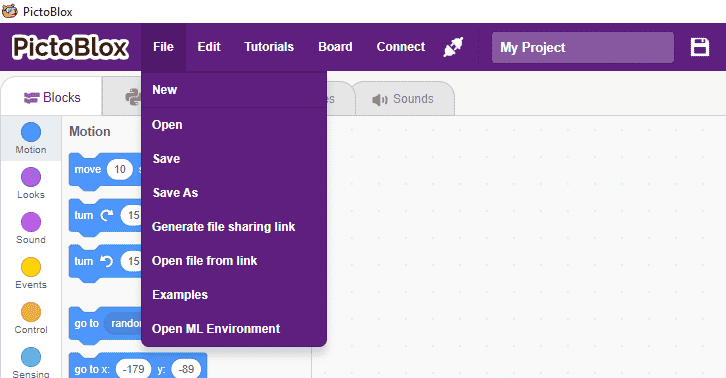
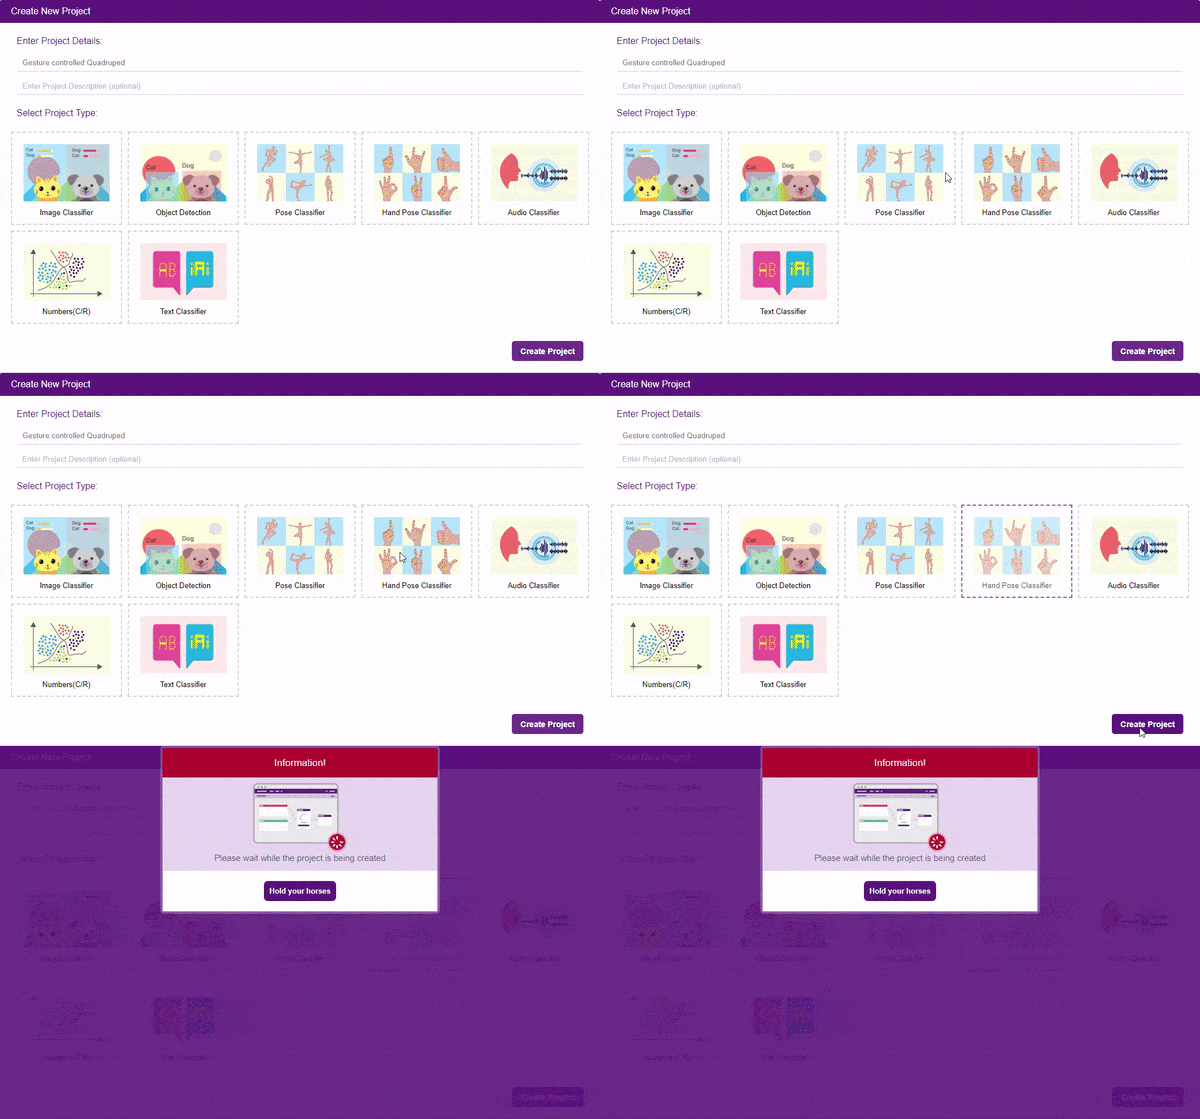
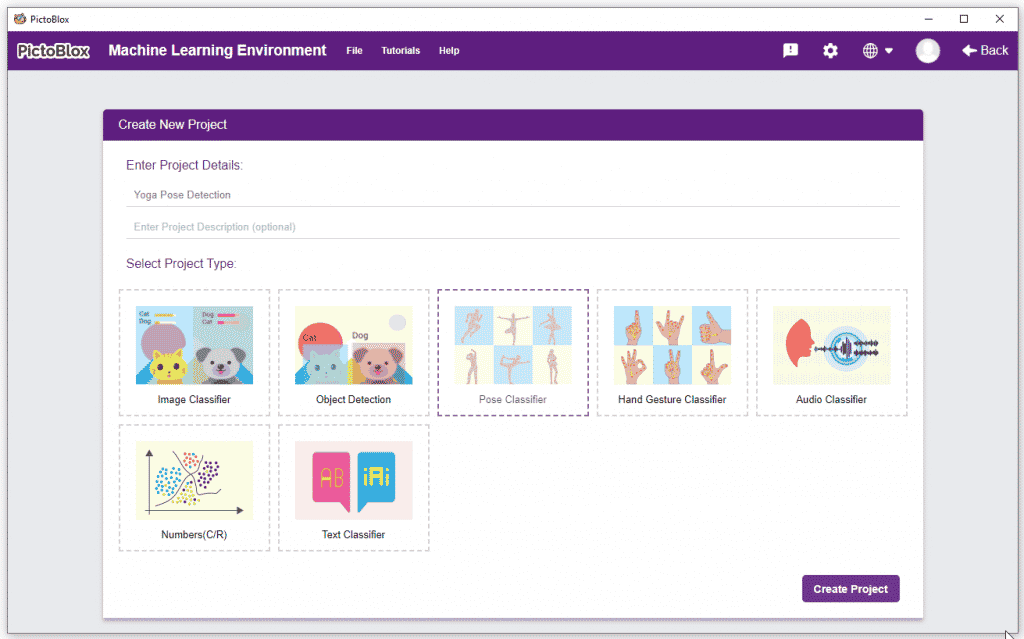
  4. Click on “Create New Project“.
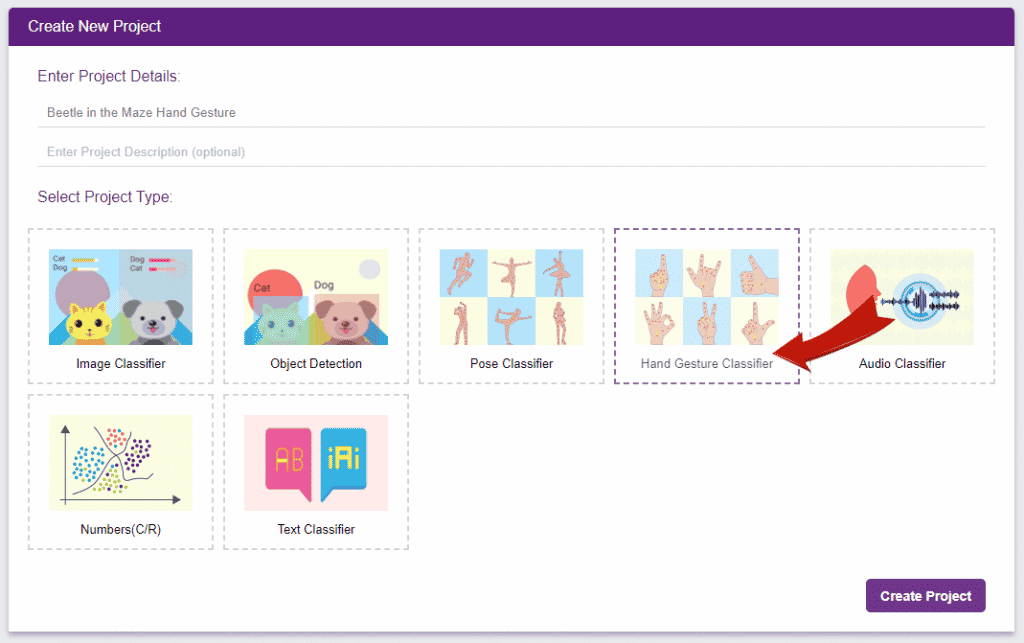
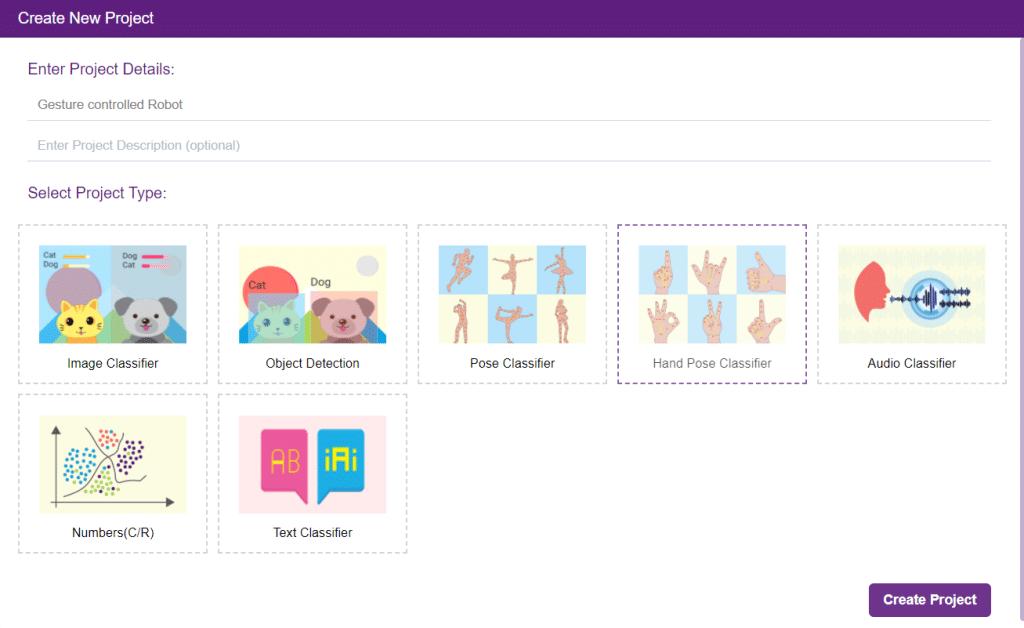
  5. A window will open. Type in a project name of your choice and select the “Hand Gesture Classifier” extension. Click the “Create Project” button to open the Hand Pose Classifier window.
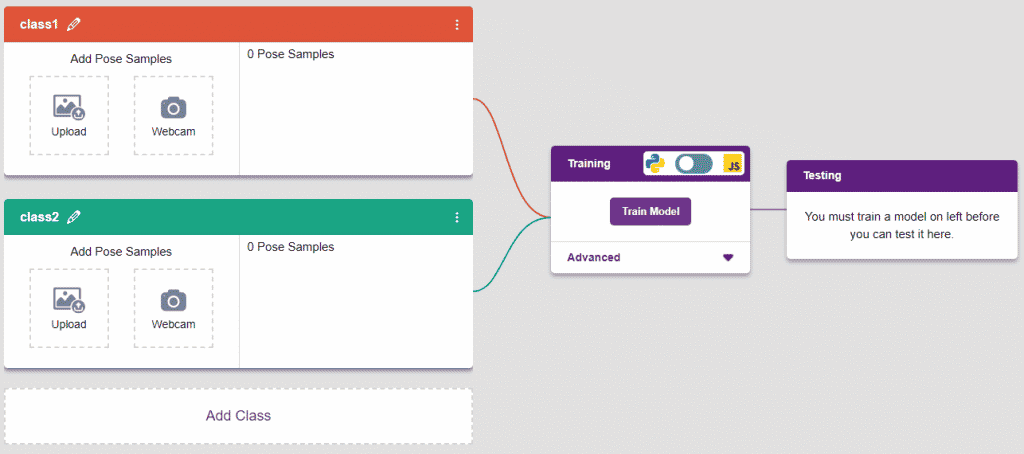
  6. You shall see the Classifier workflow with two classes already made for you. Your environment is all set. Now it’s time to upload the data.
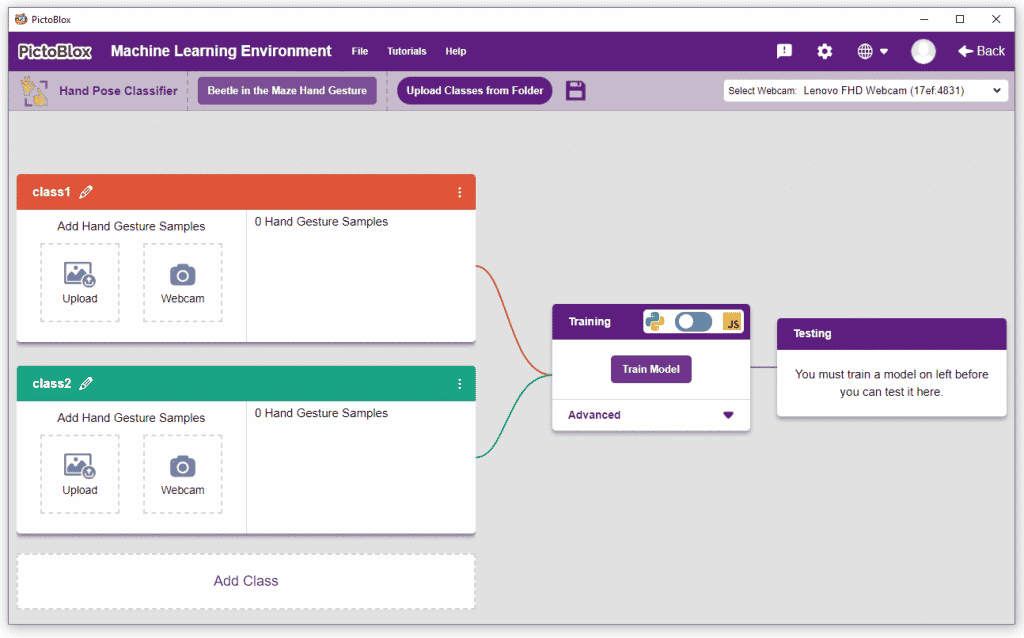
Class in Hand Gesture Classifier

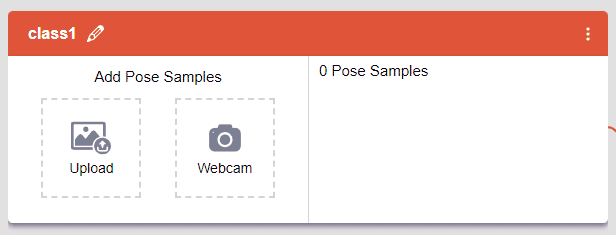
There are 2 things that you have to provide in a class:

  1. Class Name: The name to which the class will be referred.
  2. Hand Pose Data: This data can be taken from the webcam or uploaded from local storage.

Note: You can add more classes to the projects using the Add Class button.
Adding Data to Class

You can perform the following operations to manipulate the data into a class.

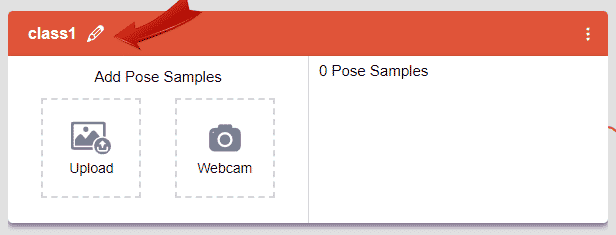
  1. Naming the Class: You can rename the class by clicking on the edit button.
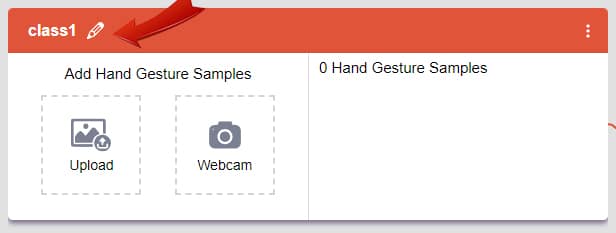
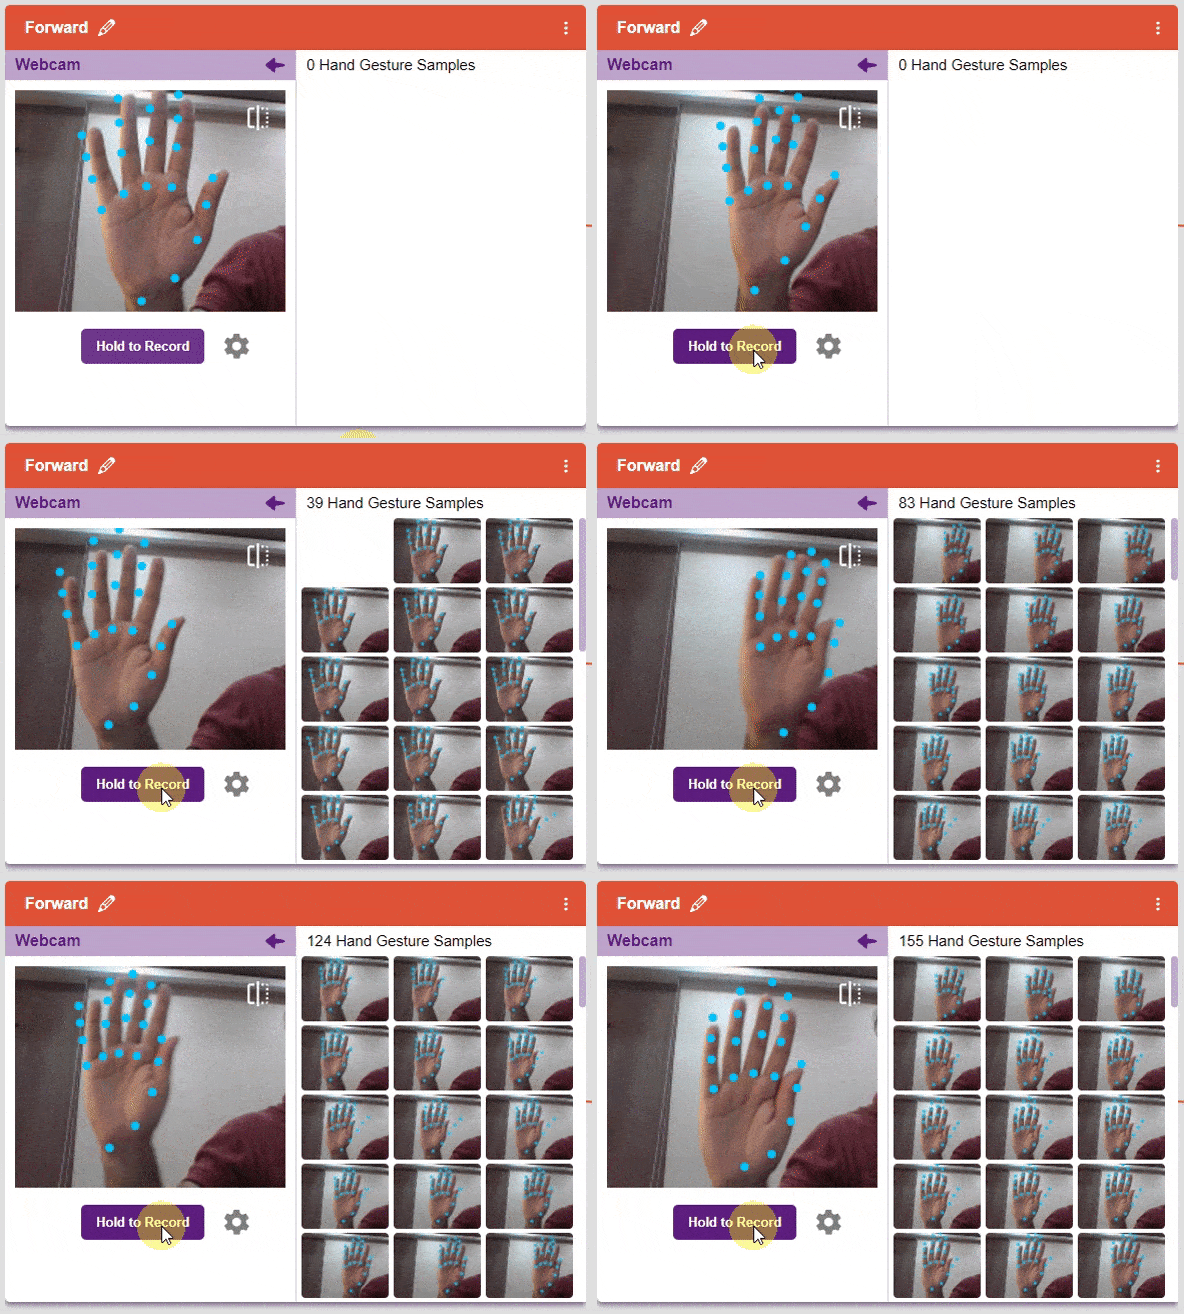
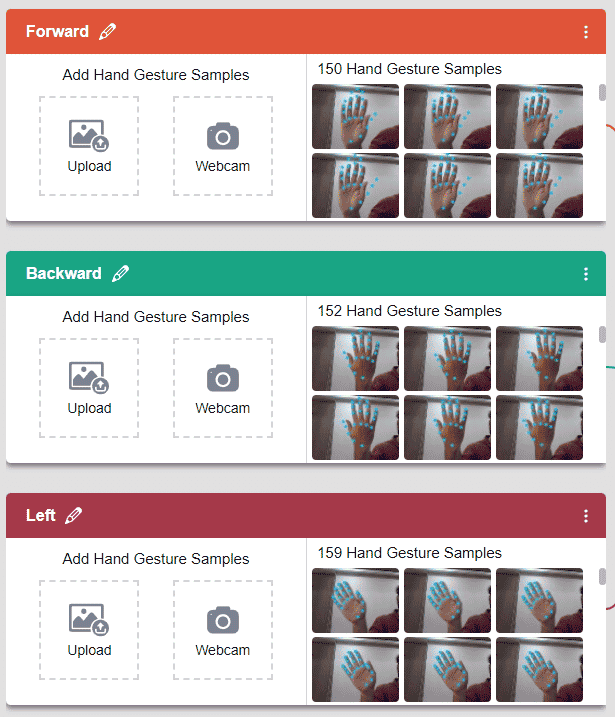
  2. Adding Data to the Class: You can add the data using the Webcam or by Uploading the files from the local folder.
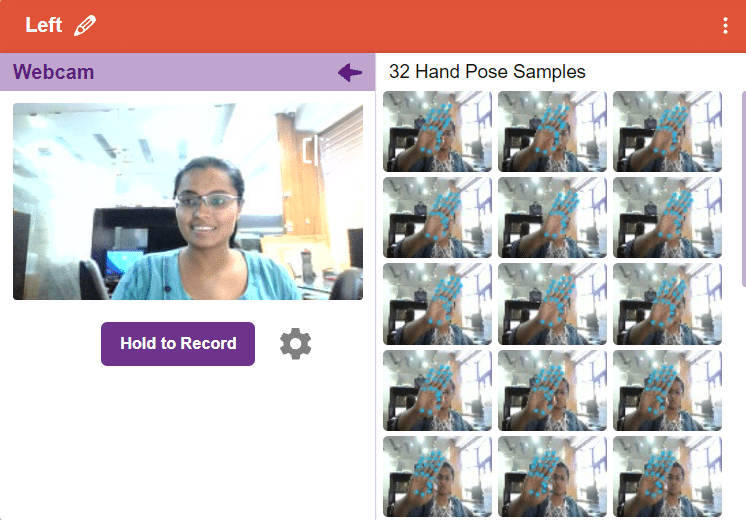
    1. Webcam:
Note: You must add at least 20 samples to each of your classes for your model to train. More samples will lead to better results.
Training the Model

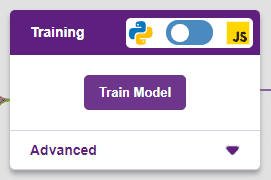
After data is added, it’s fit to be used in model training. To do this, we have to train the model. By training the model, we extract meaningful information from the hand pose, and that in turn updates the weights. Once these weights are saved, we can use our model to predict previously unseen data.
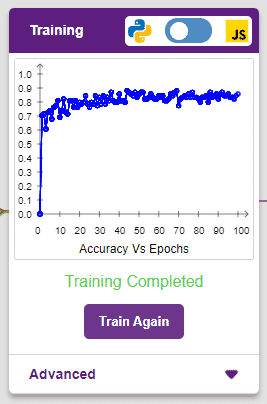
The accuracy of the model should increase over time. The x-axis of the graph shows the epochs, and the y-axis represents the accuracy at the corresponding epoch. Remember, the higher the reading in the accuracy graph, the better the model. The range of accuracy is 0 to 1.
Testing the Model
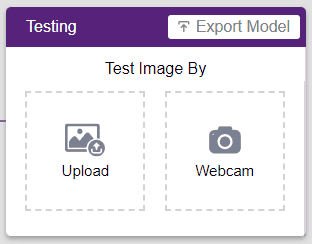
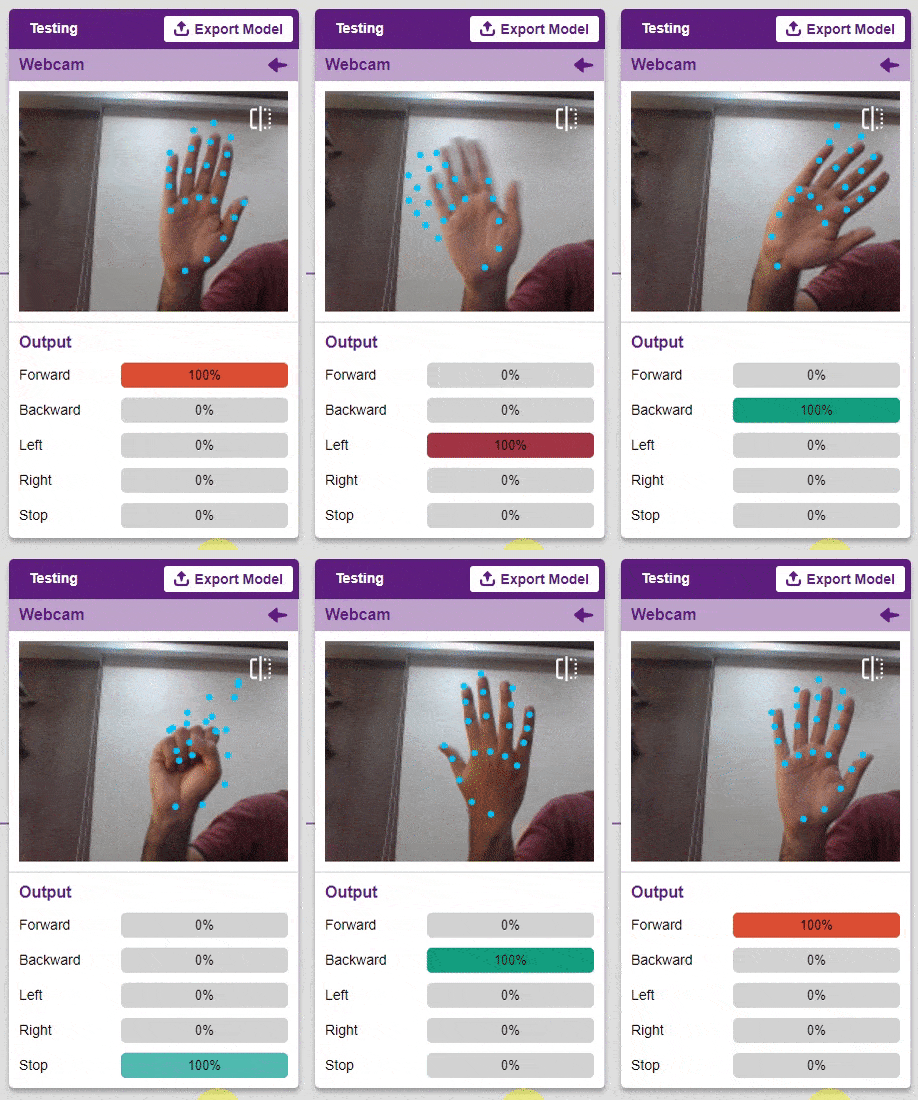
To test the model, simply enter the input values in the “Testing” panel and click on the “Predict” button.
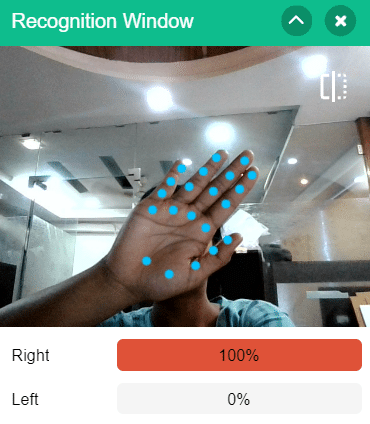
The model will return the probability of the input belonging to the classes.

Export in Block Coding

Click on the “Export Model” button on the top right of the Testing box, and PictoBlox will load your model into the Block Coding Environment if you have opened the ML Environment in the Block Coding.
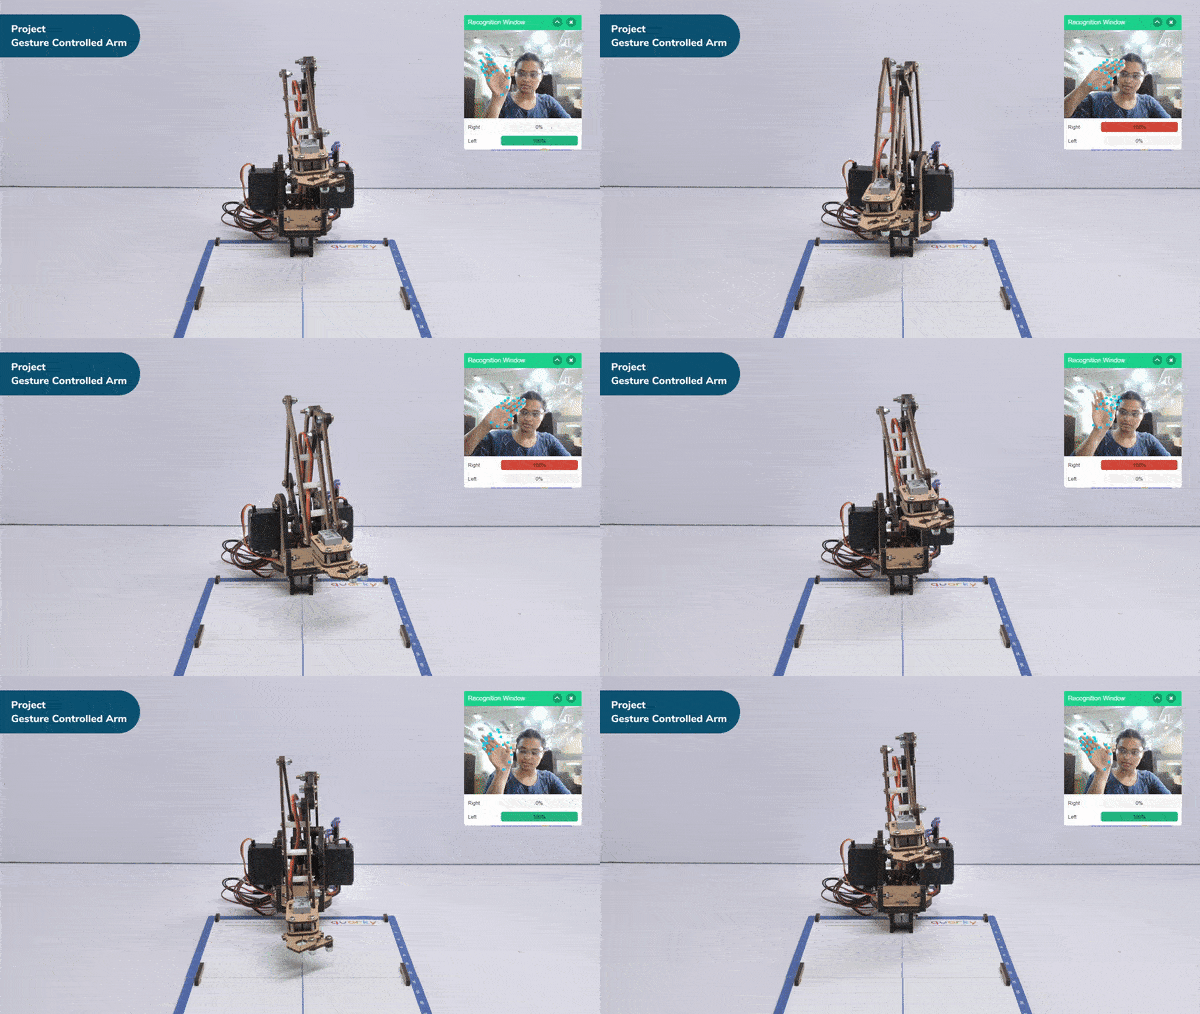
Logic

The robotic arm will move according to the following logic:

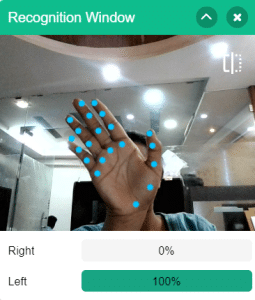
  1. When the left gesture is detected – the robotic arm will move in the anti-clockwise direction.
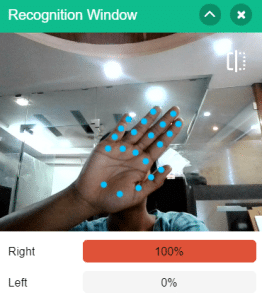
  2. When the right gesture is detected – the robotic arm will move in a Clockwise direction.
Code
Logic

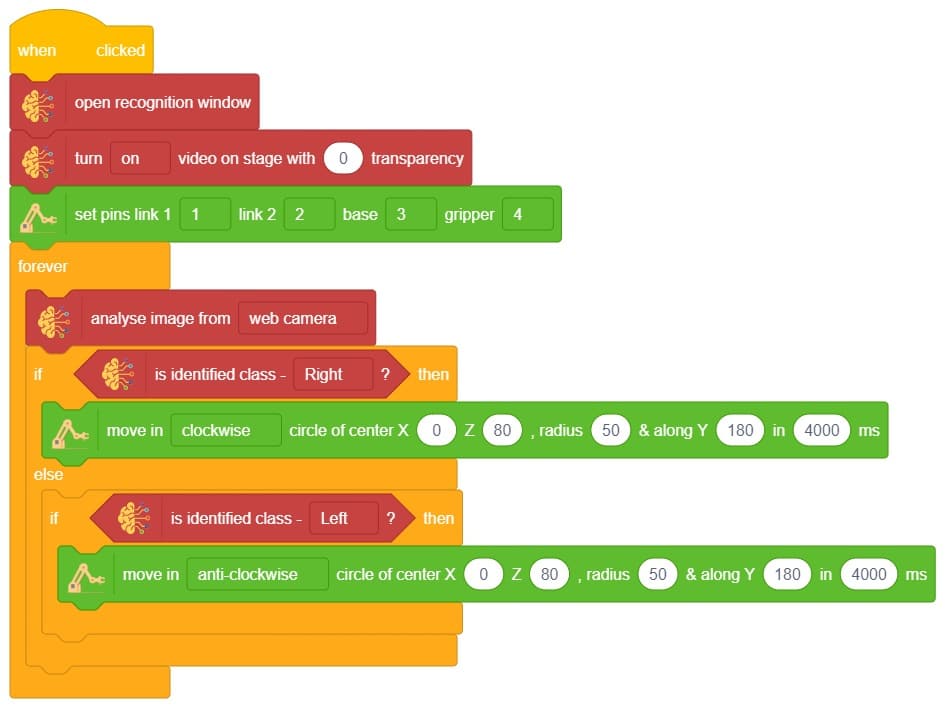
  1. First we Initialize Robitc Arm extension.
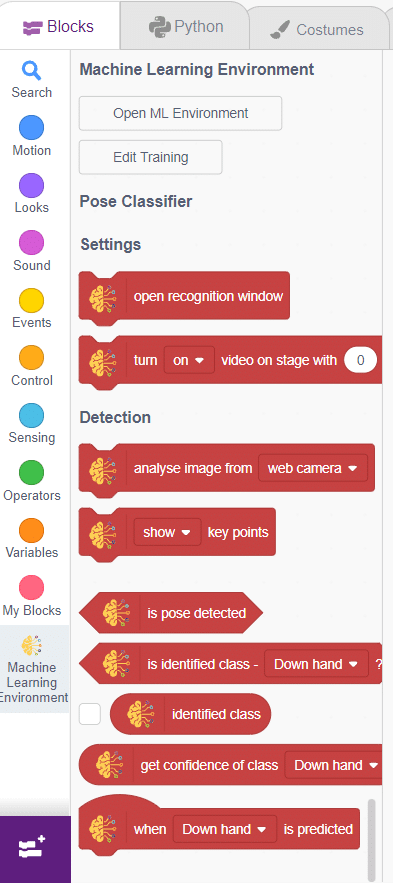
  2. Then, we open the recognition window, which will identify different poses, and turn on the camera with a certain level of transparency to identify images from the stage.
  3. If the identified class is “left,” the Robotic arm will move in anti-clockwise direction using move in () circle of center X() Z(),radius() & along Y() in ()ms block.
  4. If the identified class is “right,” the Robotic Arm will move right using move in () circle of center X() Z(),radius() & along Y() in ()ms block
  5. Press Run to run the code.

Output
Read More
This project demonstrates how to use Machine Learning Environment to make a machine–learning model that identifies the hand gestures and makes the Mecanum robot move accordingly.

This project demonstrates how to use Machine Learning Environment to make a machinelearning model that identifies the hand gestures and makes the Mecanum move accordingly.

We are going to use the Hand Classifier of the Machine Learning Environment. The model works by analyzing your hand position with the help of 21 data points. We will add in total 8 different classes to operate the different motions of the Mecanum Robot with the help of the ML Environment of the Pictoblox Software.

Hand Gesture Classifier Workflow

Follow the steps below:

  1. Open PictoBlox and create a new file.
  2. Select the coding environment as appropriate Coding Environment.
  3. Select the “Open ML Environment” option under the “Files” tab to access the ML Environment.
  4. Click on “Create New Project“.
  5. A window will open. Type in a project name of your choice and select the “Hand Gesture Classifier” extension. Click the “Create Project” button to open the Hand Pose Classifier window.
  6. You shall see the Classifier workflow with two classes already made for you. Your environment is all set. Now it’s time to upload the data.

Class in Hand Gesture Classifier

There are 2 things that you have to provide in a class:

  1. Class Name: It’s the name to which the class will be referred as.
  2. Hand Pose Data: This data can either be taken from the webcam or by uploading from local storage.

Note: You can add more classes to the projects using the Add Class button.
Adding Data to Class

You can perform the following operations to manipulate the data into a class.

  1. Naming the Class: You can rename the class by clicking on the edit button.
  2. Adding Data to the Class: You can add the data using the Webcam or by Uploading the files from the local folder.
    1. Webcam:
Note: You must add at least 20 samples to each of your classes for your model to train. More samples will lead to better results.
Training the Model

After data is added, it’s fit to be used in model training. In order to do this, we have to train the model. By training the model, we extract meaningful information from the hand pose, and that in turn updates the weights. Once these weights are saved, we can use our model to make predictions on data previously unseen.

The accuracy of the model should increase over time. The x-axis of the graph shows the epochs, and the y-axis represents the accuracy at the corresponding epoch. Remember, the higher the reading in the accuracy graph, the better the model. The range of the accuracy is 0 to 1.

Testing the Model

To test the model, simply enter the input values in the “Testing” panel and click on the “Predict” button.

The model will return the probability of the input belonging to the classes.

Export in Block Coding

Click on the “Export Model” button on the top right of the Testing box, and PictoBlox will load your model into the Block Coding Environment if you have opened the ML Environment in the Block Coding.

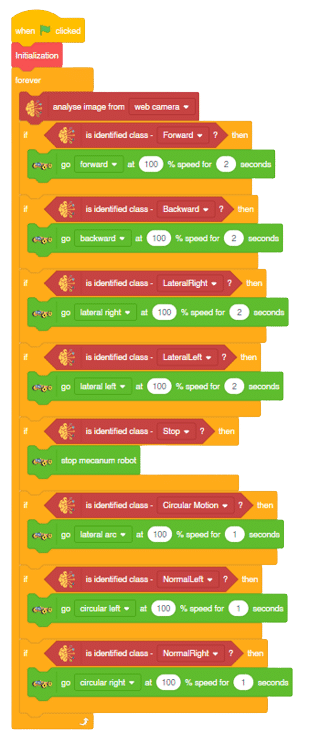
Logic

The mecanum will move according to the following logic:

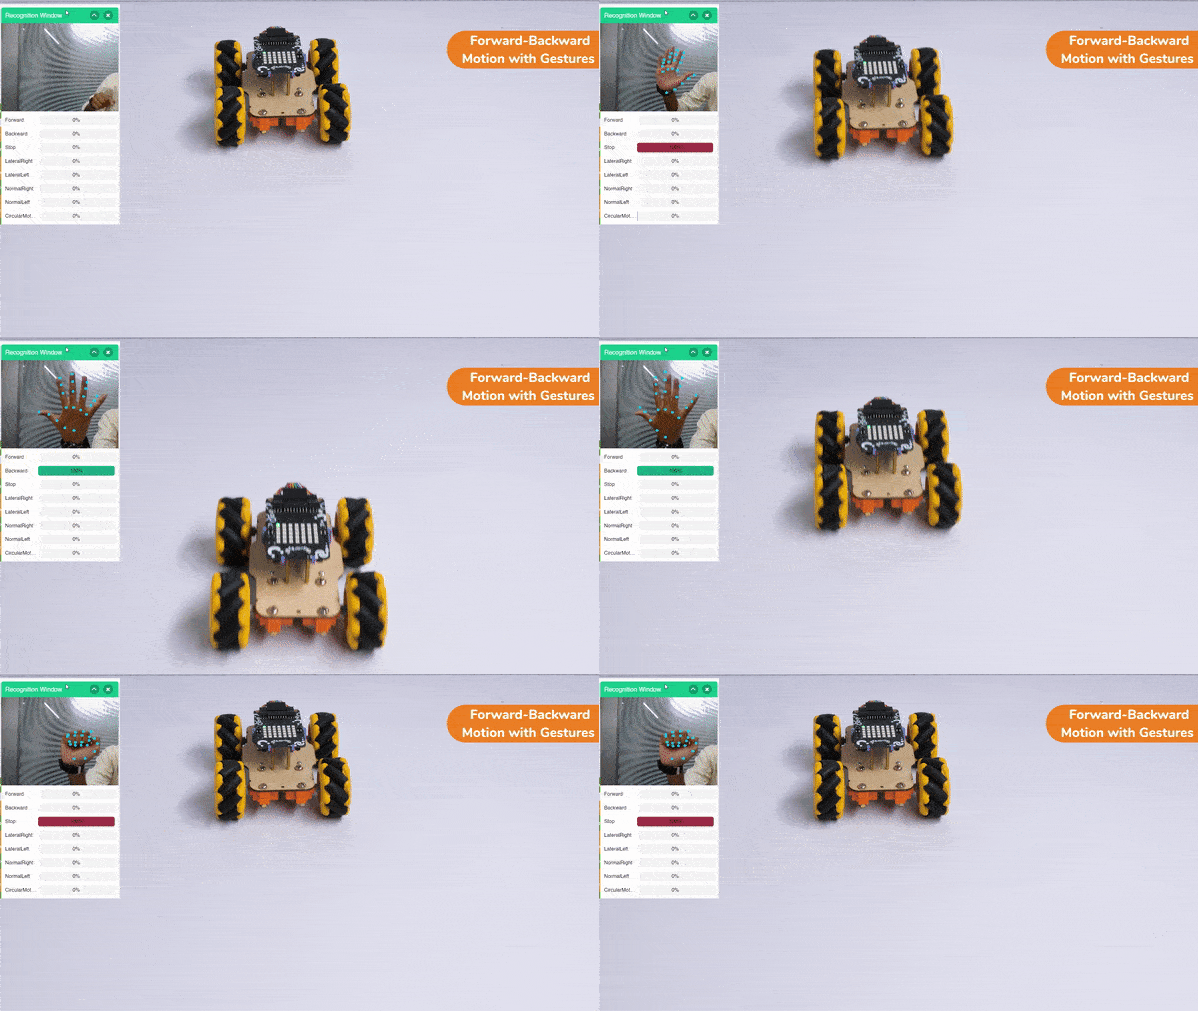
  1. When the forward gesture is detected – Mecanum will move forward.
  2. When the backward gesture is detected – Mecanum will move backwards.
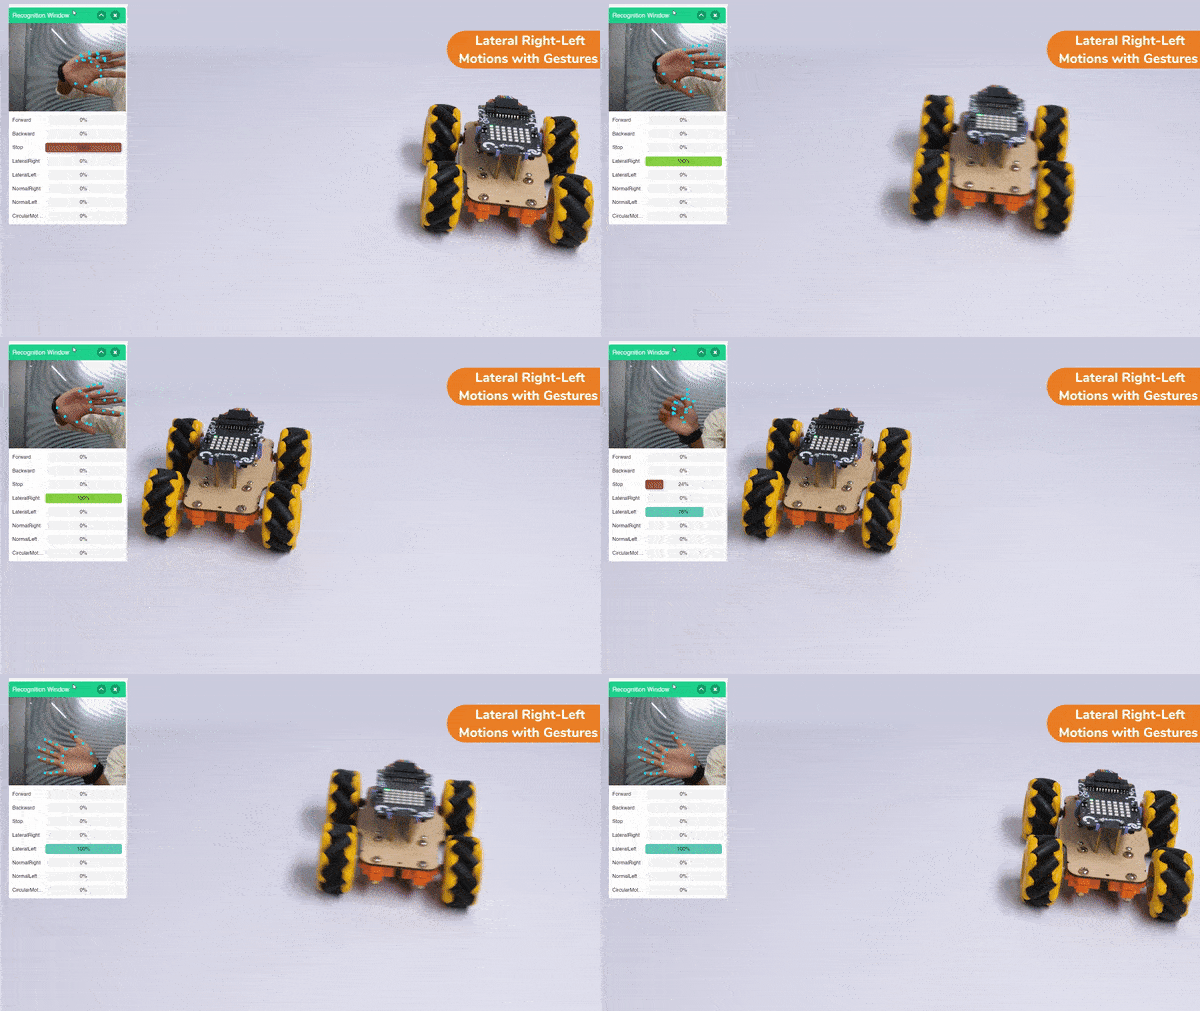
  3. When the Lateral Left gesture is detected – Mecanum will move towards the left direction laterally with the help of its omnidirectional wheels.
  4. When the Lateral Right gesture is detected – Mecanum will move towards the right direction laterally with the help of its omnidirectional wheels.
  5. When the Stop gesture is detected – Mecanum will stop moving.
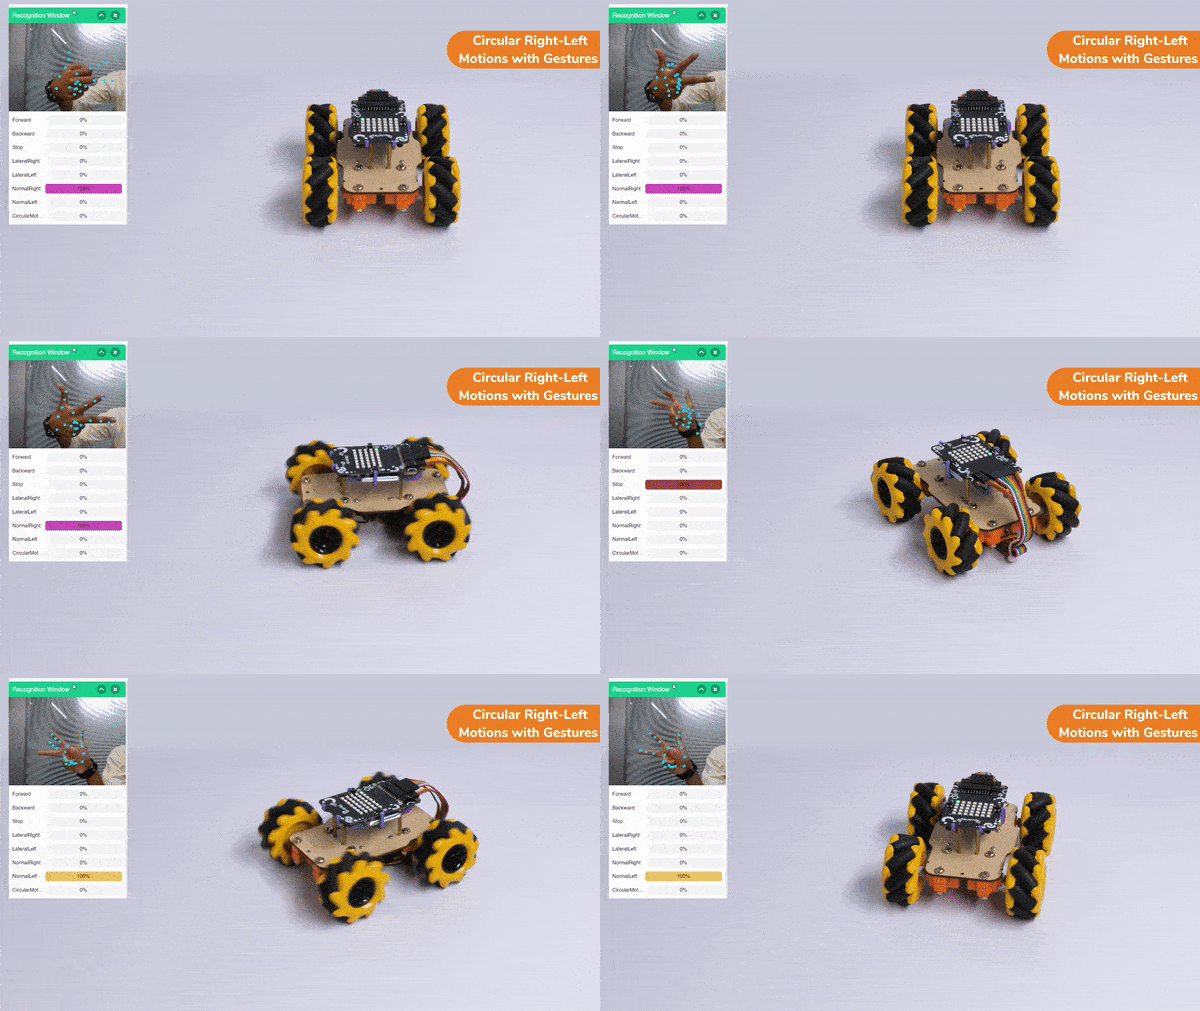
  6. When the Normal Left gesture is detected – Mecanum will rotate in the left direction.
  7. When the Normal Right gesture is detected – Mecanum will rotate in the right direction.
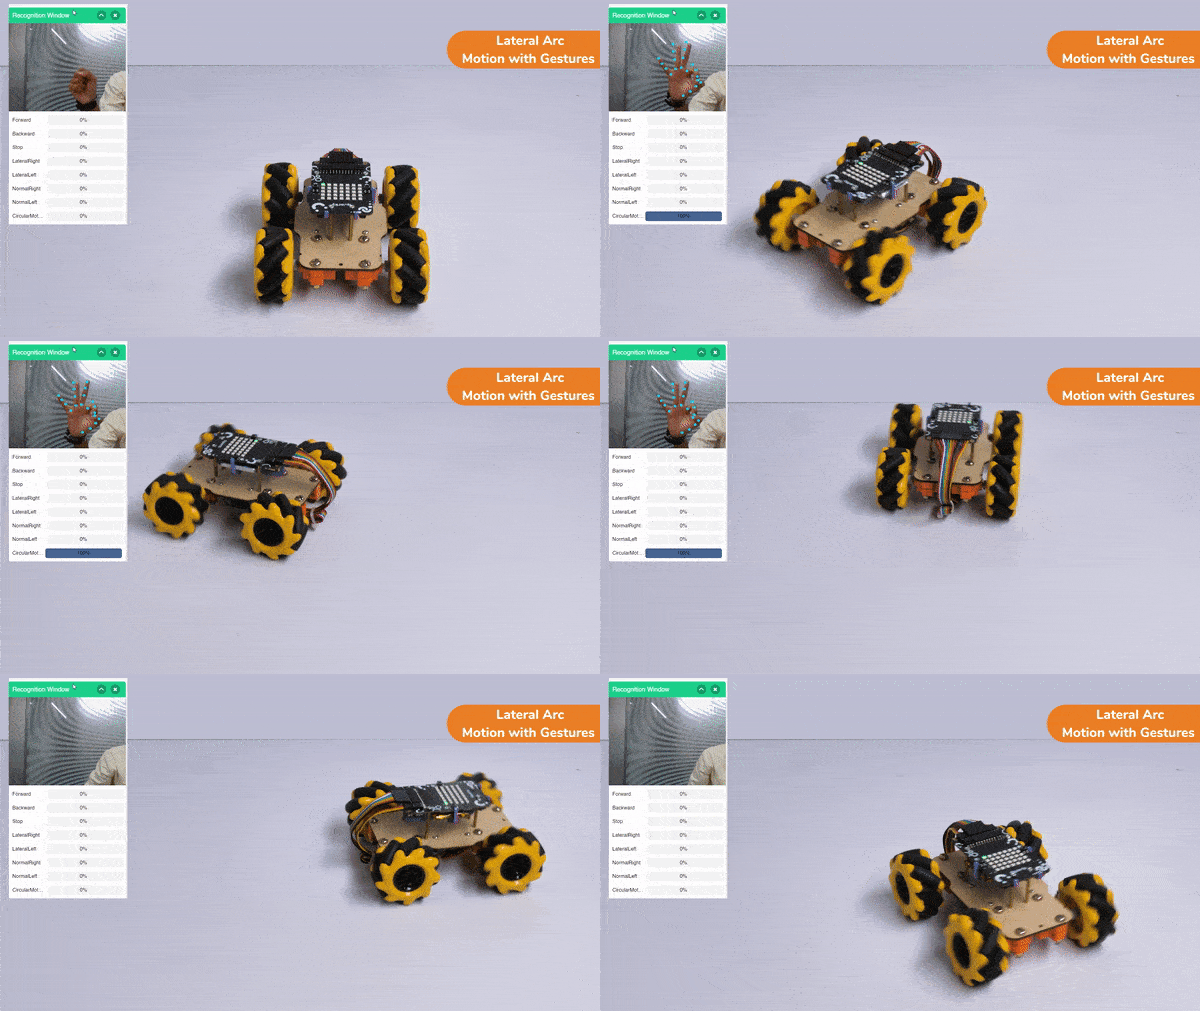
  8. When the Circular Motion gesture is detected – Mecanum will move in a lateral arc.

Code

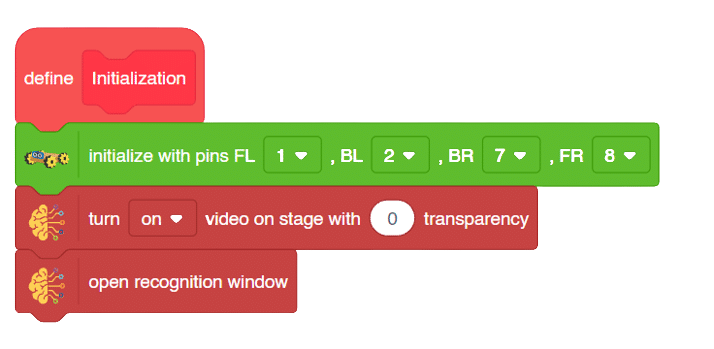
Initialization

Main Code

Output
Forward-Backward Motions:

Lateral Right-Left Motions:

Circular Right-Left Motions:

Lateral Arc Motion:

Read More
The examples show how to use pose recognition in PictoBlox to maintain a yoga pose for a particular time interval.

Script

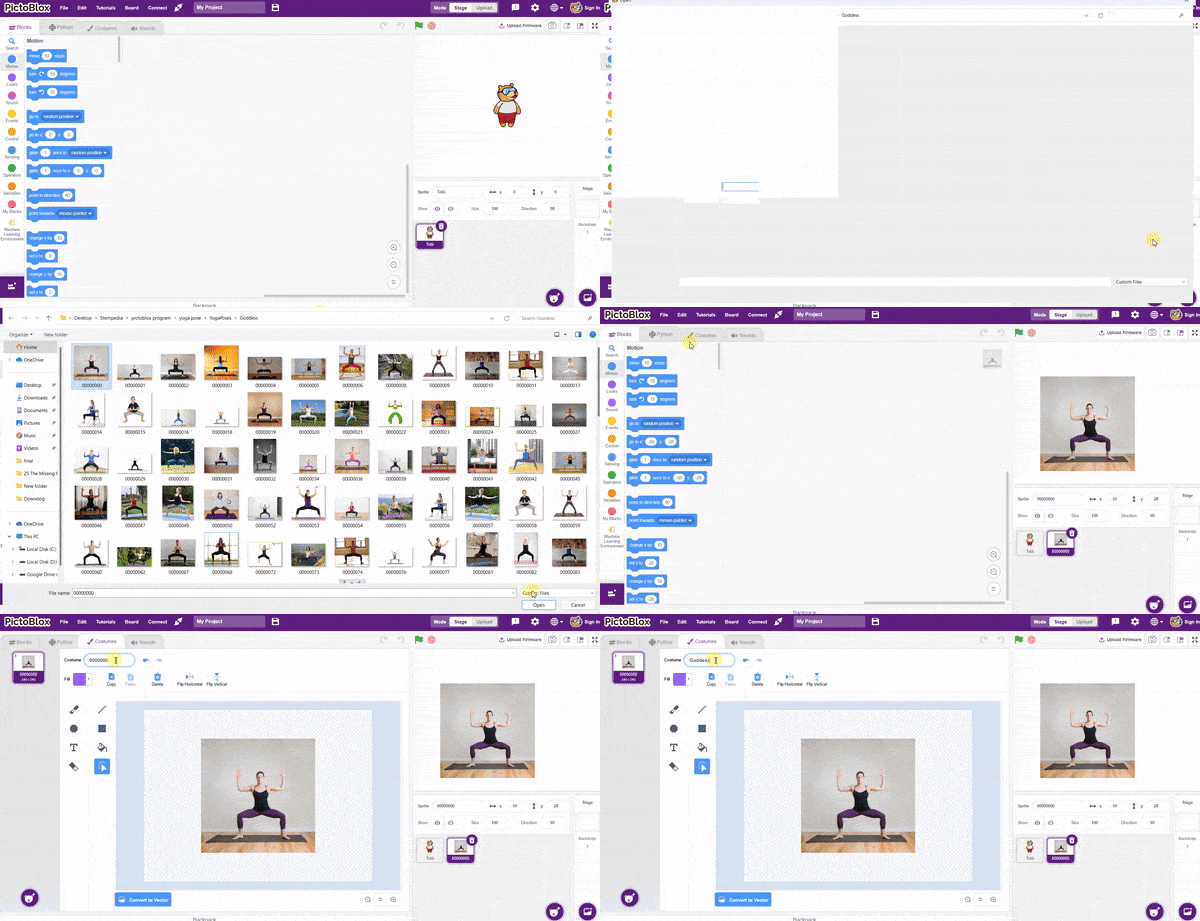
The idea is simple, we’ll add one image of  each class in the “costume” column by making one new sprite which will we display on the stage according to input from user. we’ll also change name of the image according to pose.

  1. Add testing images to the backdrop and delete the default backdrop.
  2. Now, come back to the coding tab and select the Tobi sprite.
  3. We’ll start by adding a when flag clicked block from the Events palette.
  4. We made the new variable “count” by choosing the “Make a Variable” option from the Variables palette.
  5. Add the “hide variable () block from the Variables palette. Select count.
  6. Add the “turn () video on stage with () transparency” block from the Machine Learning palette. Select the off option at the first empty place, and for the second, write a 0 value.
  7. Add an “ask () and wait” block from the Sensing palette. Write an appropriate statement in an empty place.
  8. Add the “if () then” block from the control palette for checking the user’s input.
  9. In the empty place of the “if () then” block, add a condition checking block from the operators palette block. At the first empty place, put the answer block from the sensing palette, and at the second place, write an appropriate statement.
  10. Inside the “if () then” block, add a “broadcast ()” block from the Events palette block. Select the “New message” option and write an appropriate statement for broadcasting a message to another sprite.
  11. Add the “turn () video on stage with () transparency” block from the Machine Learning palette. Select the option at the first empty place, and for the second, write a 0 value.
  12. Add the “() key points” block from the Machine Learning palette. Select the show option.
  13. Add the “Set () to ()” block from the Variables palette. Select the count option at the first empty place, and for the second, write a 30 value.
  14. Add the Show variable () block from the Variables palette. Select count.
  15. Add “forever” from the Control palette.
  16. Inside the “forever” block, add an “analysis image from ()” block from the Machine Learning palette. Select the Web camera option.
  17. Inside the “forever” block, add an “if () then” block from the Control palette.
  18. In the empty place of the “if () then” block, add an “is identified class ()” block from the Machine Learning palette. Select the appropriate class from the options.
  19. Inside the “if () then” block, add an “say ()” block from the Looks palette block. Write an appropriate statement in an empty place.
  20. Add “change () by ()” from the Variables palette. Select the count option in the first empty place, and for the second, write a -1 value.

  21. Add the “if () then” block from the control palette for checking the user’s input.
  22. In the empty place of the “if () then” block, add a condition checking block from the operators palette block. In the first empty place, put the “count” block from the sensing palette, and in the second place, write 0.
  23. Add the “Set () to ()” block from the Variables palette. Select the count option at the first empty place, and for the second, write a 30 value.
  24. Add the “turn () video on stage with () transparency” block from the Machine Learning palette. Select the off option at the first empty place, and for the second, write a 0 value.
  25. Inside the “if () then” block, add an “say ()” block from the Looks palette block. Write an appropriate statement in an empty place.
  26. Add the “() key points” block from the Machine Learning palette. Select the hide option
  27. Add the “stop ()” block to the control pallet. Select all options.
  28. Repeat “if () then” block code for other classes, make appropriate changes in copying block code according to other classes, and add code just below it.
  29. The final block code looks like
  30. Now click on another sprite and write code.
  31. We’ll start writing code for this sprite by adding a when flag is clicked block from the Events palette.
  32. Add the “hide” block from the Looks pallet.
  33. Write a new code in the same sprite according to class and add the “when I receive ()” block from the Events palette. Select the appropriate class from the options.
  34. Add the “show” block from the Looks pallet.
  35. Add the “switch costume to ()” block from the Looks palette. Select the appropriate class from the options.
  36. Repeat the same code for other classes and make changes according to the class.

    Final Result

Read More
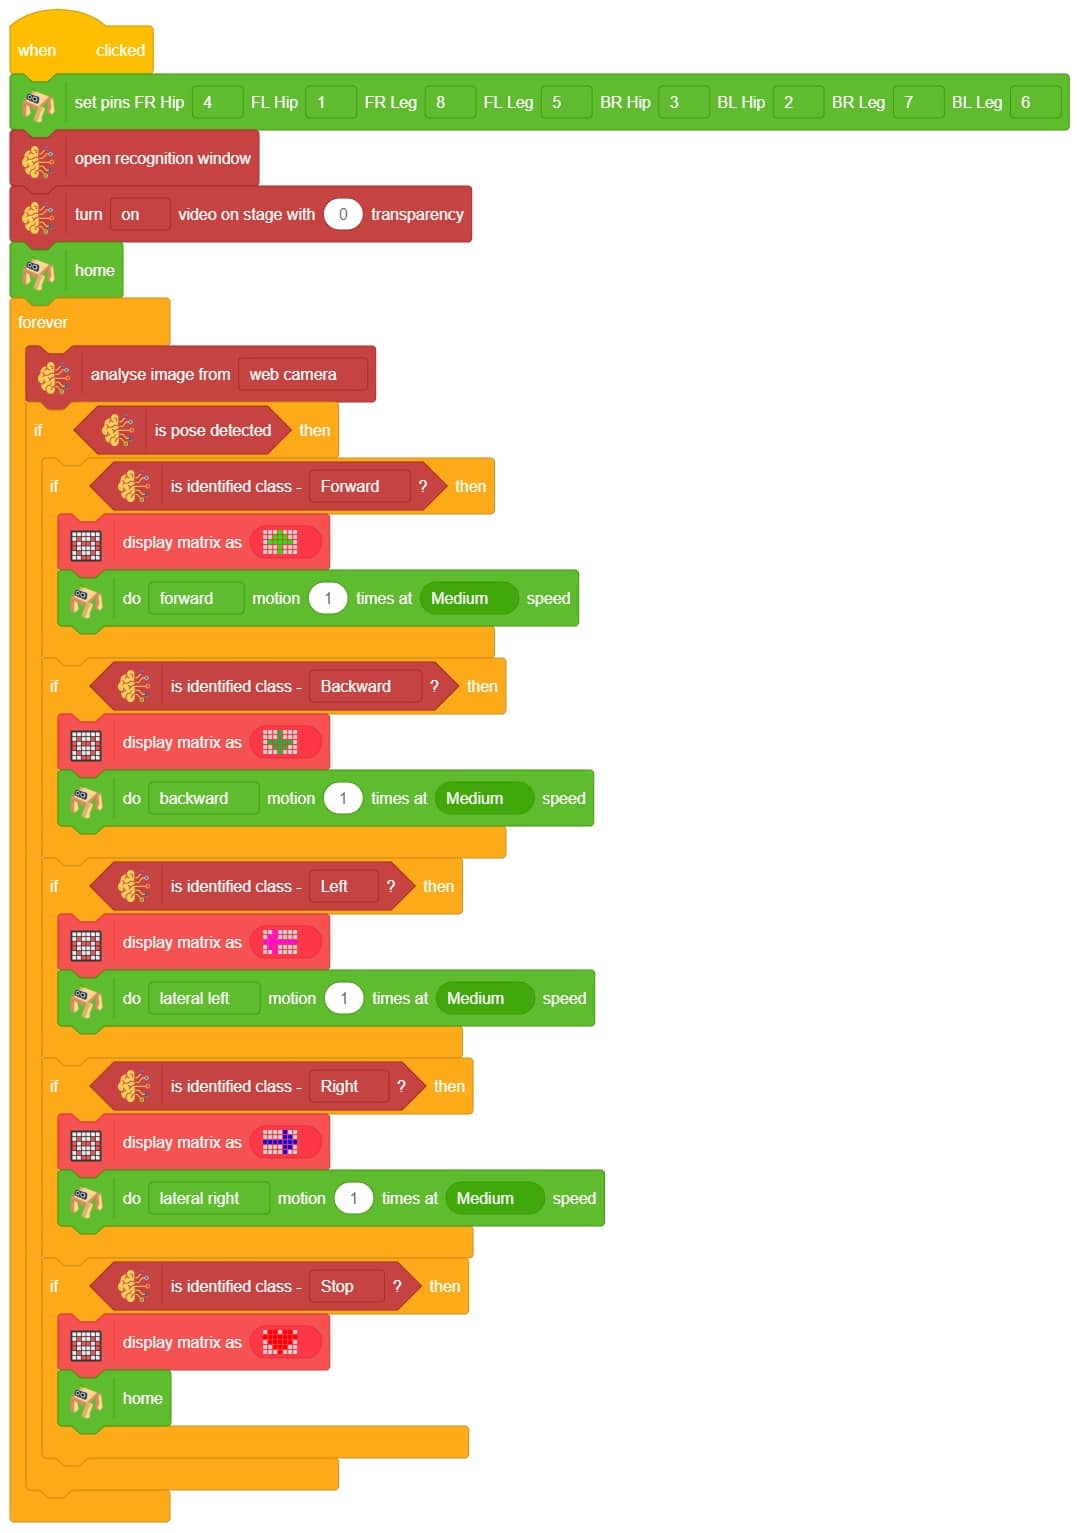
Explore the power of machine learning in recognizing hand gestures and controlling the movements of a Quadruped robot.

Introduction

This project demonstrates how to use Machine Learning Environment to make a machinelearning model that identifies the hand gestures and makes the Quadruped move accordingly. learning model that identifies the hand gestures and makes the qudruped move accordingly.

We are going to use the Hand Classifier of the Machine Learning Environment. The model works by analyzing your hand position with the help of 21 data points.

Hand Gesture Classifier Workflow

Follow the steps below:

  1. Open PictoBlox and create a new file.
  2. You can click on “Machine Learning Environment” to open it.
  3. Click on “Create New Project“.
  4. A window will open. Type in a project name of your choice and select the “Hand Gesture Classifier” extension. Click the “Create Project” button to open the Hand Pose Classifier window.
  5. You shall see the Classifier workflow with two classes already made for you. Your environment is all set. Now it’s time to upload the data.

Class in Hand Gesture Classifier

There are 2 things that you have to provide in a class:

  1. Class Name: It’s the name to which the class will be referred as.
  2. Hand Pose Data: This data can either be taken from the webcam or by uploading from local storage.

Note: You can add more classes to the projects using the Add Class button.
Adding Data to Class

You can perform the following operations to manipulate the data into a class.

  1. Naming the Class: You can rename the class by clicking on the edit button.
  2. Adding Data to the Class: You can add the data using the Webcam or by Uploading the files from the local folder.
    1. Webcam:
Note: You must add at least 20 samples to each of your classes for your model to train. More samples will lead to better results.

We are going to use the Hand Classifier of the Machine Learning Environment.


Training the Model

After data is added, it’s fit to be used in model training. In order to do this, we have to train the model. By training the model, we extract meaningful information from the hand pose, and that in turn updates the weights. Once these weights are saved, we can use our model to make predictions on data previously unseen.

The accuracy of the model should increase over time. The x-axis of the graph shows the epochs, and the y-axis represents the accuracy at the corresponding epoch. Remember, the higher the reading in the accuracy graph, the better the model. The range of the accuracy is 0 to 1.

Testing the Model


Hand Pose Classifier

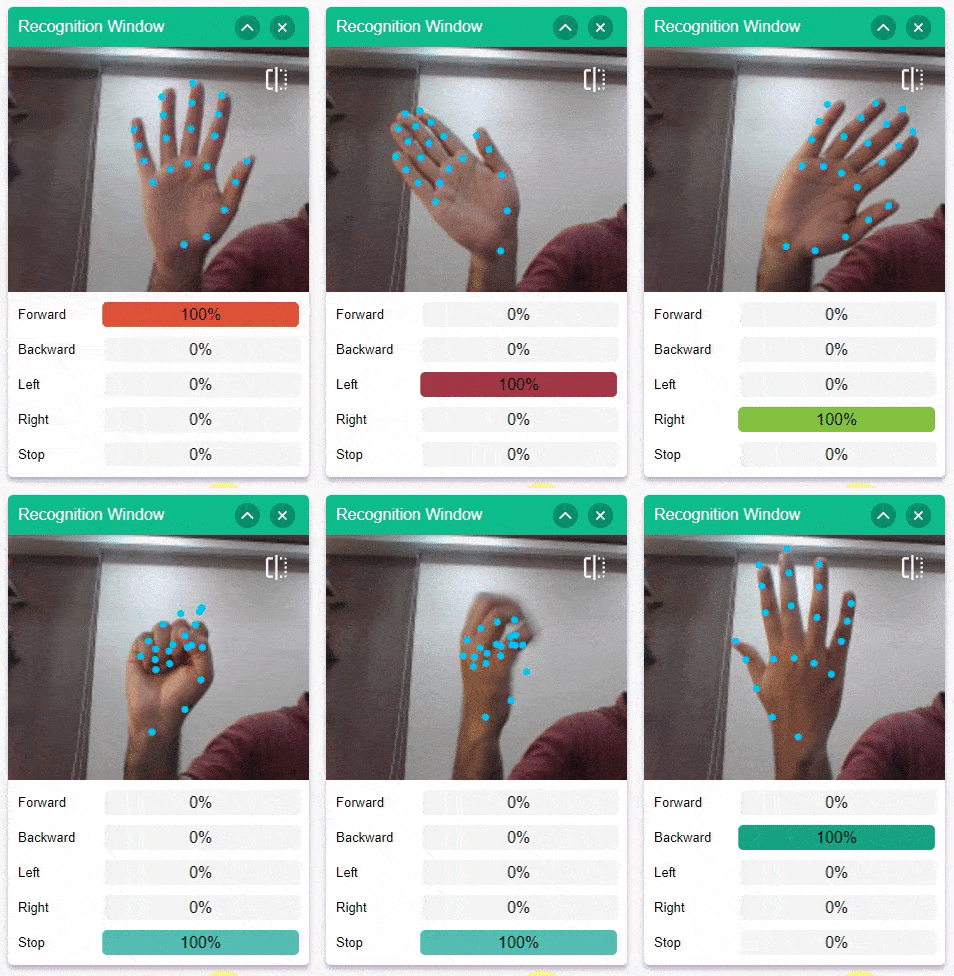
The model will return the probability of the input belonging to the classes.You will have the following output coming from the model.

Logic

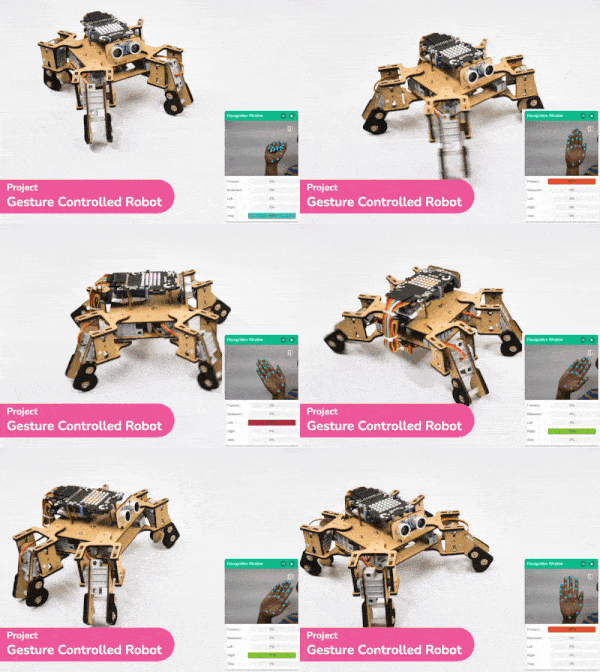
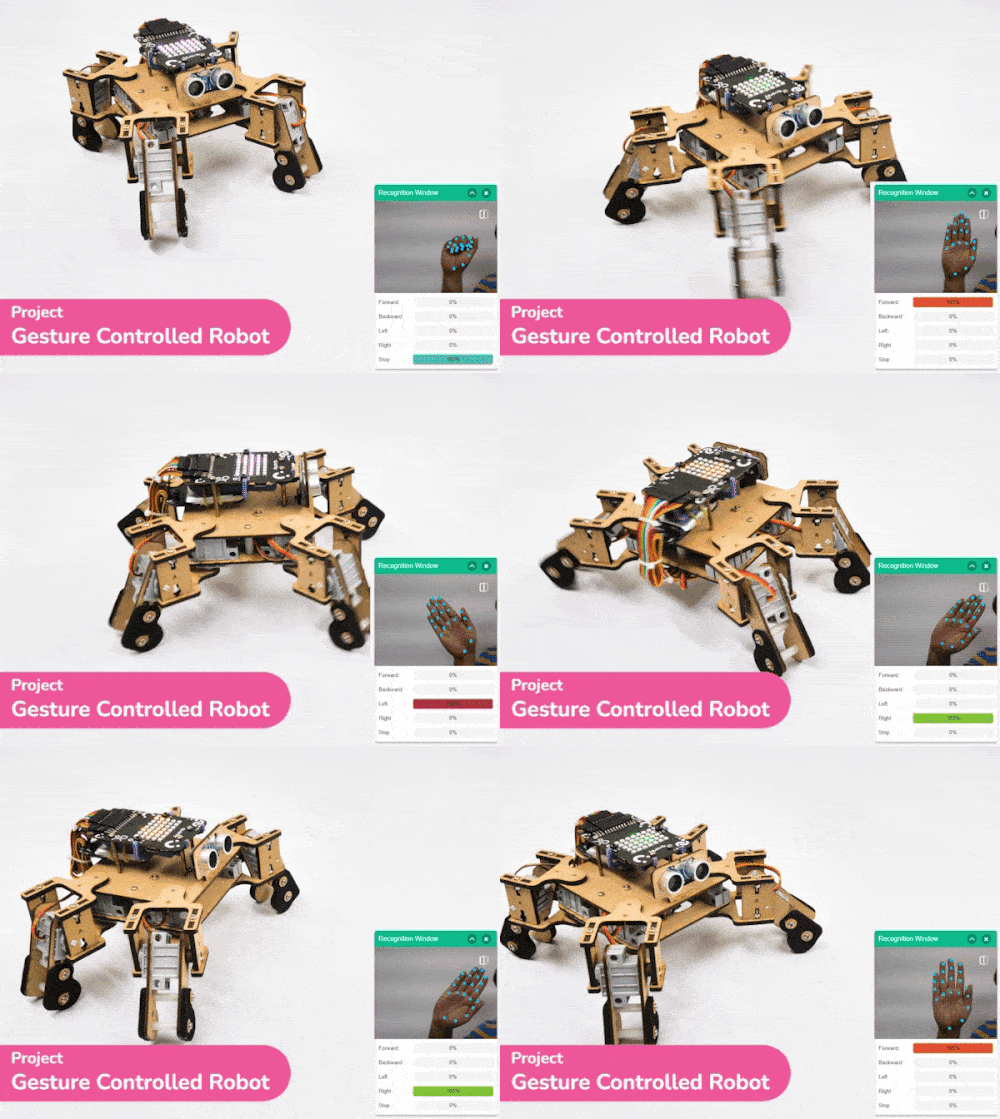
The Quadruped will move according to the following logic:

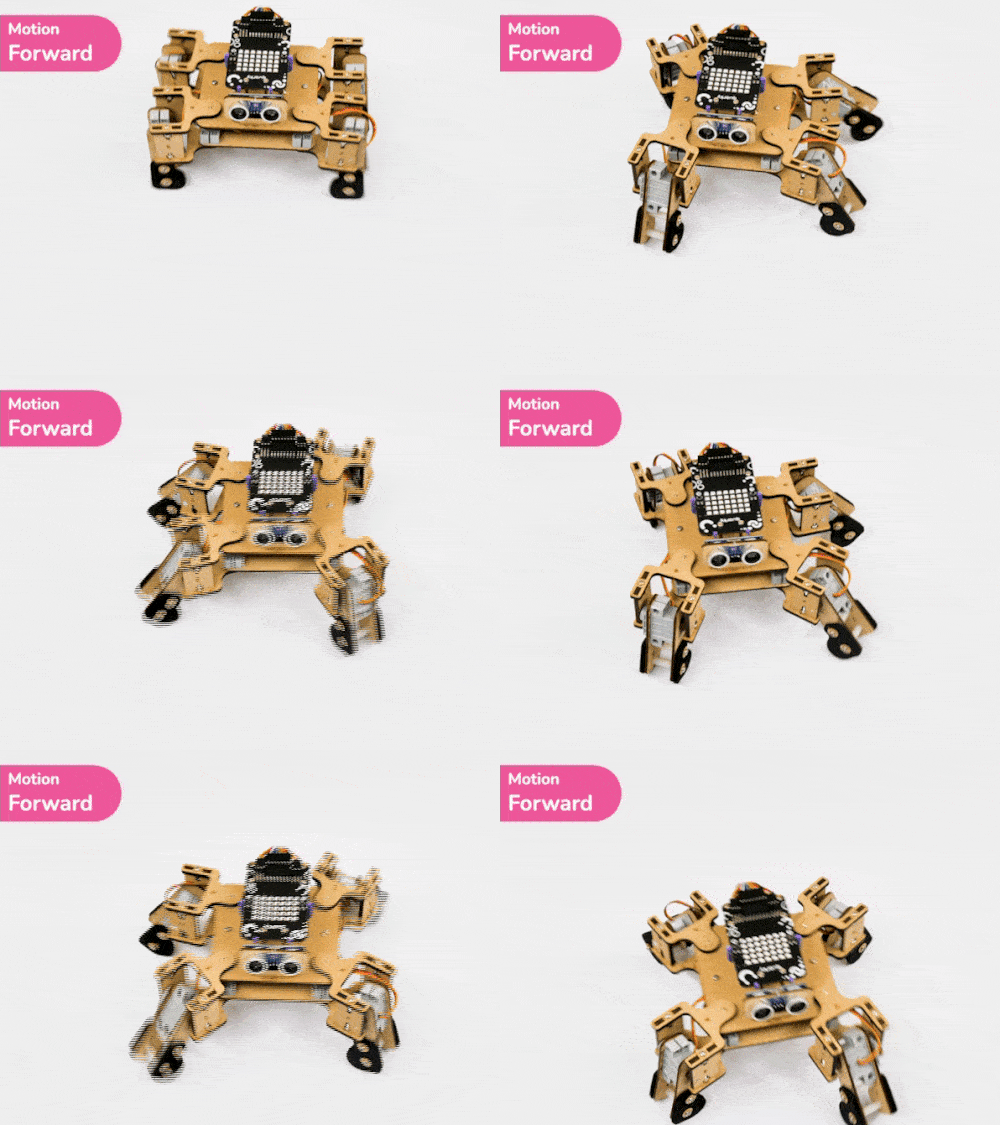
  1. When the forward gesture is detected – Quadruped will move forward.
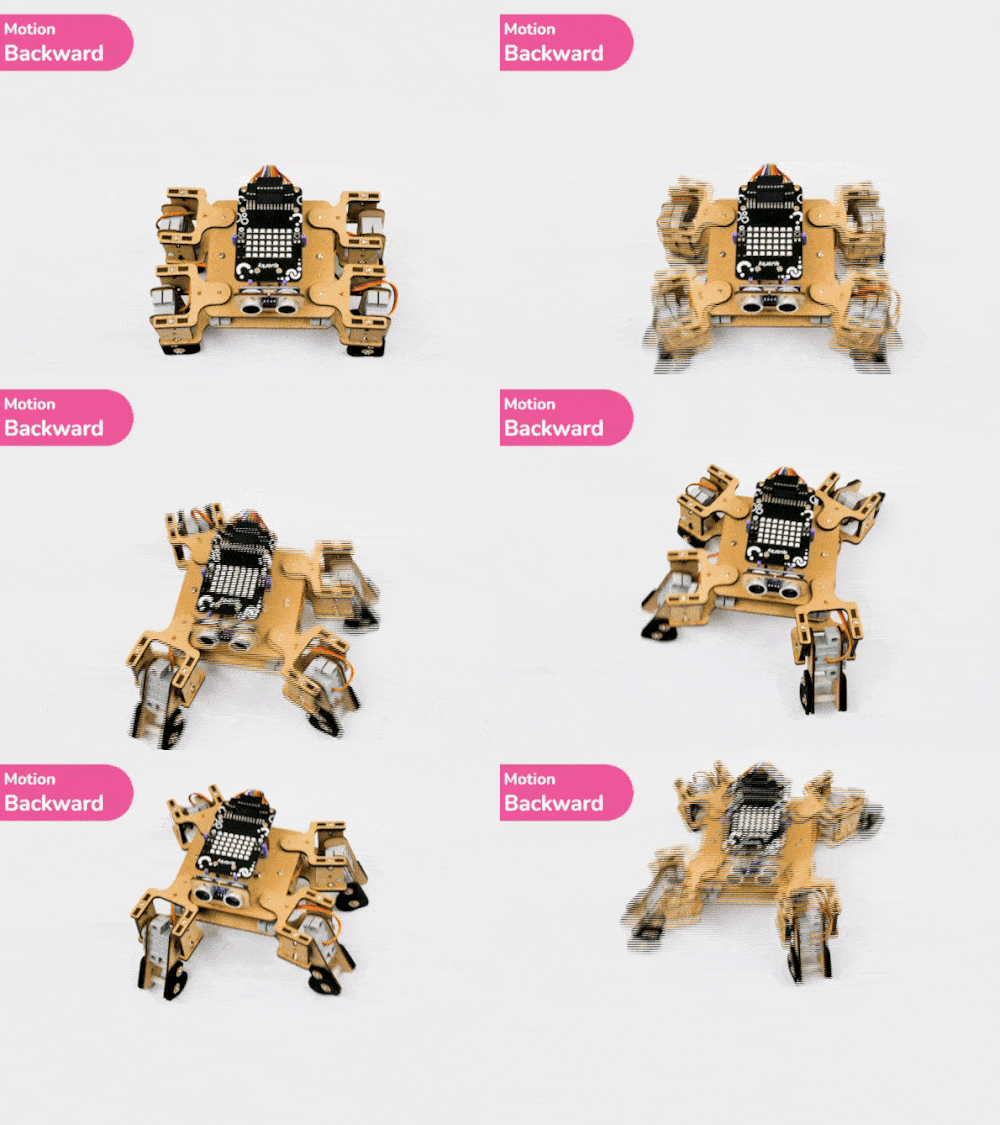
  2. When the backward gesture is detected – Quadruped will move backward.
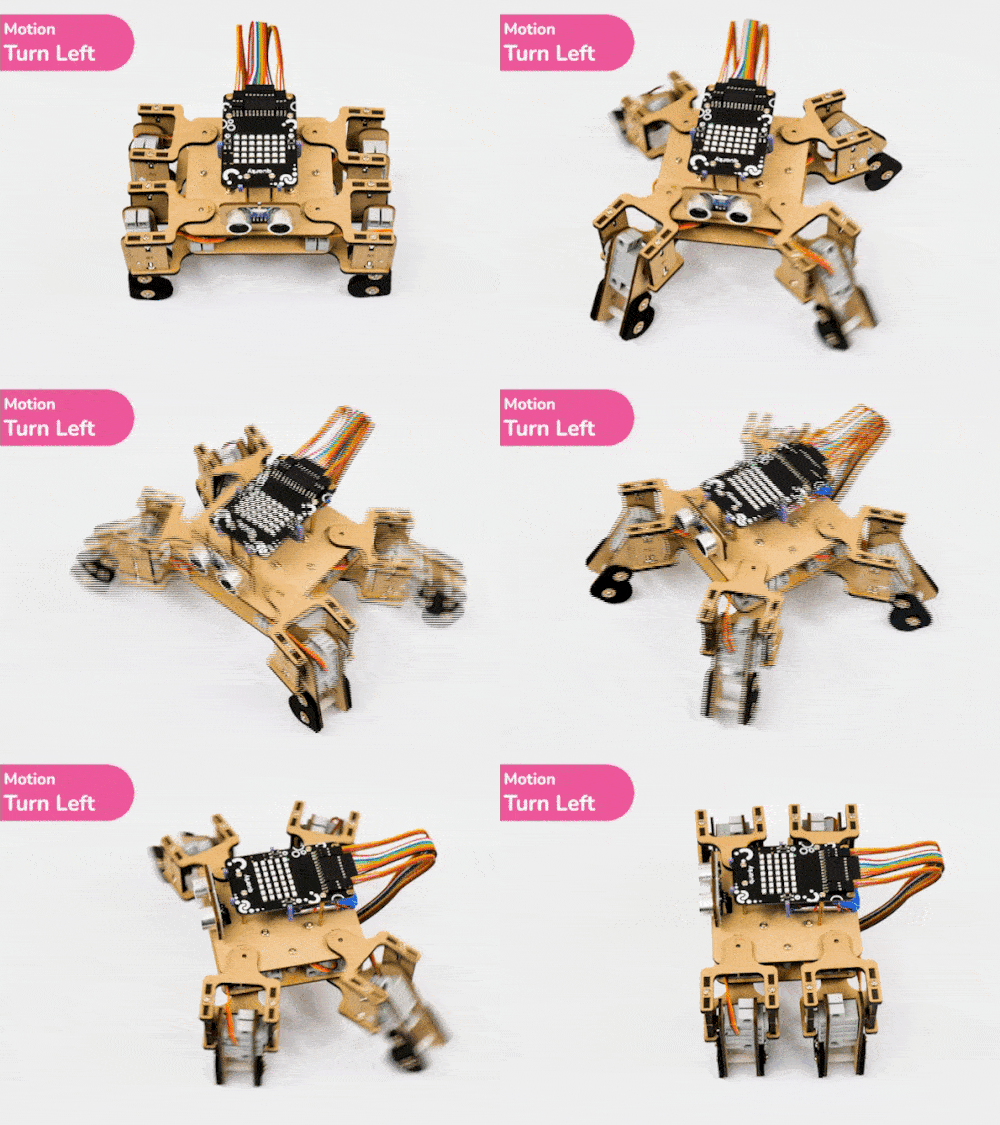
  3. When the left gesture is detected – Quadruped will turn left.
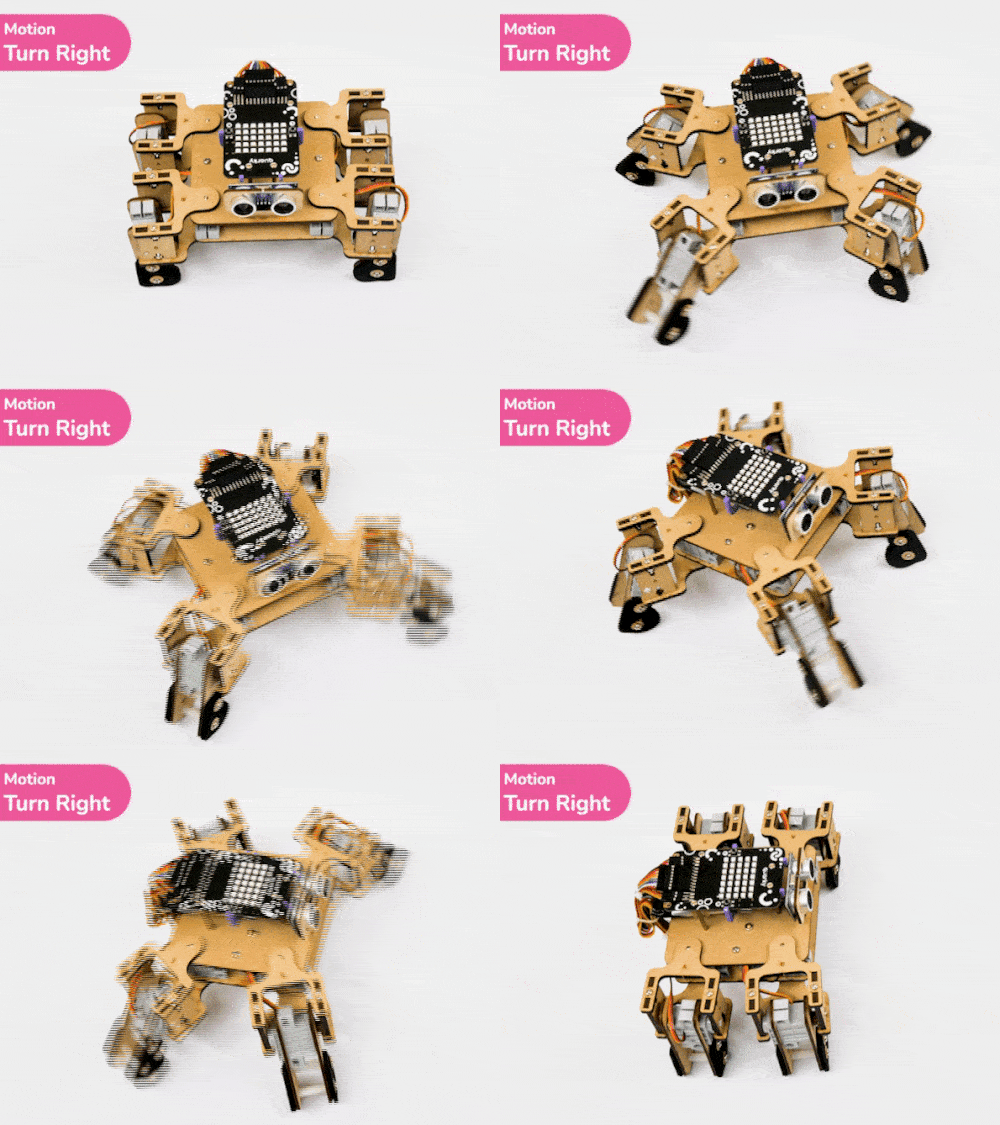
  4. When the right gesture is detected – Quadruped will turn right.

Code

Output

Read More
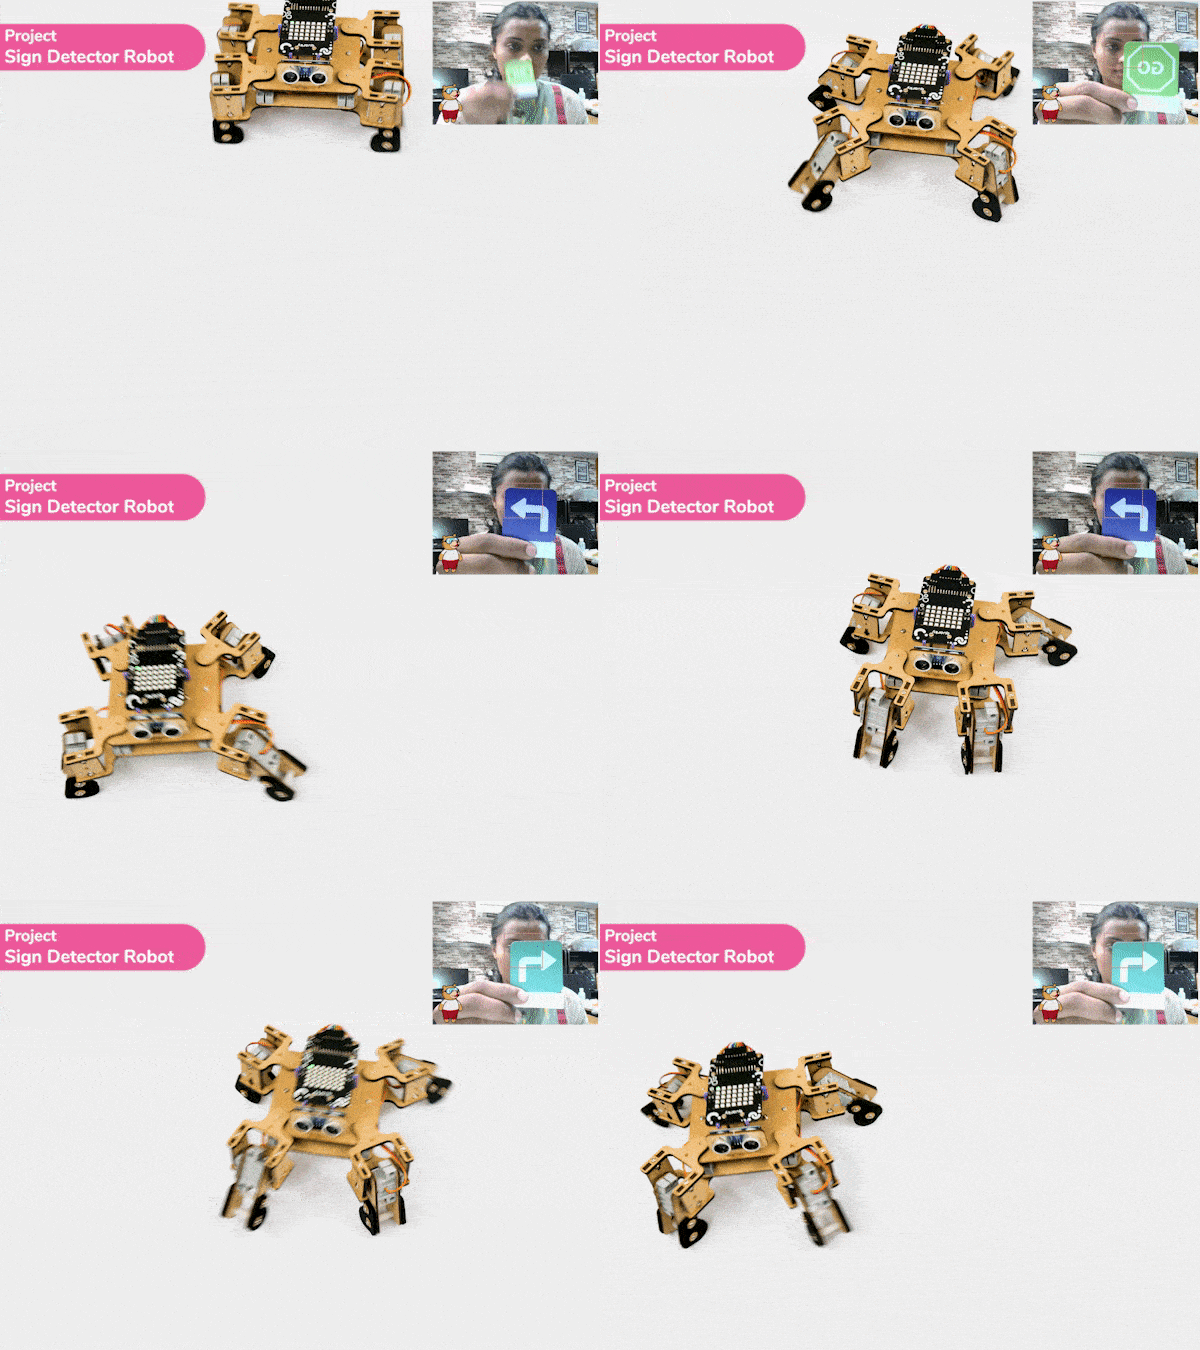
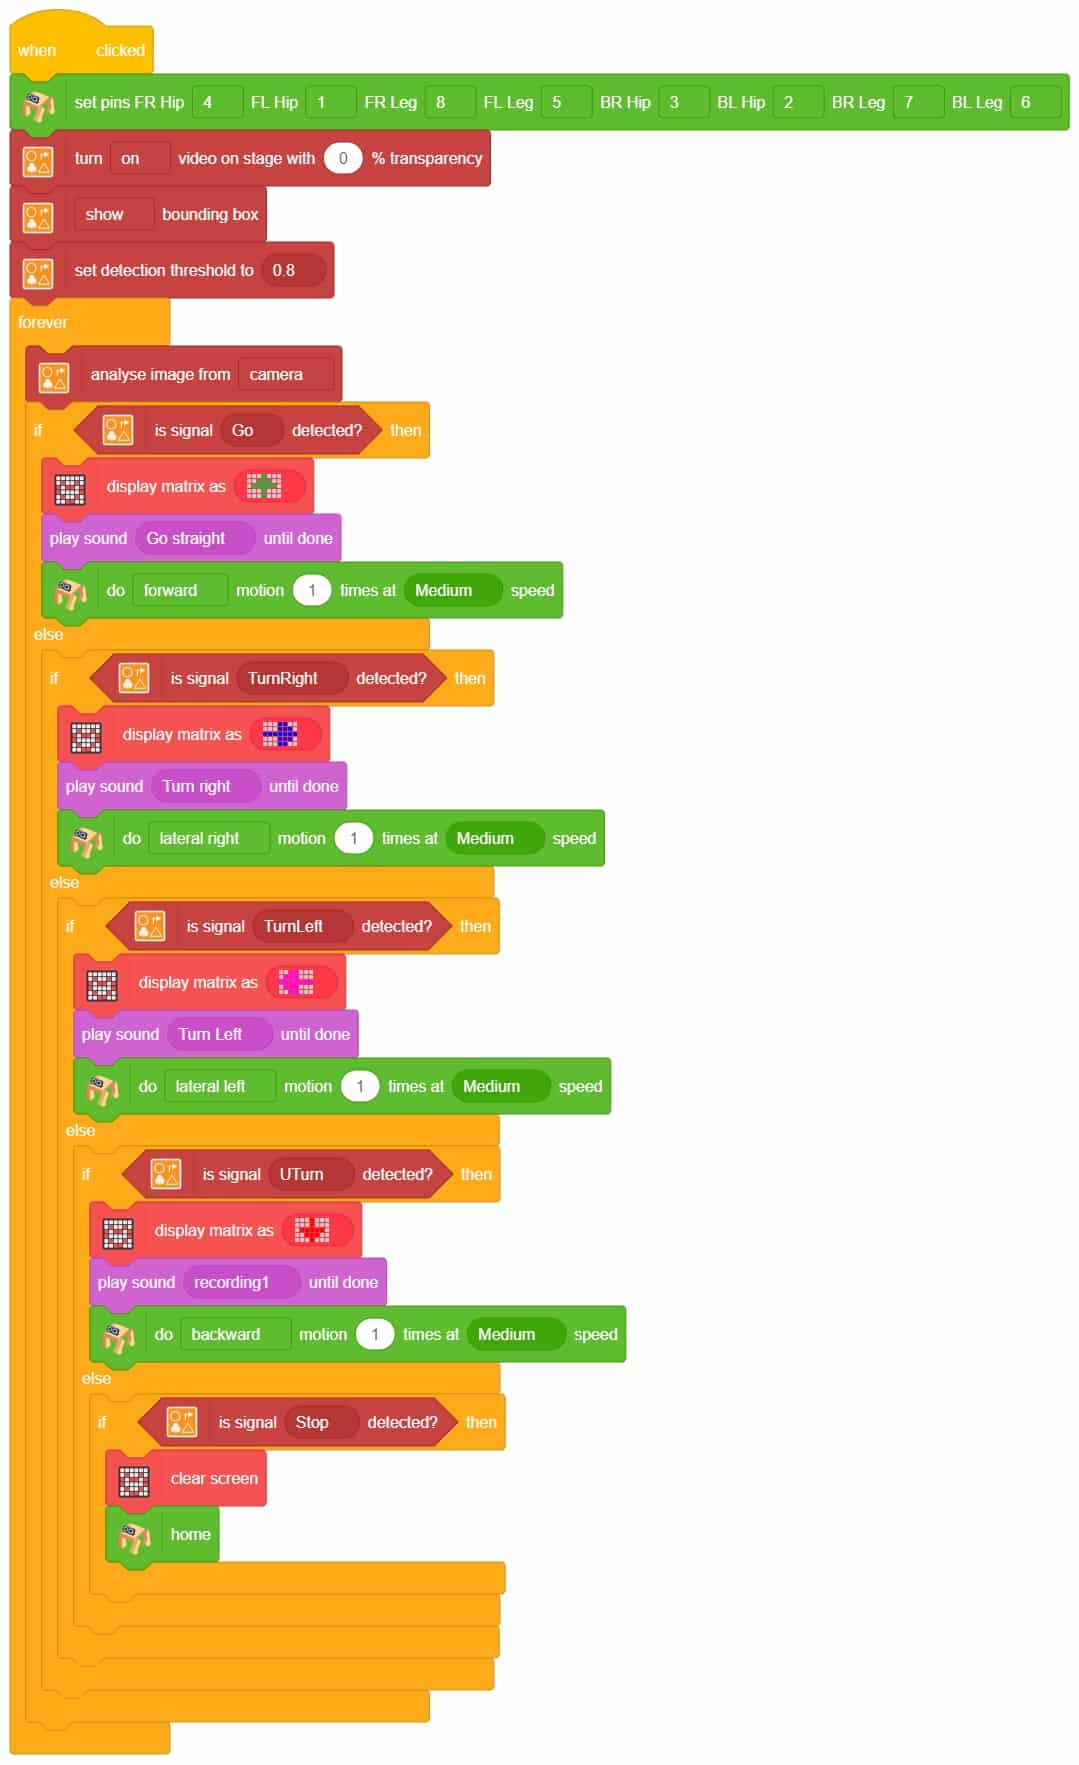
Learn how to set the bounding box threshold, and detect signals such as 'Go', 'TurnRight', 'TurnLeft', and 'Stop' to control quadruped movements.

Introduction

A sign detector Quadruped robot is a robot that can recognize and interpret certain signs or signals, such as hand gestures or verbal commands, given by a human. The robot uses sensors, cameras, and machine learning algorithms to detect and understand the sign, and then performs a corresponding action based on the signal detected.

These robots are often used in manufacturing, healthcare, and customer service industries to assist with tasks that require human-like interaction and decision-making.

Code

Logic

  1. Then, it sets up the quadruped robot’s camera to look for hand signs and tells it how to recognize different signs.
  2. Next, the code starts a loop where the robot looks for hand signs. If it sees a sign, it says the name of the sign out loud.
  3. Finally, if the robot sees certain signs (like ‘Go’, ‘Turn Left’, ‘Turn Right’, or ‘U Turn’), it moves in a certain direction (forward, backward, left, or backward) based on the sign it sees.
  4. So, this code helps a robot understand hand signs and move in response to them!

Output

Read More
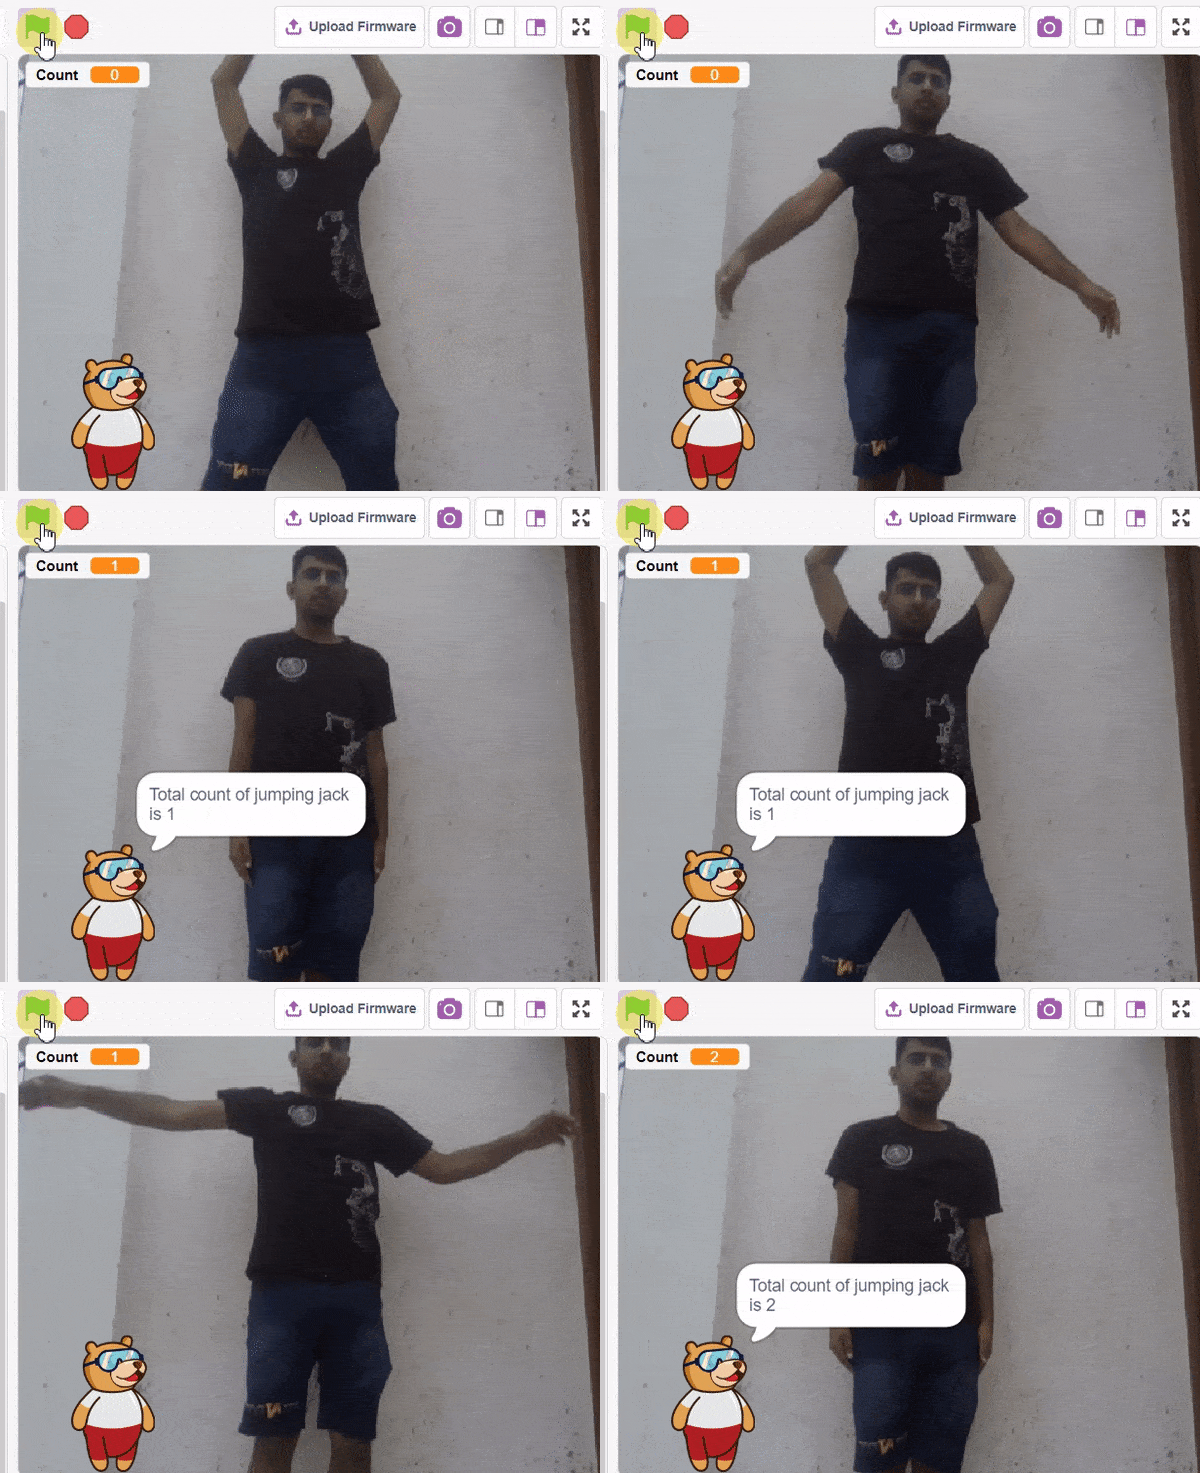
The examples show how to use pose recognition in PictoBlox to make jumping jack counter.

Introduction

In this example project, we are going to create a machine learning model that can count the number of jumping jack activities from the camera feed.

Pose Classifier in Machine Learning Environment

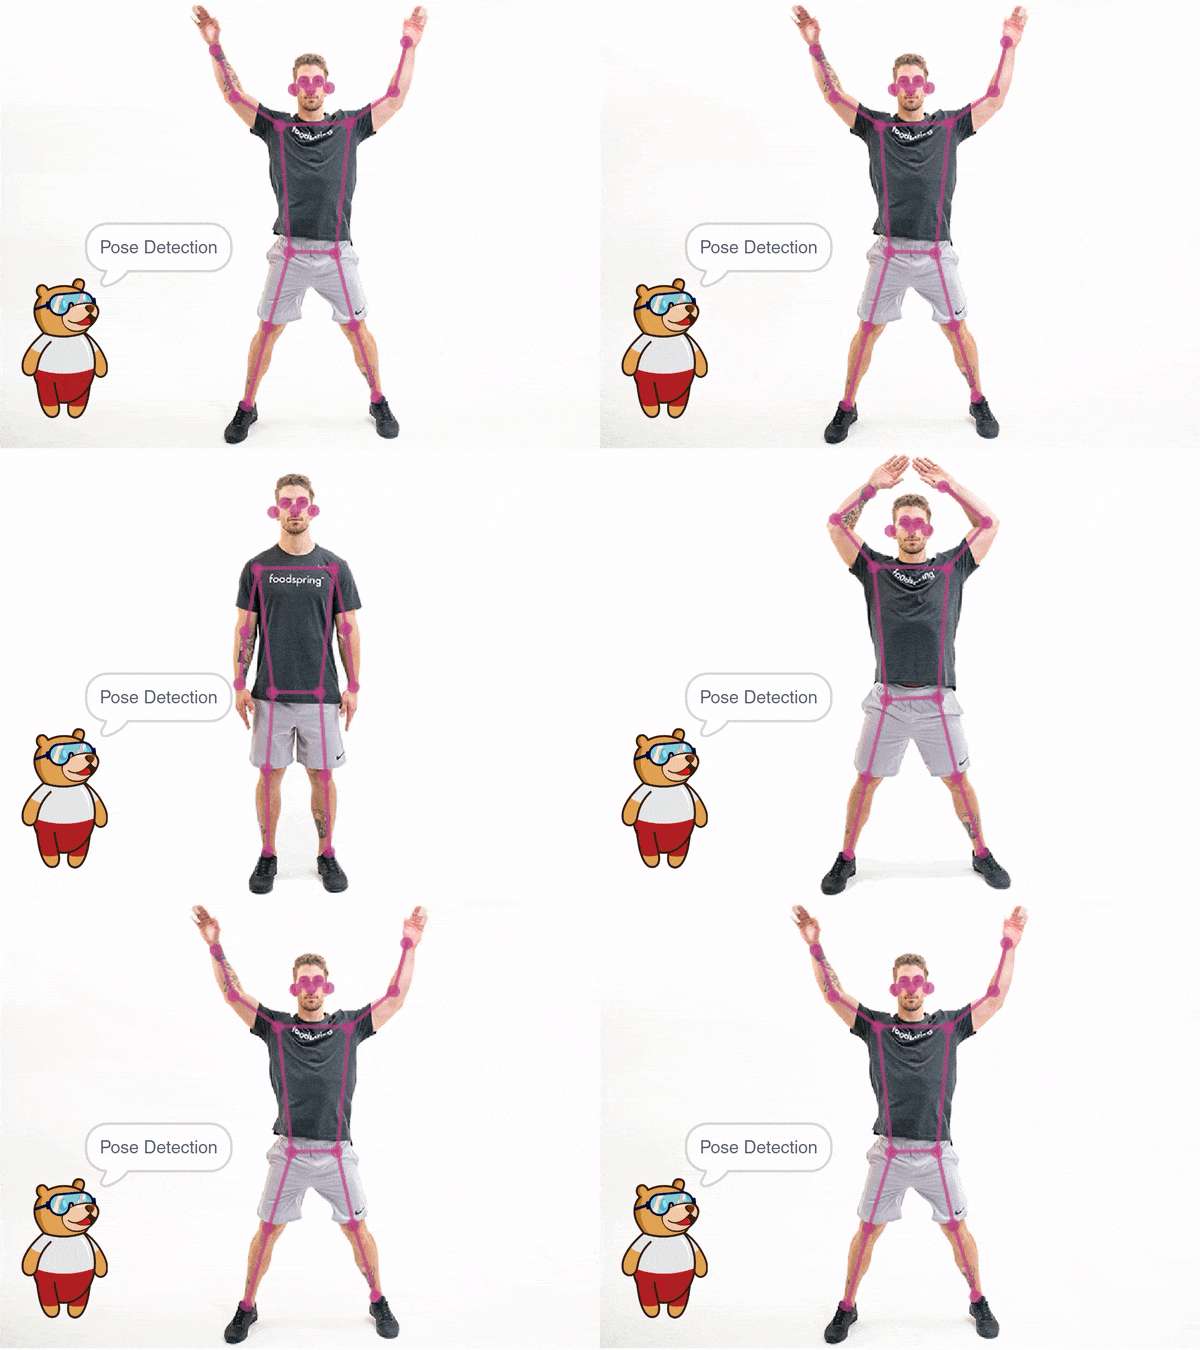
The pose Classifier is the extension of the ML Environment used for classifying different body poses into different classes.

The model works by analyzing your body position with the help of 17 data points.

Pose Classifier Workflow

  1. Open PictoBlox and create a new file.
  2. You can click on “Machine Learning Environment” to open it.
  3. Click on “Create New Project“.
  4. A window will open. Type in a project name of your choice and select the “Pose Classifier” extension. Click the “Create Project” button to open the Pose Classifier window.
  5. You shall see the Pose Classifier workflow with two classes already made for you. Your environment is all set. Now it’s time to upload the data.

Class in Pose Classifier

Class is the category in which the Machine Learning model classifies the poses. Similar posts are put in one class.

There are 2 things that you have to provide in a class:

  1. Class Name: The name to which the class will be referred.
  2. Pose Data: This data can be taken from the webcam or uploaded from local storage.

Adding Data to Class

You can perform the following operations to manipulate the data into a class.

  1. Naming the Class: You can rename the class by clicking on the edit button.
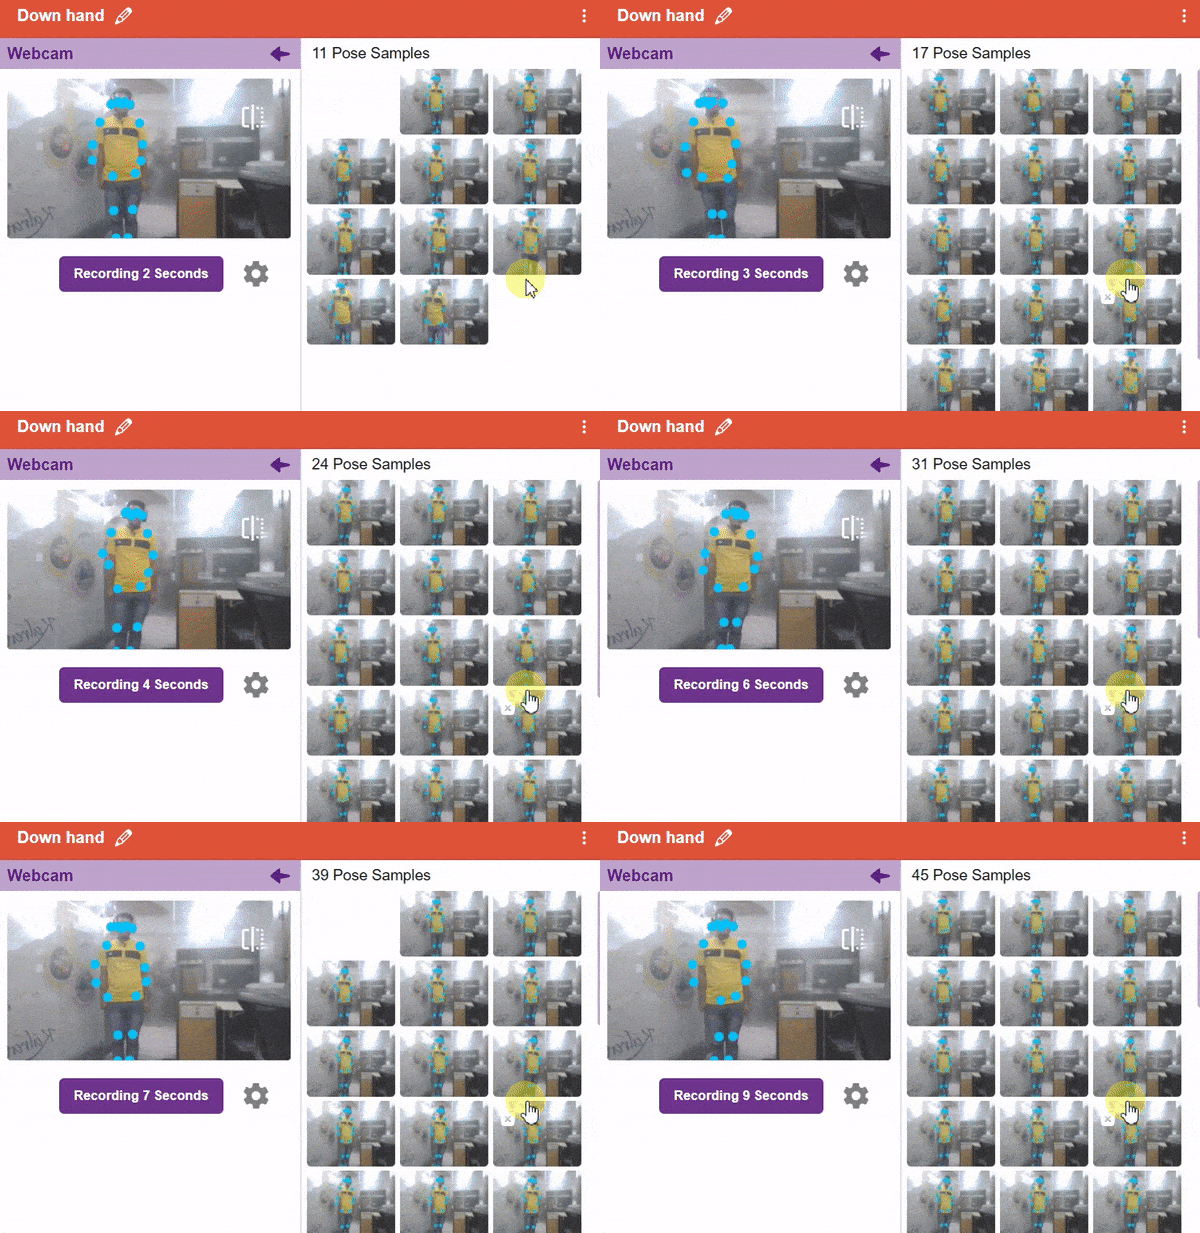
  2. Adding Data to the Class: You can add the data using the Webcam or by Uploading the files from the local folder.
    1. Webcam:

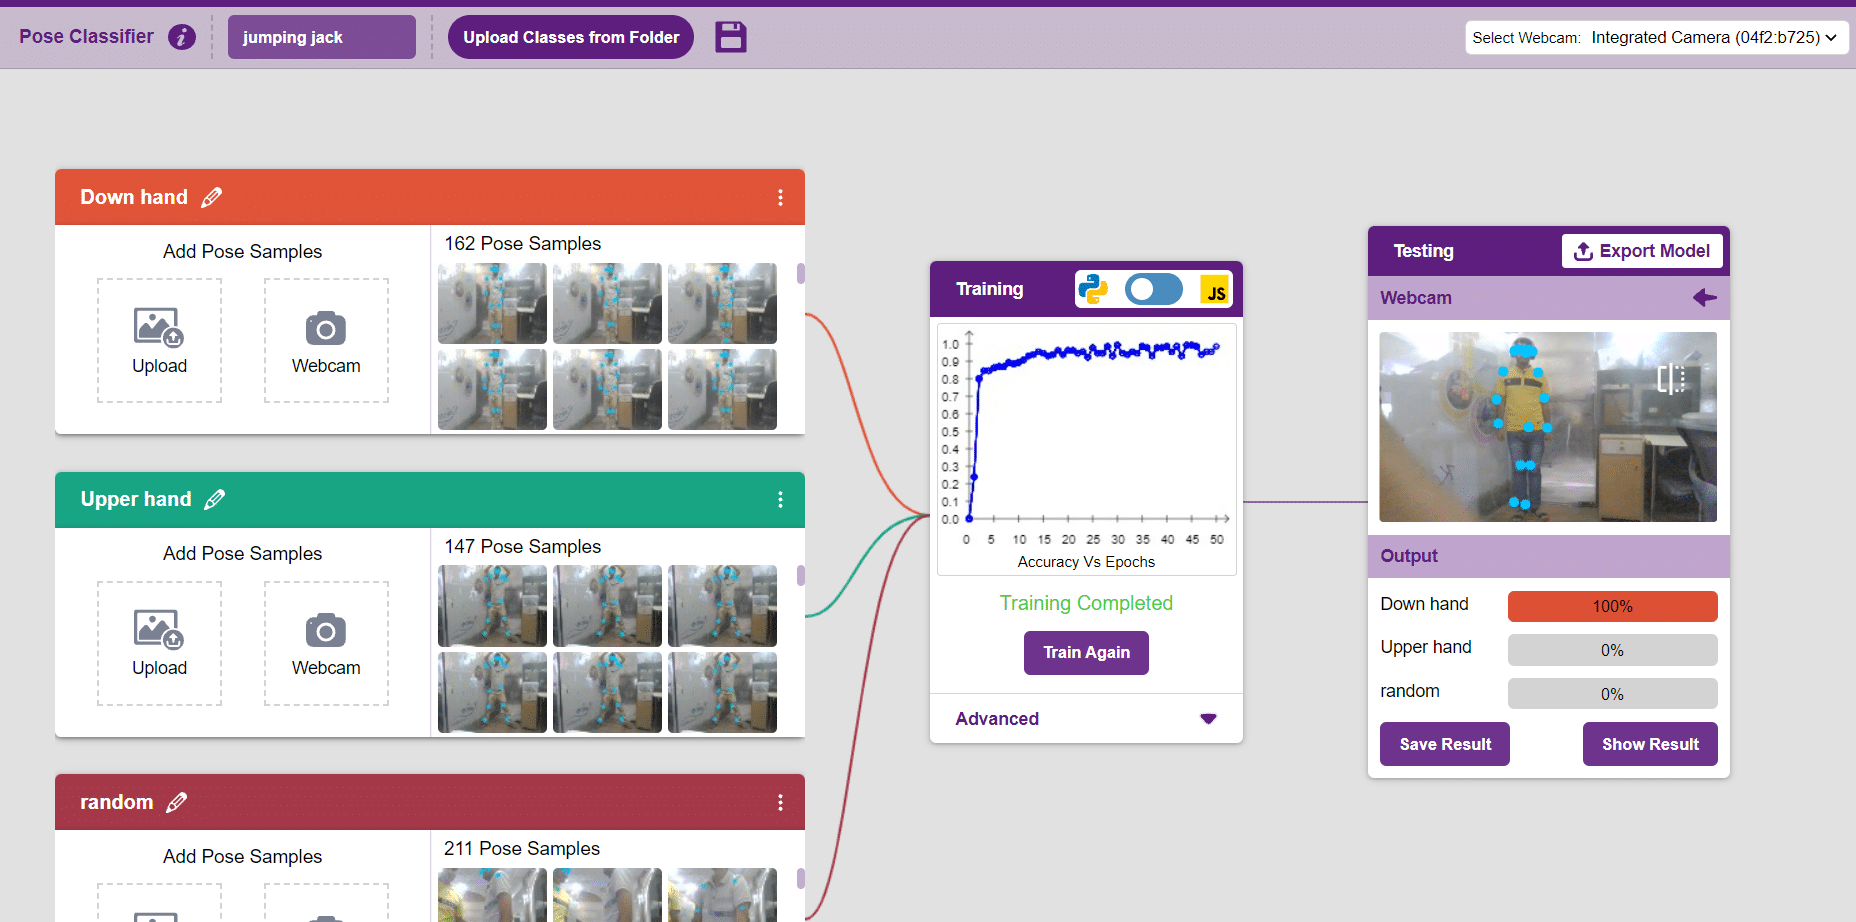
Training the Model

After data is added, it’s fit to be used in model training. To do this, we have to train the model. By training the model, we extract meaningful information from the hand pose, and that in turn updates the weights. Once these weights are saved, we can use our model to predict previously unseen data.

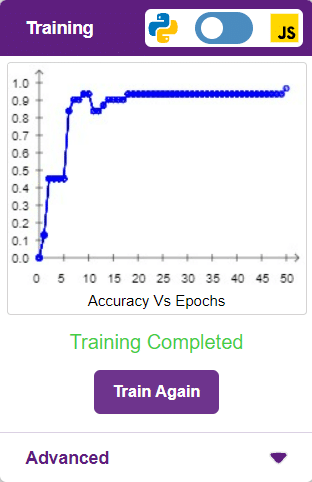
The accuracy of the model should increase over time. The x-axis of the graph shows the epochs, and the y-axis represents the accuracy at the corresponding epoch. Remember, the higher the reading in the accuracy graph, the better the model. The range of accuracy is 0 to 1.

Testing the Model

To test the model, simply enter the input values in the “Testing” panel and click on the “Predict” button.

The model will return the probability of the input belonging to the classes.

Export in Block Coding

Click on the “Export Model” button on the top right of the Testing box, and PictoBlox will load your model into the Block Coding Environment if you have opened the ML Environment in the Block Coding.

Script

The idea is simple, after running code we will do jumping jack activity in front of camera and tobi sprite will say counting of jumping jack.

  1. Select the Tobi sprite.
  2. We’ll start by adding a when flag clicked block from the Events palette.
  3. We made the new variable “count” by choosing the “Make a Variable” option from the Variables palette.
  4. Also we made the new variable “temp” by choosing the “Make a Variable” option from the Variables palette.
  5. Add “forever” from the Control palette.
  6. Inside the “forever” block, add an “analysis image from ()” block from the Machine Learning palette. Select the Web camera option.
  7. Inside the “forever” block, add an “if () then” block from the Control palette.
  8. In the empty place of the “if () then” block, add an “key () pressed?” block from the Sensing palette. Select the ‘q’ key from the options.
  9. Inside the “if () then” block, add the “Set () to ()” block from the Variables palette. Select the count option at the first empty place, and for the second, write a 0 value.
  10. Also add the “Set () to ()” block from the Variables palette. Select the temp option at the first empty place, and for the second, write a 0 value.
  11. Inside the “forever” block, add an new “if () then” block from the Control palette.
  12. In the empty place of the “if () then” block, add an “is identified class ()” block from the Machine Learning palette. Select the ‘Upper hand‘ option from the options.
  13. Inside the “if () then” block, add the “Set () to ()” block from the Variables palette. Select the temp option at the first empty place, and for the second, write a 1 value.
  14. Inside the “forever” block, add an new “if () then” block from the Control palette.
  15. In the empty place of the “if () then” block, add an “is identified class ()” block from the Machine Learning palette. Select the ‘Down hand‘ option from the options.
  16. Inside the “if () then” block, add the another “if () then” block from the Control palette.
  17. In the empty place of the “if () then” block, add a condition checking block from the operators palette block. At the first empty place, put the temp variable from the variables palette, and at the second place, write a 1 value.
  18. Inside the “if () then” block, add the “Set () to ()” block from the Variables palette. Select the count option at the first empty place, and for the second, write a 1 value.
  19. Also add the “Set () to ()” block from the Variables palette. Select the temp option at the first empty place, and for the second, write a 0 value
  20. Inside the “if () then” block, add an “say () for () seconds” block from the Looks palette block. At the first empty place, add the “join () ()” block from operator palette and at the second place, write a 2 value.
  21. Inside “join () ()” block at the first empty place, write the appropriate statement and at the second place, add count variable from Variables palette.

    Final Output


Read More
All articles loaded
No more articles to load