The function sets the servo motor connected to the specified servo pin to the specified angle.
Function Definition: moveservo(servo_pin = "Servo 1", angle = 90)
| Name | Type | Description | Expected Values | Default Value |
|---|---|---|---|---|
| servo_pin | string | The specific pin where the servo motor is connected. | "Servo 1", "Servo 2", "D1", "D2", or "D3" | "Servo 1" |
| angle | int | The angle at which the servo needs to be set. | 0 to 180 | 90 |
The function sets the servo motor connected to the specified servo pin to the specified angle.
sprite = Sprite('Tobi')
quarky = Quarky()
import time

Angle = 0
while True:
  for i in range(0, 18):
    Angle += 10
    moveservo("Servo 1", Angle)
    time.sleep(0.01)

  for i in range(0, 18):
    Angle += -10
    moveservo("Servo 1", Angle)
    time.sleep(0.01)

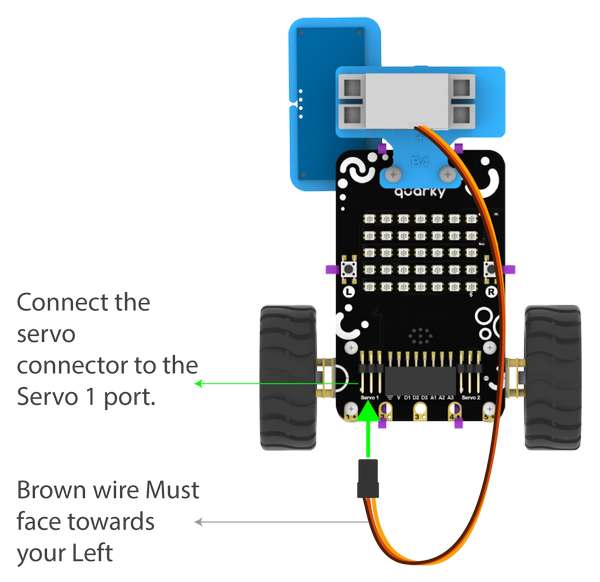
The purpose of servo motor calibration is to align the angle of your servo motor properly.

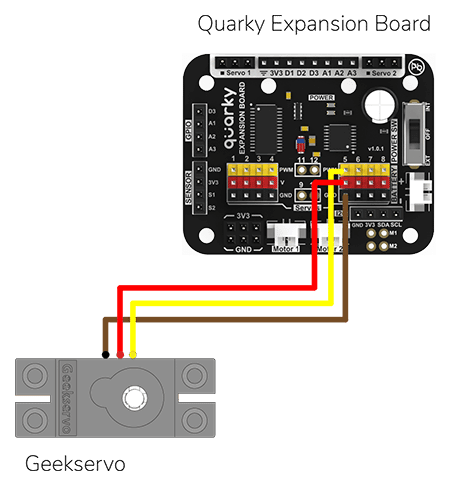
The Servo motor will be connected to the Quarky Servo Connector. There are two servo ports on Quarky. Always make sure that brown wire is on your left side.

sprite = Sprite('Tobi')
quarky=Quarky()

quarky.moveservo("Servo 1", 90)
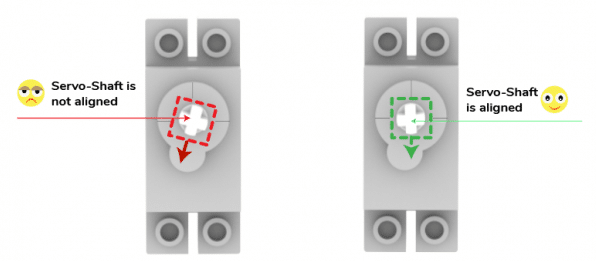
Put the Ultrasonic Assembly on the servo shaft.
In this example, we will demonstrate how to control the door of the IoT House.
Connect the servo motor to the Quarky Expansion Board servo pin 5.
The door of the IoT House is controlled with a servo motor. You need to make the servo motor set to 0 angles before assembling the door. You can do it with the following code.
#Creating two objects called "quarky" and "expansion"
quarky = Quarky()

# The "expansion" object is now set to the "Expansion" class
expansion = Expansion()

# We are using the "moveservo" method from the "Expansion" class to make the servo motor 5 be set at 0-degree
expansion.moveservo(5, 0)The following script makes the door closed by default and opens it for 1 second when the space key is pressed.
import time

sprite = Sprite('Tobi') # create a sprite object called 'Tobi'
quarky = Quarky() # create a Quarky object
expansion = Expansion() # create an Expansion object

expansion.moveservo(5,100); # move the servo on pin 5 to position 100

while True: # loop forever
	if sprite.iskeypressed("space"): # if the spacebar is pressed
		expansion.moveservo(5,0); # move the servo on pin 5 to position 0
		time.sleep(1) # wait for 1 second
expansion.moveservo(5,100); # move the servo on pin 5 to position 100Press the space key to make the door open.

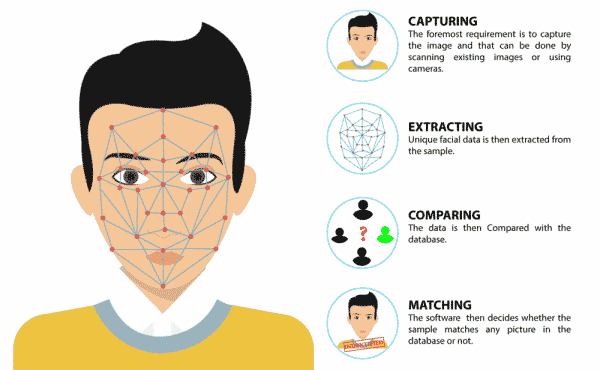
The project uses face recognition to identify authorized people and opens the door accordingly.
We are using 2 devices in this project:

We will be using Face Detection extension for making the face recognition application.
This code is used to add a new face to a system:
#Create a new Sprite object with the name 'Tobi'
sprite = Sprite('Tobi')

#Create a new Face Detection object
fd = FaceDetection()

#Import the time library
import time

#Set the threshold for face detection to 0.5
fd.setthreshold(0.5)
#Turn off the video feed from the camera
fd.video("off", 0)
#Enable the box to be drawn around the detected face
fd.enablebox()

#Define a function that adds a new face to the system
def addFace():
  #Create a flag to keep track if a new face has been added
  faceFlag = 0

  #Turn on the video feed from the camera
  fd.video("on", 0)
  time.sleep(1)

  #Keep looping until a new face has been added
  while faceFlag == 0:
    #Analyse the camera for a face
    fd.analysecamera()

    #Check if one face has been detected
    if fd.count() == 1:
      #Ask the user which slot the face should be added to
      sprite.input("Select the slot (1 to 10)?")
      #Store the slot number the user provided
      faceSlot = sprite.answer()

      #Ask the user to enter a name for the new face
      sprite.input("Enter the name of the face")
      #Store the name the user provided
      faceName = sprite.answer()

      #Add the face to the system with the provided slot number and name
      fd.addclassfromcamera(faceSlot, faceName)

      #Set the faceFlag to 1 to stop the loop
      faceFlag = 1

  #Turn off the video feed from the camera
  fd.video("off", 0)

#Keep running the loop forever
while True:
  #Check if the 'a' key has been pressed
  if sprite.iskeypressed("a"):
    #If yes, call the addFace() function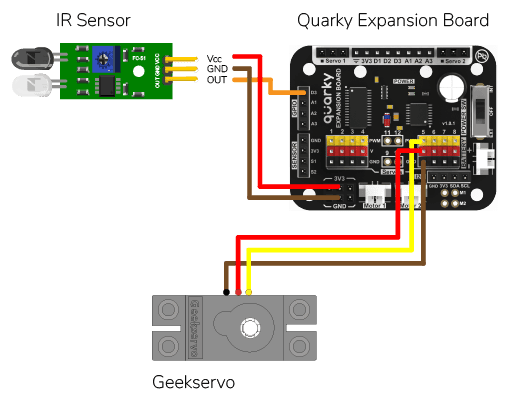
addFace()An Infrared sensor is a type of sensor that senses if something is close to it or not. The IR stands for Infrared sensor. Infrared is the light out of our visible spectrum.

An IR sensor has a white LED (transmitter) and a photodiode (receiver). The transmitter emits IR light, and the receiver detects reflected light from objects within the sensor’s range, which can be adjusted with a potentiometer. The sensor is indicated by two LED indicators, a power LED which is always on, and a signal LED which is on when an object is detected and off when nothing is detected.
The signal LED has two states or situations:
This code creates a program that can add a new face to the system, and then recognize and authenticate the user:
#Create a new Sprite object with the name 'Tobi'
sprite = Sprite('Tobi')

#Create a new Face Detection object
fd = FaceDetection()

#Import the time library
import time

#Create a new Quarky object
quarky = Quarky()

#Create a new Expansion object
expansion = Expansion()
house = IoTHouse()

#Set the threshold for face detection to 0.5
fd.setthreshold(0.5)
#Turn off the video feed from the camera
fd.video("off", 0)
#Enable the box to be drawn around the detected face
fd.enablebox()

#Move a servo on the expansion board to position 5 and move it to 100 degrees
expansion.moveservo(5, 100);

#Define a function that adds a new face to the system
def addFace():
  #Create a flag to keep track if a new face has been added
  faceFlag = 0

  #Turn on the video feed from the camera
  fd.video("on", 0)
  time.sleep(1)

  #Keep looping until a new face has been added
  while faceFlag == 0:
    #Analyse the camera for a face
    fd.analysecamera()

    #Check if one face has been detected
    if fd.count() == 1:
      #Ask the user which slot the face should be added to
      sprite.input("Select the slot (1 to 10)?")
      #Store the slot number the user provided
      faceSlot = sprite.answer()

      #Ask the user to enter a name for the new face
      sprite.input("Enter the name of the face")
      #Store the name the user provided
      faceName = sprite.answer()

      #Add the face to the system with the provided slot number and name
      fd.addclassfromcamera(faceSlot, faceName)

      #Set the faceFlag to 1 to stop the loop
      faceFlag = 1

  #Turn off the video feed from the camera
  fd.video("off", 0)


#Define a function that authenticates the user
def authenticate():
  #Turn on the video feed from the camera
  fd.video("on", 0)
  time.sleep(1)

  #Recognise the face in the camera
  fd.recognisefromstage()

  #Check if one or more face has been detected
  if fd.count() > 0:
    #Loop through all the detected faces
    for i in range(1, fd.count() + 1):
      #Check if the face has been recognised
      if fd.getclassname(i) != "unknown":
        #Speak out the name of the recognised user
        sprite.say("Authorised - " + fd.getclassname(i), 2)

        #Turn off the video feed from the camera
        fd.video("off", 0)

        #Return 1 to indicate the user has been authenticated
        return 1

  #Turn off the video feed from the camera
  fd.video("off", 0)
  #Return 0 to indicate the user has not been authenticated
  return 0

#Keep running the loop forever
while True:
  #Check if the 'a' key has been pressed
  if sprite.iskeypressed("a"):
    #If yes, call the addFace() function
    addFace()

  #Check if the space key has been pressed
  if house.irstatus("D3"):
    #If yes, call the authenticate() function
    if authenticate() == 1:
      #Move the servo to 0 degrees
      expansion.moveservo(5, 0)
      time.sleep(2)
      #Move the servo back to 100 degrees
      expansion.moveservo(5, 100)
This project demonstrates how to interface an RFID sensor with a Quarky to control the door of an IoT-enabled house using an authorized RFID tag.

RFID is short for “radio-frequency identification” and points to a technology whereby a reader catches digital information encoded in RFID tags. RFID sensors have a lot of pins. You have to connect it according to the following:
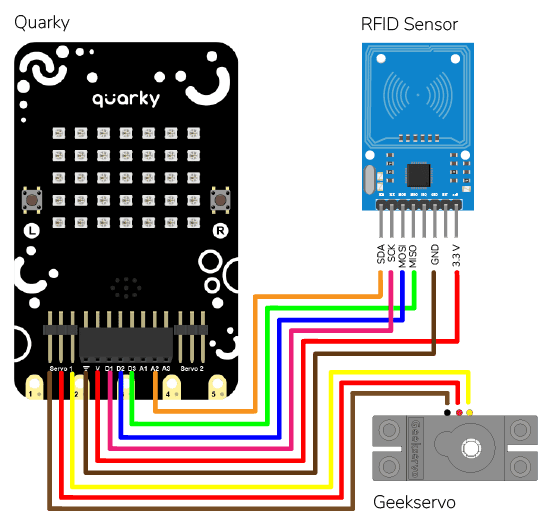
The servo motor is connected to the S1 of Quarky.
The following code makes any RFID Tag a master card that can be authorized for security:
# Create a sprite object for 'Tobi'
sprite = Sprite('Tobi')

# Create a Quarky object
quarky = Quarky()

# Create an IoTHouse object
house = IoTHouse()

# Initialise the RFID tag
house.initialiserfid()

# Set a flag to indicate if the RFID tag has been written
MasterFlag = 0

# Ask the user for the name of the user for the RFID tag
sprite.input("What is the name of the user for this RFID tag?")

# Keep looping until the RFID tag is written
while MasterFlag == 0:
  # Ask the user to put the RFID tag
  sprite.say("Writing on RFID! Please put RFID tag.")

  # Try to write the RFID tag to the house
  if house.writetorfid(sprite.answer(), 2):
    # Set the MasterFlag to 1, indicating the RFID tag has been written
    MasterFlag = 1

    # Set the master tag of the RFID
    house.setmaster()

    # Let the user know the RFID tag is created
    sprite.say("RFID tag created", 2)

  # If the RFID tag couldn't be written
  else:
    # Ask the user to put the RFID tag again
    sprite.say("No tag detected, please put RFID tag", 2)
This is how it looks:

This code makes the Quarky open the door when it reads a special RFID card:
# First, we import the time library
import time

# We also create a Quarky object
quarky = Quarky()

# We create an IoTHouse object called 'house'
house = IoTHouse()
# We initialise the RFID of the house object
house.initialiserfid()

# We move the servo of the Quarky object to 100
quarky.moveservo("Servo 1", 100)

# We create a while loop that will go on forever
while True:
  # Check if the RFID is read
  if house.readrfid(3):
    # Check if the scanned data is Quarky
    if (house.readscanneddata() == "Quarky"):
      # Move the servo to 0
      quarky.moveservo("Servo 1", 0)
      # Draw a pattern on the Quarky Display
      quarky.drawpattern("aaaaaaaaaaaaaaaaaaaaaaaaaaaaaaaaaaa")
      # Sleep for 2 seconds
      time.sleep(2)
      # Move the servo to 100
      quarky.moveservo("Servo 1", 100)
      # Clear the display of the Quarky Display
      quarky.cleardisplay()

    # If the scanned data is not Quarky
    else:
      # Draw a different pattern on the Quarky object
      quarky.drawpattern("bbbbbbbbbbbbbbbbbbbbbbbbbbbbbbbbbbb")
      # Sleep for 1 second
      time.sleep(1)
      # Clear the display of the Quarky object
      quarky.cleardisplay()
This example demonstrates how to set up the flame sensor with Quarky to detect heat or flame nearby. Later, we create an alarm system triggered with the flame sensor.
Flame sensors have 4 pins: GND, VCC, DO, and AO. You have to connect the following 3 pins to the Quarky Expansion Board:

The sensor also has 2 LEDs – Power and Detection. The desired calibration is achieved when the sensor is inactive when there is no heat or flame nearby and active when the flame is nearby. It is visible on the detection LED.
To calibrate the flame sensor:
In the project, when heat or flame is detected, the alarm system starts with
The alarm system will be on until the flame sensor stops detecting the fire.
Connect the following modules to the Quarky Expansion Board:

# The following code is written to detect a fire in a house using a Quarky robot and Expansion board.
# quarky is an instance of the Quarky class which has functionalities like playing a tone and drawing a pattern on LED Screen
quarky = Quarky()
# quarkyexpansion is an instance of the Expansion class which has functionalities like moving a servo and running a motor
quarkyexpansion = Expansion()
# house is an instance of the IoTHouse class which has functionalities like checking the flame status
house = IoTHouse()
# import time library which has functionalities like sleeping for a certain amount of time
import time

# move the servo connected to pin 5 to 100 degrees
quarkyexpansion.moveservo(5, 100)
# stop the motor connected to pin 1
quarkyexpansion.stopmotor(1)


# define a function which initiate instructions when the flame is detected
def fireDetectedSequence():
  # move the servo connected to pin 5 to 0 degrees
  quarkyexpansion.moveservo(5, 0)
  # run the motor connected to pin 1 in clockwise direction with speed 100
  quarkyexpansion.runmotor(1, 1, 100)
  # keep on checking the flame status of pin D3 in the house, until it is no longer in flame
  while not (house.flamestatus("D3")):
    # clear the display of the Quarky robot
    quarky.cleardisplay()
    # play a tone at C4 pitch for 8 beats
    quarky.playtone("C4", 8)
    # draw red pattern on the Quarky display
    quarky.drawpattern("bbbbbbbbbbbbbbbbbbbbbbbbbbbbbbbbbbb")
    time.sleep(0.7)


# define a function which is initiated when no flame is detected
def fireStopSequence():
  # move the servo connected to pin 5 to 100 degrees
  quarkyexpansion.moveservo(5, 100)
  # stop the motor connected to pin 1
  quarkyexpansion.stopmotor(1)
  # clear the display of the Quarky robot
  quarky.cleardisplay()


while True:
  # keep on checking the flame status of pin D3 in the house
  if not (house.flamestatus("D3")):
    time.sleep(2)
    # again check the flame status of pin D3 in the house
    if not (house.flamestatus("D3")):
      # if flame is detected, run the fireDetectedSequence()
      fireDetectedSequence()
      # and then run the fireStopSequence()
      fireStopSequence()
As an advanced system, we can also send the fire detection alert to the users using IFTTT. For that, we will use IFTTT webhooks.

The following IFTTT sequence is to be created:
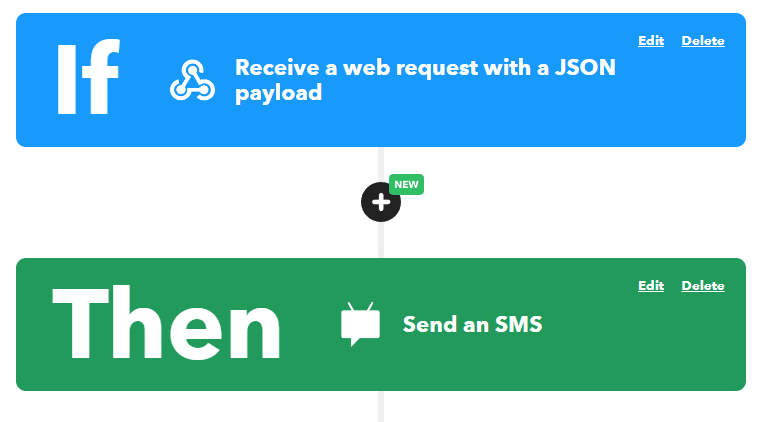
You can learn in detail how to create an IFTTT applet here: https://ai.thestempedia.com/extension/ifttt-webhooks/
This code is the continuation of the past code:
# The following code is written to detect a fire in a house using a Quarky robot and Expansion board.
# quarky is an instance of the Quarky class which has functionalities like playing a tone and drawing a pattern on LED Screen
quarky = Quarky()
# quarkyexpansion is an instance of the Expansion class which has functionalities like moving a servo and running a motor
quarkyexpansion = Expansion()
# house is an instance of the IoTHouse class which has functionalities like checking the flame status
house = IoTHouse()
# import time library which has functionalities like sleeping for a certain amount of time
import time
#Create an instance of the IFTTTWebhooks library
ifttt = IFTTTWebhooks()

# move the servo connected to pin 5 to 100 degrees
quarkyexpansion.moveservo(5, 100)
# stop the motor connected to pin 1
quarkyexpansion.stopmotor(1)

#Set the webhook key and event name
ifttt.setifttt("Flame_Detected", "iNyFg77wDLYV-V9UtdXVtmeebiOw_72LjxZud084ybr")

# define a function which initiate instructions when the flame is detected
def fireDetectedSequence():
  #Set the message and priority
  ifttt.setvalues("Fire Started! Evacuation Started", 1)
  ifttt.triggerevent() #Send the event
  # move the servo connected to pin 5 to 0 degrees
  quarkyexpansion.moveservo(5, 0)
  # run the motor connected to pin 1 in clockwise direction with speed 100
  quarkyexpansion.runmotor(1, 1, 100)
  # keep on checking the flame status of pin D3 in the house, until it is no longer in flame
  while not (house.flamestatus("D3")):
    # clear the display of the Quarky robot
    quarky.cleardisplay()
    # play a tone at C4 pitch for 8 beats
    quarky.playtone("C4", 8)
    # draw red pattern on the Quarky display
    quarky.drawpattern("bbbbbbbbbbbbbbbbbbbbbbbbbbbbbbbbbbb")
    time.sleep(0.7)


# define a function which is initiated when no flame is detected
def fireStopSequence():
  #Set the message and priority
  ifttt.setvalues("Fire Stopped", 1)
  ifttt.triggerevent() #Send the event
  # move the servo connected to pin 5 to 100 degrees
  quarkyexpansion.moveservo(5, 100)
  # stop the motor connected to pin 1
  quarkyexpansion.stopmotor(1)
  # clear the display of the Quarky robot
  quarky.cleardisplay()


while True:
  # keep on checking the flame status of pin D3 in the house
  if not (house.flamestatus("D3")):
    time.sleep(2)
    # again check the flame status of pin D3 in the house
    if not (house.flamestatus("D3")):
      # if flame is detected, run the fireDetectedSequence()
      fireDetectedSequence()
      # and then run the fireStopSequence()
      fireStopSequence()