


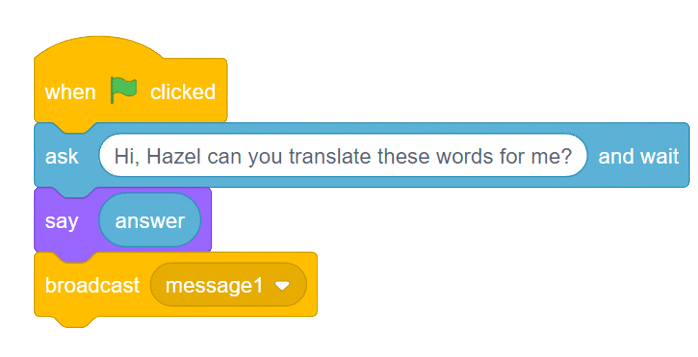
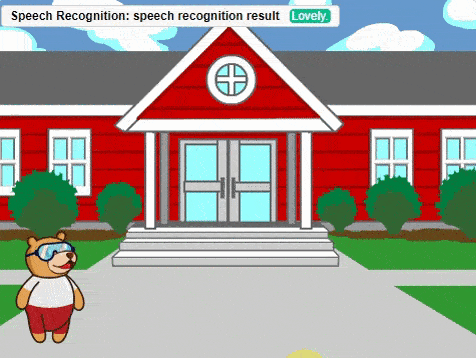
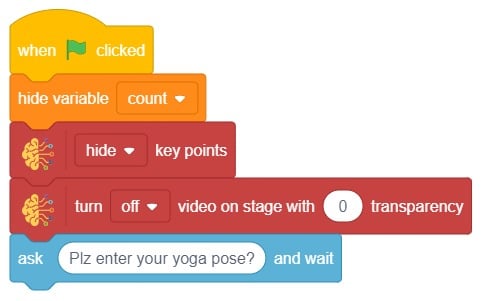
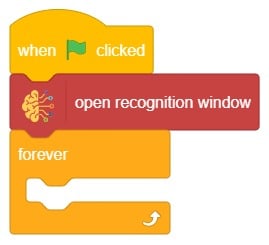
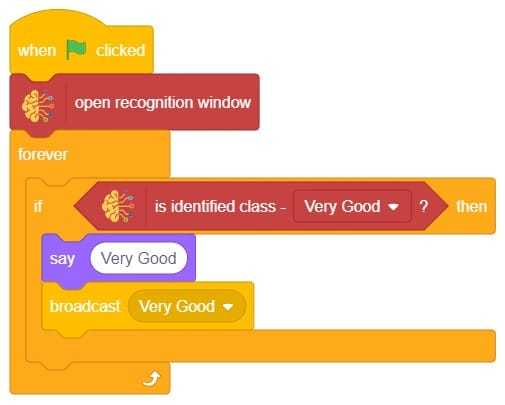
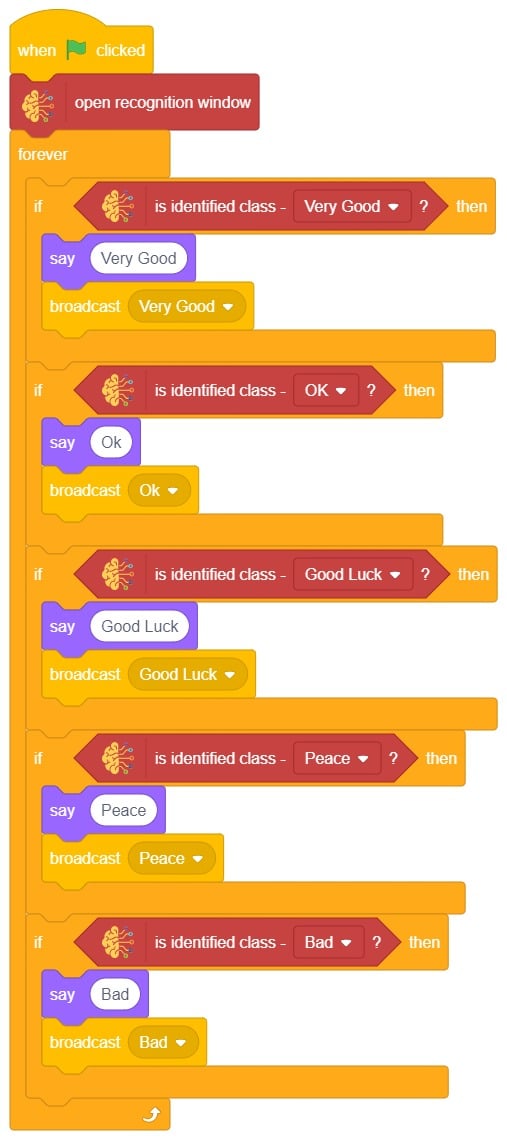
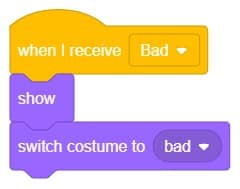
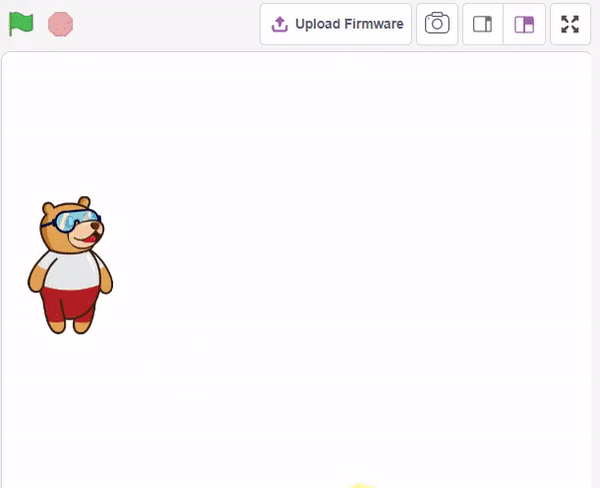
The block gives its sprite a speech bubble with the specified text — the speech bubble stays until another speech or thought block is activated, or the stop sign is pressed.
Script
![]()
Output
![]()
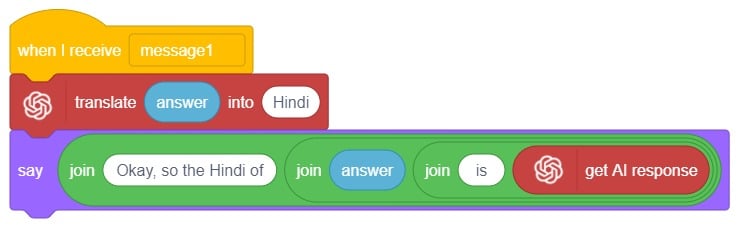
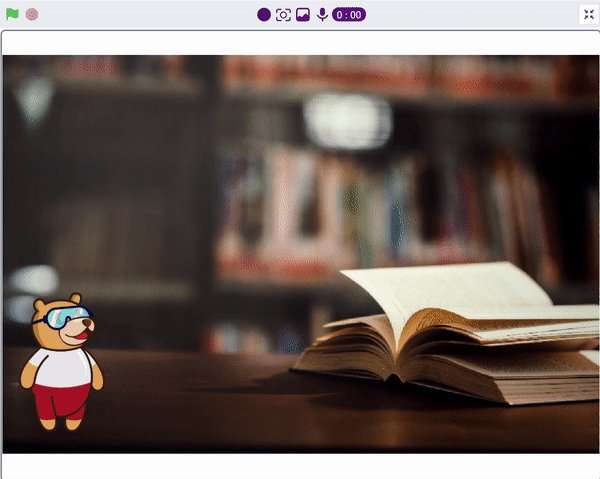
The block gives its sprite a speech bubble with the specified text — the speech bubble stays until another speech or thought block is activated, or the stop sign is pressed.
![]()
![]()
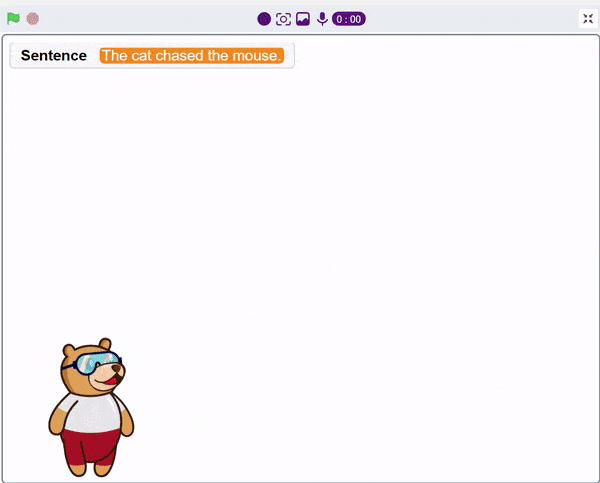
The Language Translator with ChatGPT and Speech Recognition is a system that helps people communicate across languages by providing real-time translation and conversation support. It combines language translation, chatbot capabilities, and speech recognition to facilitate multilingual communication.
Language Translator Using ChatGPT is a project that trains the ChatGPT language model with multilingual data to enable it to understand and translate text between different languages. It utilizes ChatGPT’s natural language processing abilities to generate human-like responses, making it ideal for building a language translation system. The training data includes sentence pairs in different languages and their corresponding translations.
Initially, two characters engage in a conversation. One character asks a question, and the other character converts it into a different language before answering it and providing a response.


![]()
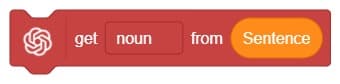
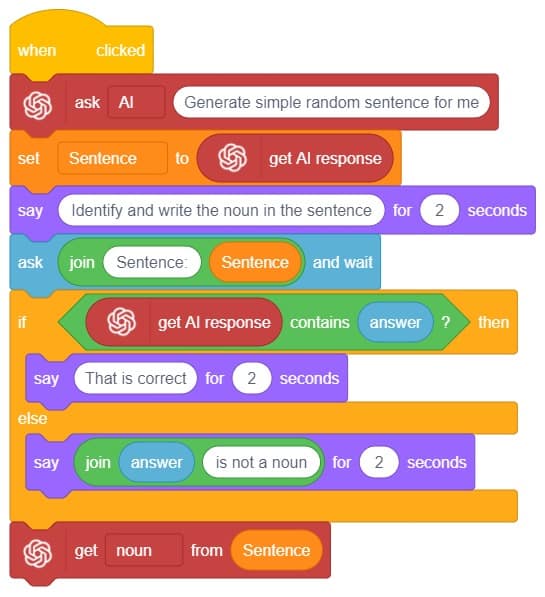
A noun detector is a tool or algorithm designed to identify and extract nouns from a given text or speech input. Nouns are a type of word that typically represent people, places, things, or ideas. In the context of chat-based applications, a noun detector can be useful for extracting key information or identifying specific entities mentioned in a conversation. It can help in tasks such as named entity recognition, information retrieval, sentiment analysis, and many more.
A noun detector serves as a valuable component in language processing systems, helping to extract and utilize meaningful information from text or speech inputs in chat-based interactions.
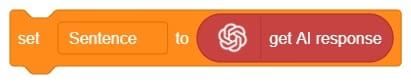
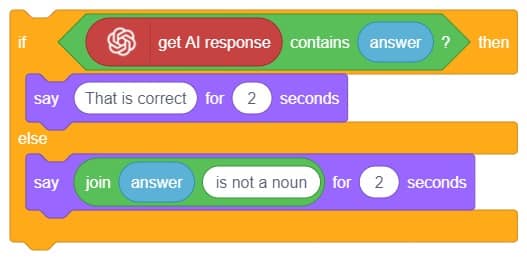
First, ChatGPT generates random sentences, and we save this response in a variable. Then, it asks users to identify a noun from the given sentence. If the user’s answer matches the response generated by ChatGPT, it will say “Correct.” Otherwise, it will say “Incorrect answer.”

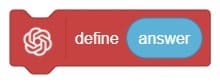
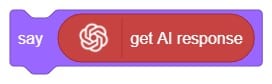
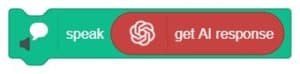
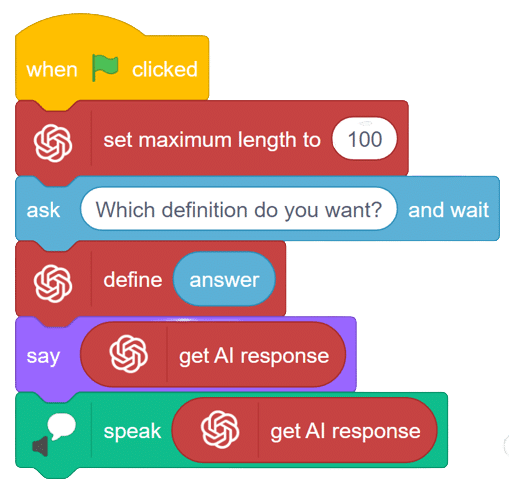
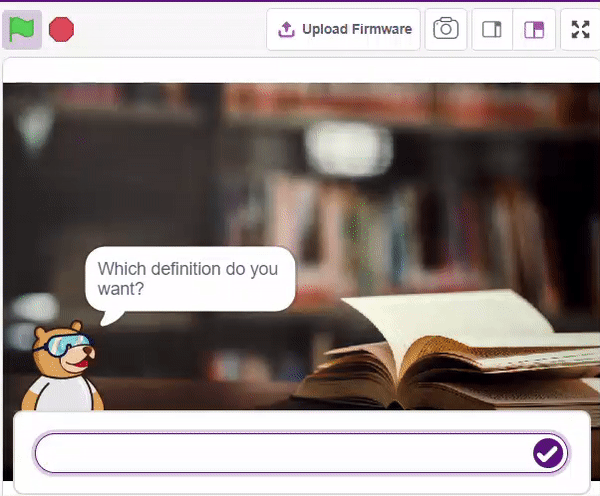
We ask the user which definition they want, and based on their input, ChatGPT generates the definition of the particular word. The sprite then uses the text-to-speech extension to speak out the definition.
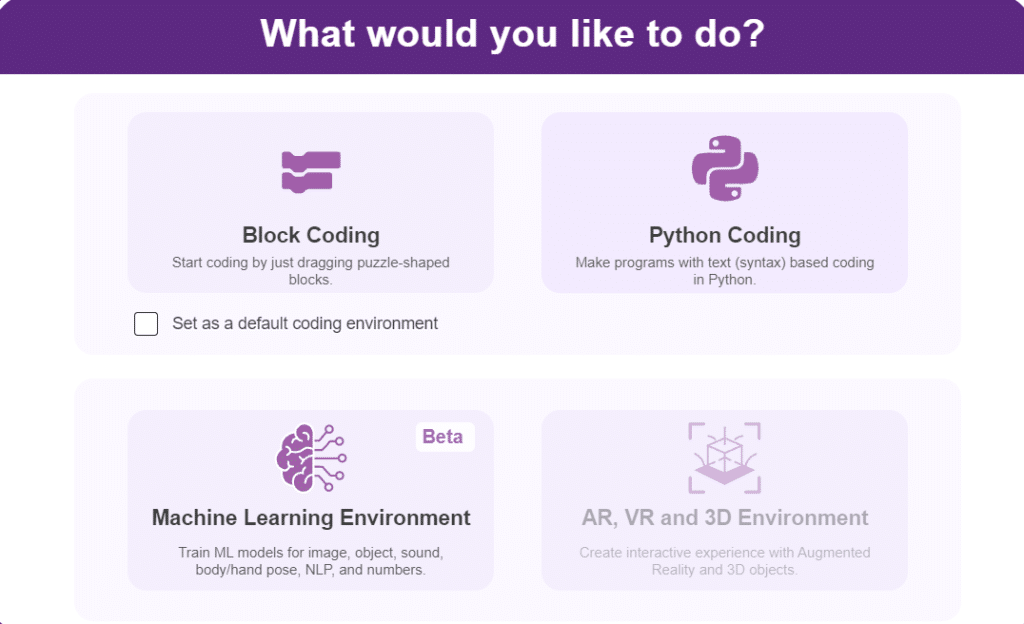
Follow the steps below:


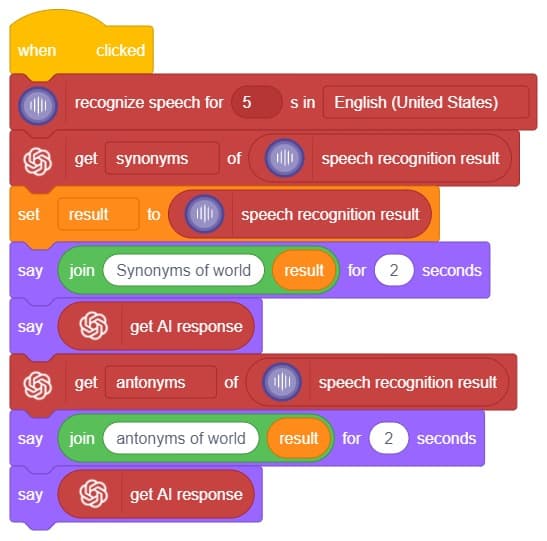
Hey! Welcome to the fascinating realm of “Synonym/Antonym World,” where the powers of Speech Recognition and ChatGPT converge. Immerse yourself in an innovative platform that not only recognizes your speech but also provides an extensive collection of synonyms and antonyms for any given word. With this powerful combination, you can effortlessly expand your vocabulary, explore alternative expressions, and delve into the nuances of language. Unleash the potential of speech recognition and ChatGPT as you navigate through a world where words find their perfect counterparts. Get ready to unlock new dimensions of linguistic exploration in the captivating Synonym/Antonym World!

In this interactive chatbox experience, the user has the freedom to specify the tone in which they would like the AI to respond. The tone can be anything they prefer: Normal, sarcastic, Friend that suits their preference.
Once the user has selected a particular tone, they can provide their input or ask a question. Based on their input, the AI will generate a response that aligns with the chosen tone. This allows for the creation of a conversational atmosphere similar to real-life interactions.
Users are encouraged to ask any question or share their thoughts on various topics. They can also engage in discussions or seek assistance with the information they need. The AI is there to facilitate a meaningful conversation and provide helpful responses based on the tone chosen by the user.
So, the user is requested to let the AI know the specific tone they would like it to adopt, and then they are free to ask any question they have in mind. The AI is here to provide a personalized and engaging chat experience!
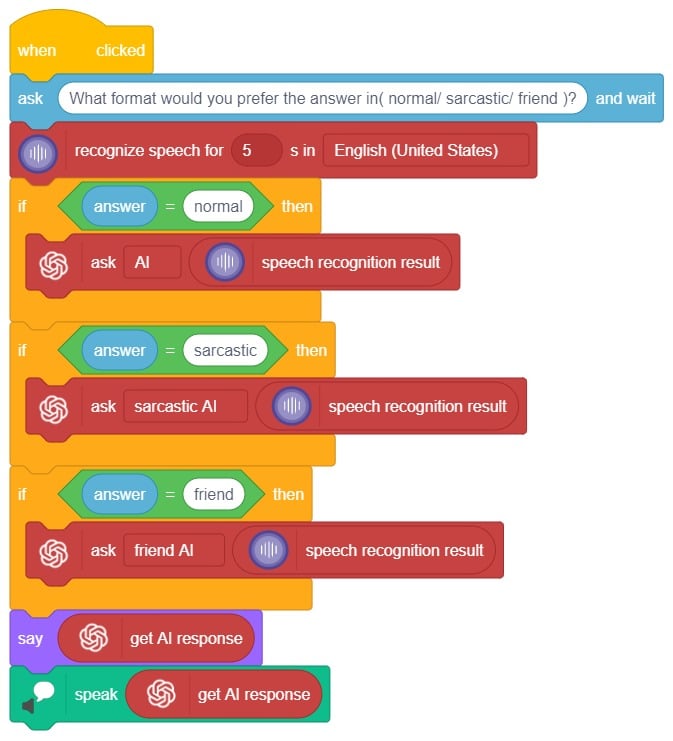

In summary, we can describe it as a chatbox that provides answers in three different ways based on the user’s mood and entertainment preferences. When a question is asked, it will respond accordingly.

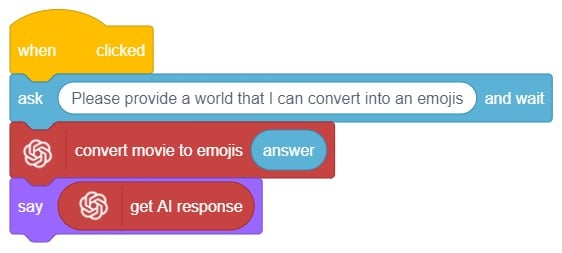
Are you looking to add some fun and expressiveness to your conversations? Look no further! I’m here to help you convert any word or phrase into a colorful array of emojis. Whether you want to spice up your messages, or social media posts, or simply bring a smile to someone’s face, I’ve got you covered.
Just type in the word or phrase you want to transform, and I’ll generate a delightful sequence of emojis that capture the essence of your text. Emojis are a universal language that transcends words from happy faces to animals, objects, and everything in between.
So, let’s get started and infuse your text with a touch of emoji magic! 🎉🔥
This code allows the user to interact with the sprite and provide emojis, which are then transformed into a response using the ChatGPT model. The sprite then speaks the generated response using the provided emojis.
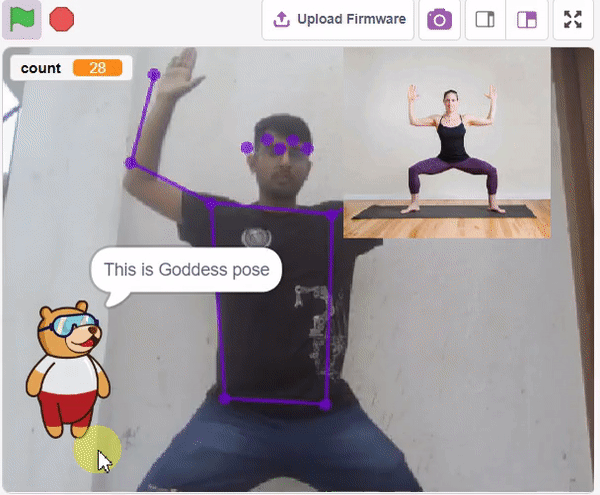
The idea is simple, we’ll add one image of each class in the “costume” column by making one new sprite which will we display on the stage according to input from user. we’ll also change name of the image according to pose.
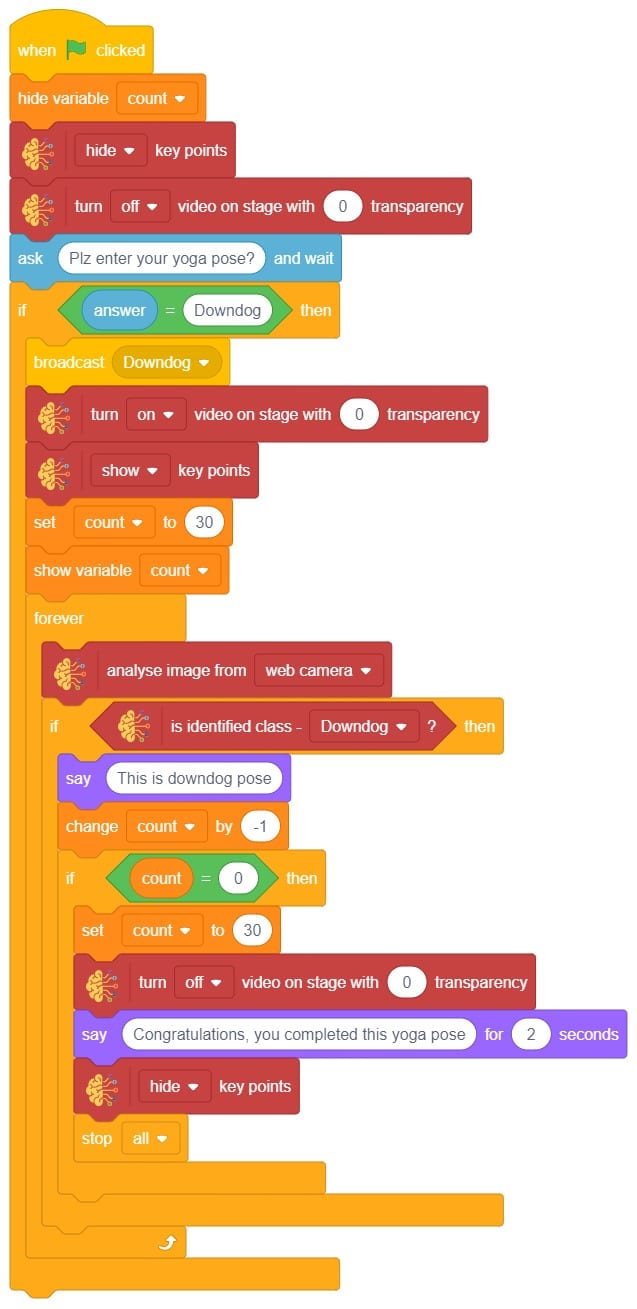
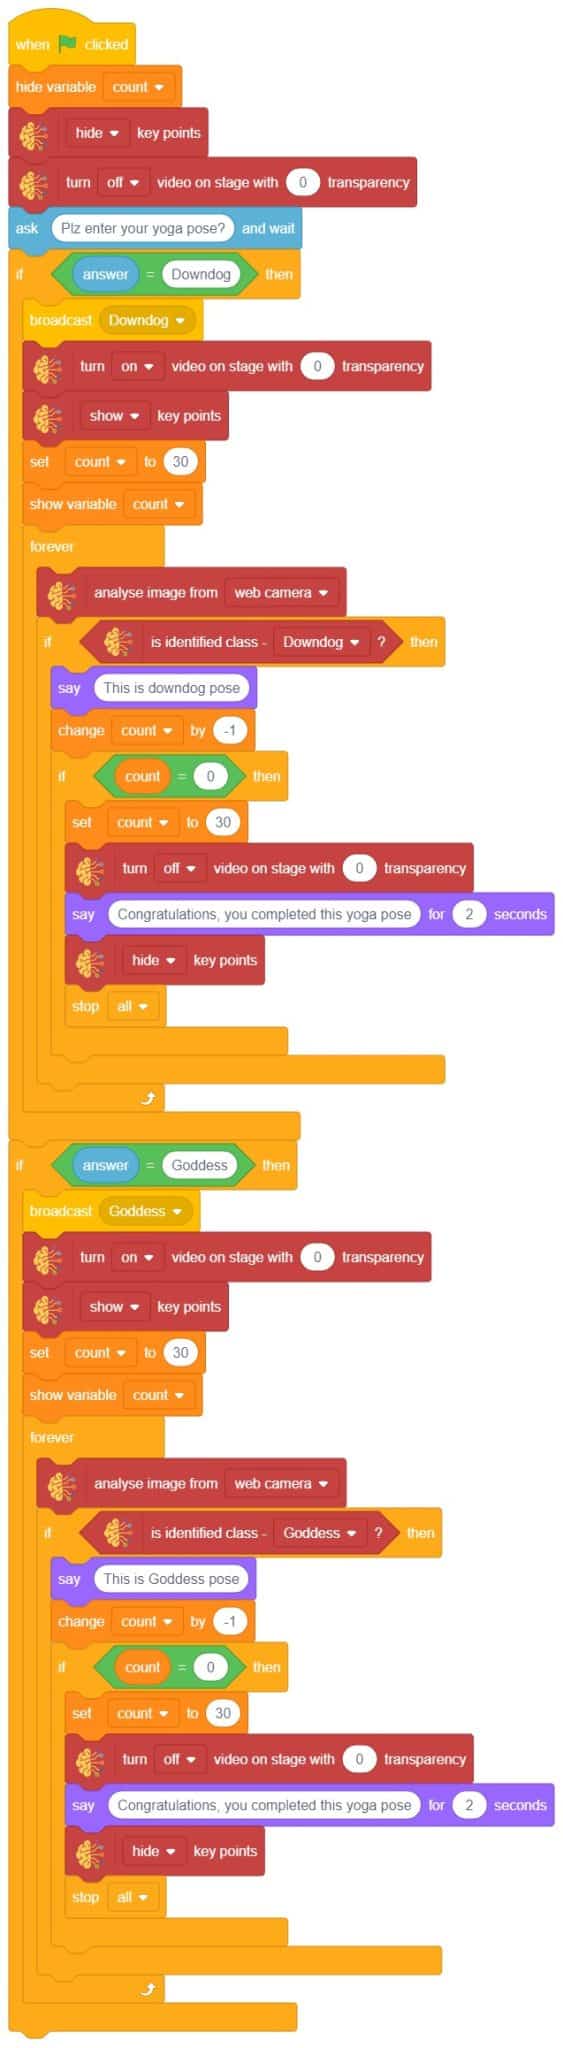

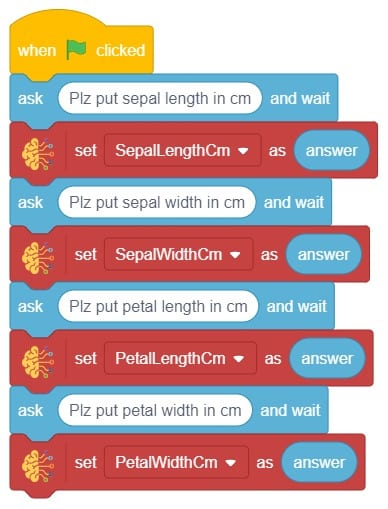
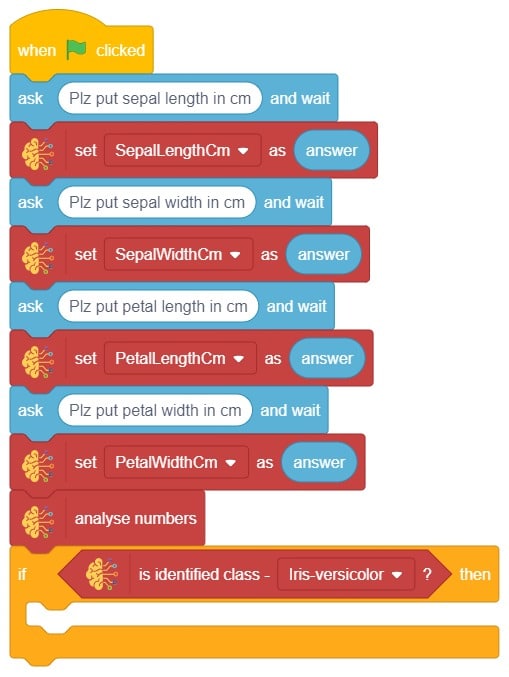
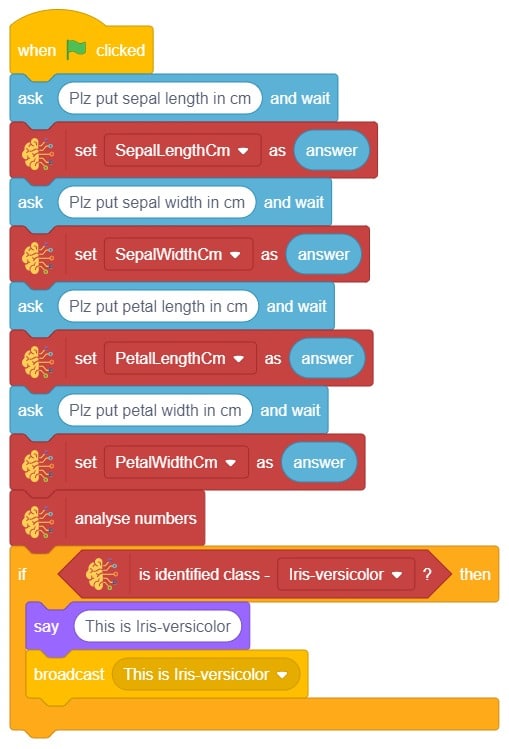
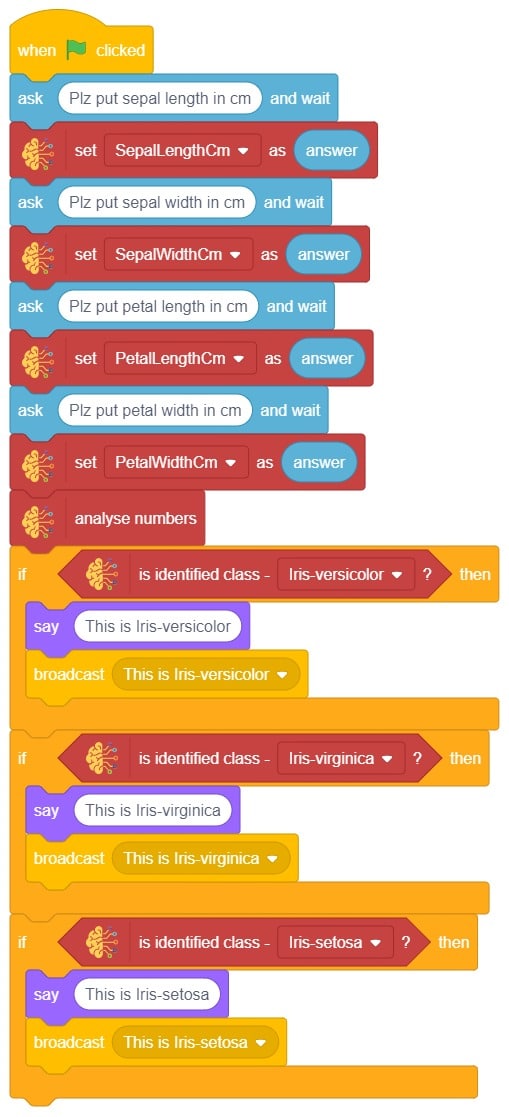
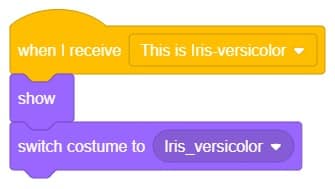
The idea is simple, we’ll add one image of each class in the “costume” column by making one new sprite which will we display on the stage according to input from user. we’ll also change name of the image according to iris type.

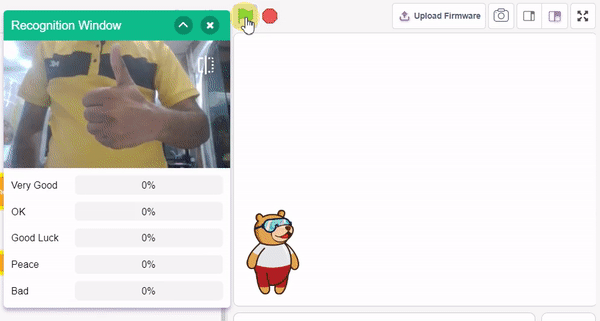
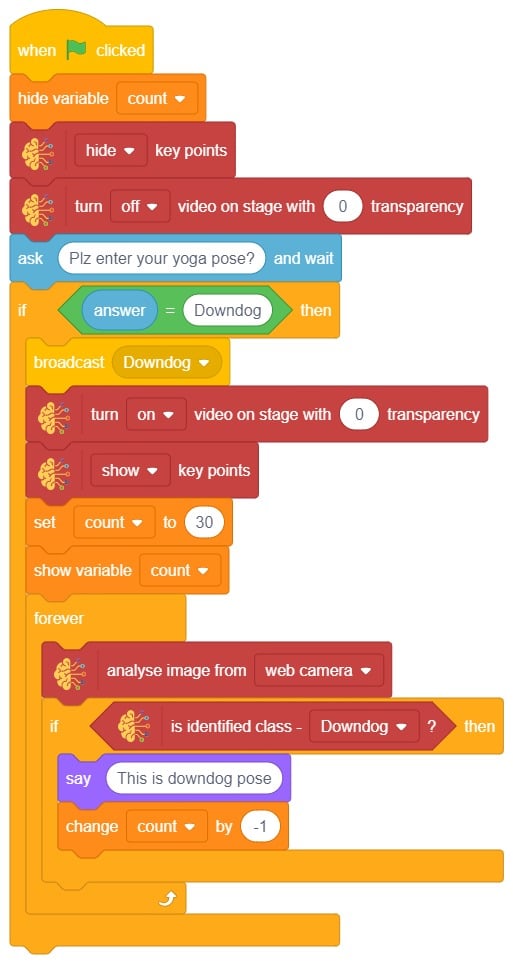
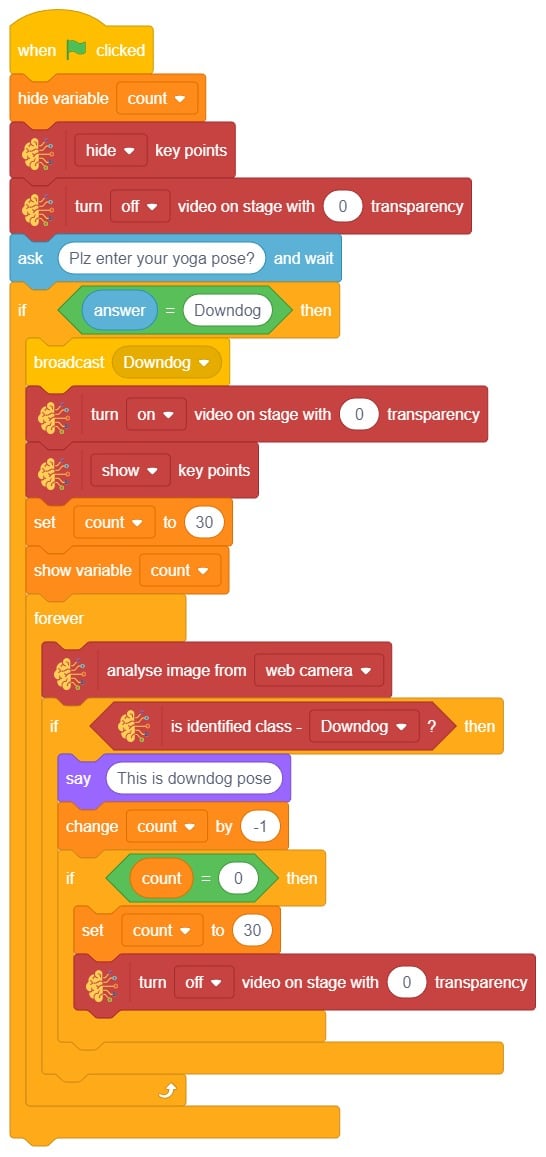
In this example project, we are going to create a machine learning model that can classify different sign messages from the camera feed or image.
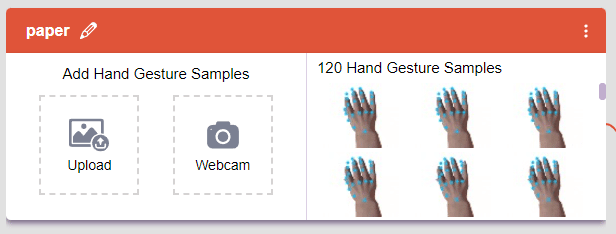
The Hand Gesture Classifier is the extension of the ML Environment used for classifying different hand poses into different classes.


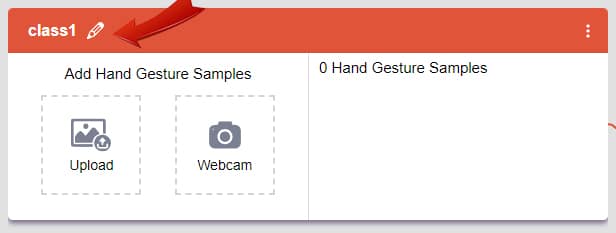
Class is the category in which the Machine Learning model classifies the poses. Similar posts are put in one class.
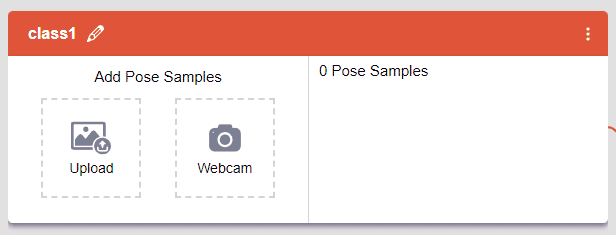
Class is the category in which the Machine Learning model classifies the hand poses. Similar hand poses are put in one class.
You can perform the following operations to manipulate the data into a class.
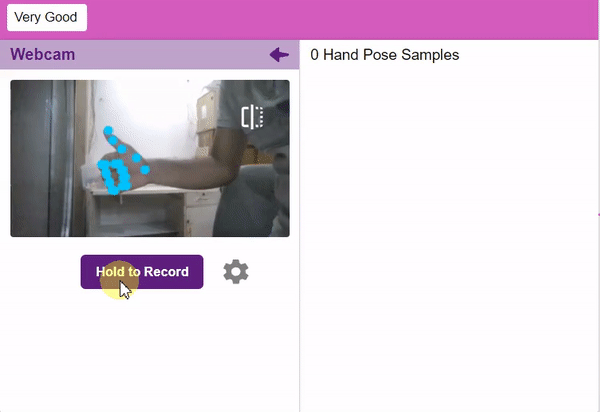

If you want to change your camera feed, you can do it from the webcam selector in the top right corner.

After data is added, it’s fit to be used in model training. In order to do this, we have to train the model. By training the model, we extract meaningful information from the hand pose, and that in turn updates the weights. Once these weights are saved, we can use our model to make predictions on data previously unseen.

However, before training the model, there are a few hyperparameters that you should be aware of. Click on the “Advanced” tab to view them.
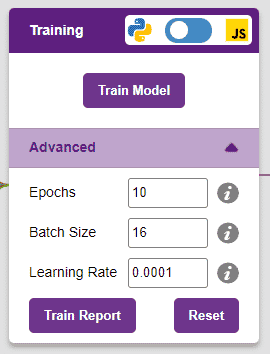
It’s a good idea to train a numeric classification model for a high number of epochs. The model can be trained in both JavaScript and Python. In order to choose between the two, click on the switch on top of the Training panel.

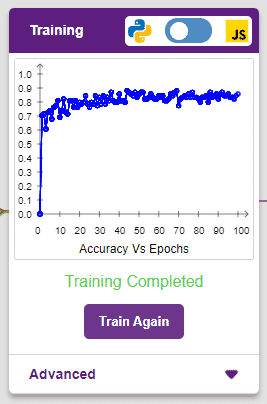
The accuracy of the model should increase over time. The x-axis of the graph shows the epochs, and the y-axis represents the accuracy at the corresponding epoch. Remember, the higher the reading in the accuracy graph, the better the model. The x-axis of the graph shows the epochs, and the y-axis represents the corresponding accuracy. The range of the accuracy is 0 to 1.

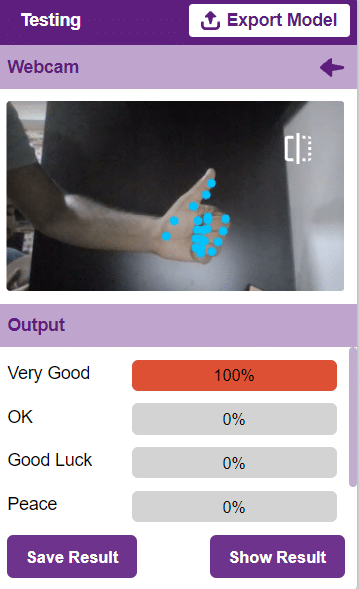
To test the model, simply enter the input values in the “Testing” panel and click on the “Predict” button.
The model will return the probability of the input belonging to the classes.
Click on the “Export Model” button on the top right of the Testing box, and PictoBlox will load your model into the Block Coding Environment if you have opened the ML Environment in the Block Coding.
The idea is simple, we’ll add one image of each class in the “costume” column by making one new sprite which will we display on the stage according to input from user. we’ll also change name of the image according to sign class type.
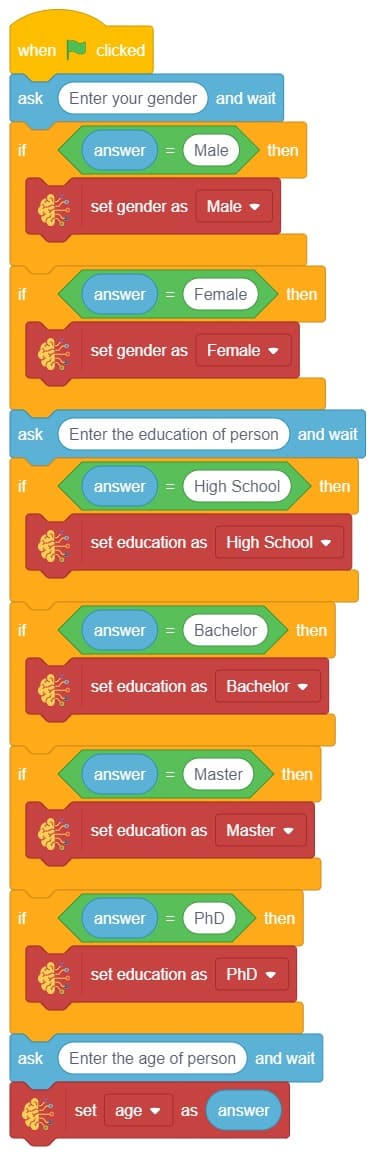
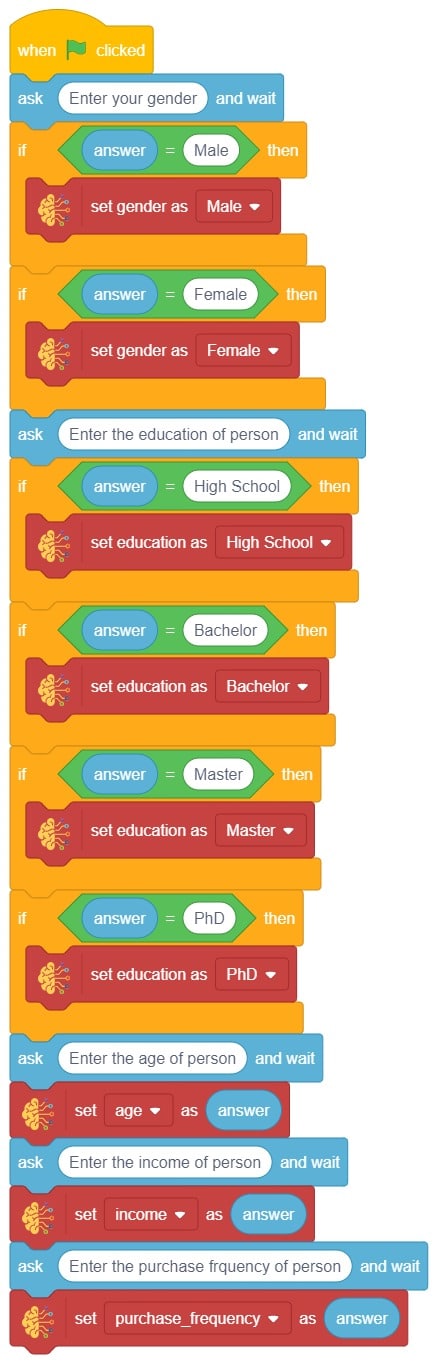
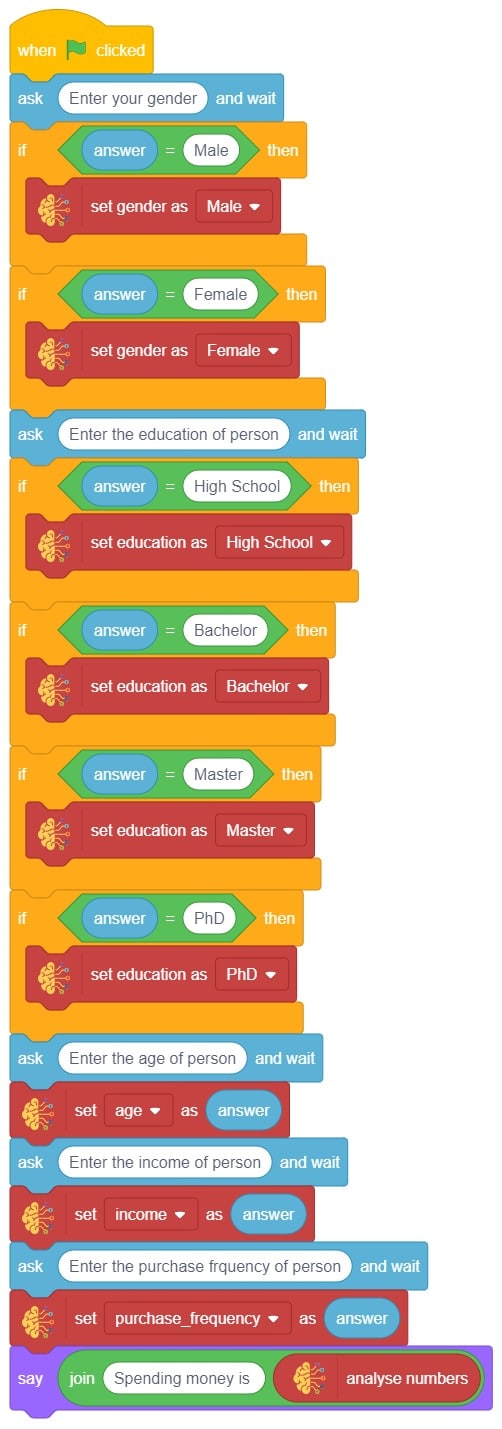
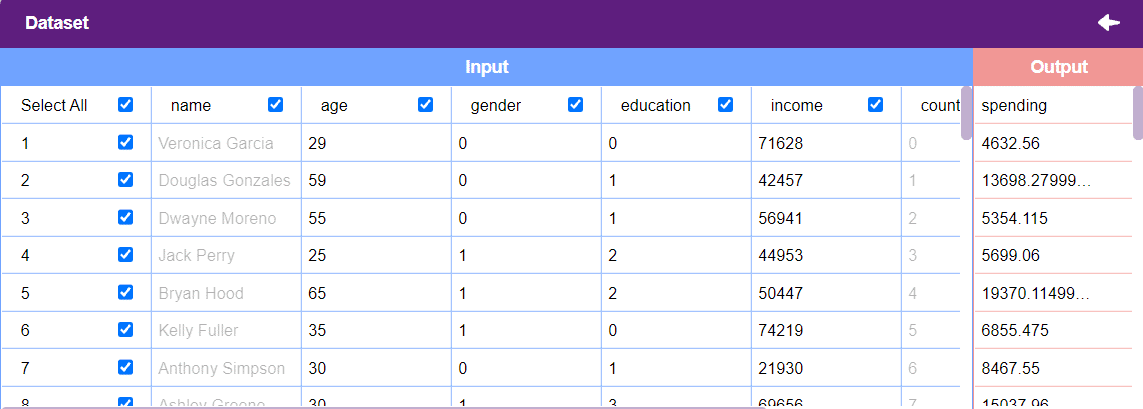
In this example project, we are going to create a Machine Learning Model that can predict the amount of money a customer will spend based on the input details added by the user.
Datasets on the internet are hardly ever fit to directly train on. Programmers often have to take care of unnecessary columns, text data, target columns, correlations, etc. Thankfully, PictoBlox’s ML Environment is packed with features to help us pre-process the data as per our liking.
Let’s create the ML model.
Alert: The Machine Learning Environment for model creation is available in the only desktop version of PictoBlox for Windows, macOS, or Linux. It is not available in Web, Android, and iOS versions.
Follow the steps below:


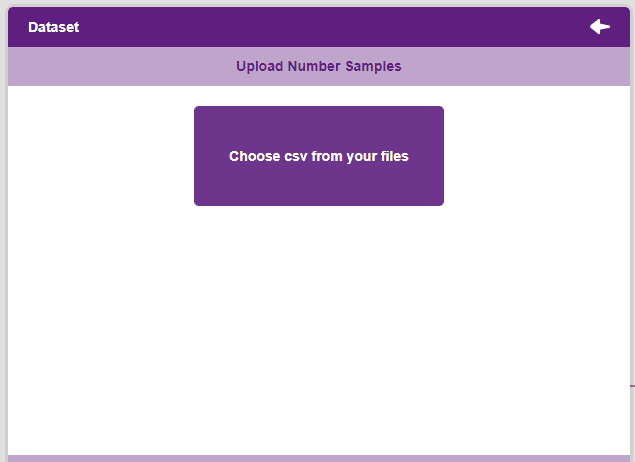
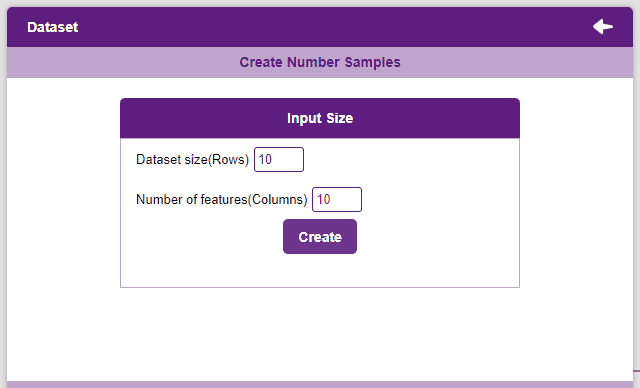
Datasets can either be uploaded or created on the ML Environment. Lets see how it is done.
Notes:
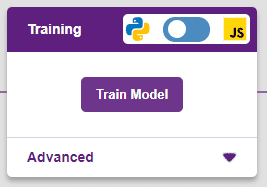
After data is pre-processed and optimized, it’s fit to be used in model training. To train the model, simply click the “Train Model” button found in the “Training” panel.
By training the model, meaningful information is extracted from the numbers, and that in turn updates the weights. Once these weights are saved, the model can be used to make predictions on data previously unseen.
The model’s function is to use the input data and predict the output. The target column must always contain numbers.
However, before training the model, there are a few hyperparameters that need to be understood. Click on the “Advanced” tab to view them.
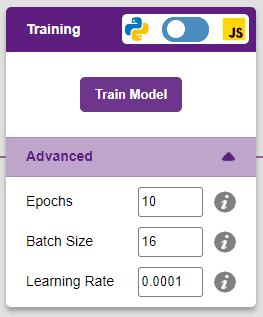
There are three hyperparameters that can be altered in the Numbers(C/R) Extension:
It’s a good idea to train a numeric classification model for a high number of epochs. The model can be trained in both JavaScript and Python. In order to choose between the two, click on the switch on top of the Training panel.
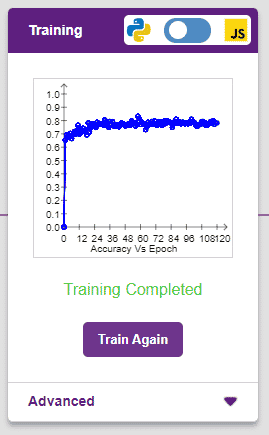
The accuracy of the model should increase over time. The x-axis of the graph shows the epochs, and the y-axis represents the accuracy at the corresponding epoch.
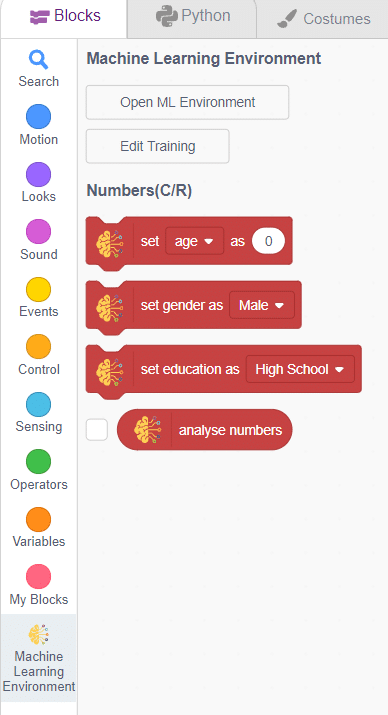
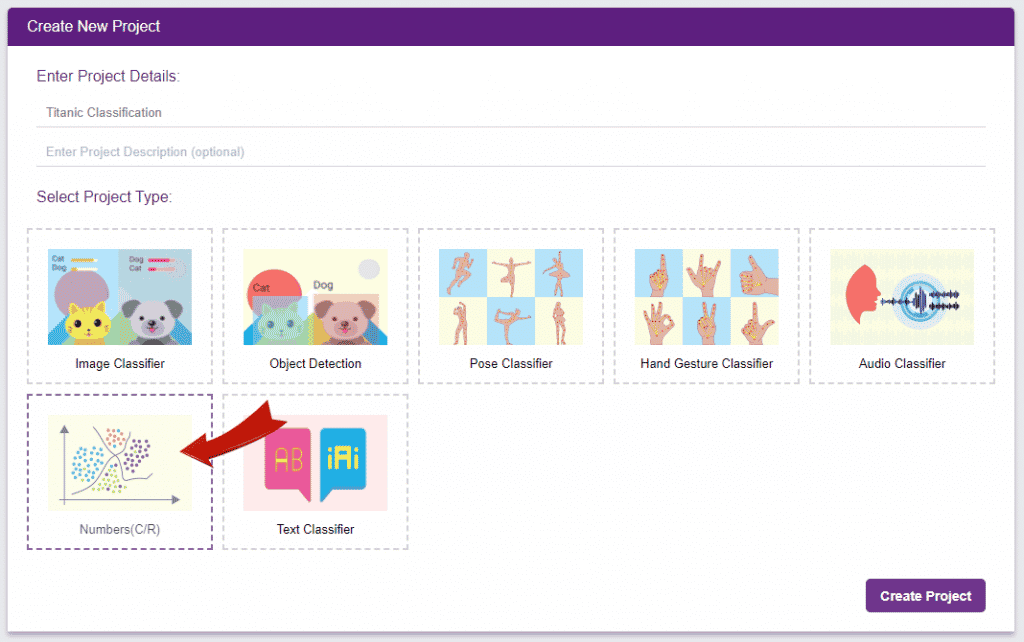
A window will open. Type in a project name of your choice and select the “Numbers(C/R)” extension. Click the “Create Project” button to open the Numbers(C/R) window.
To test the model, simply enter the input values in the “Testing” panel and click on the “Predict” button.
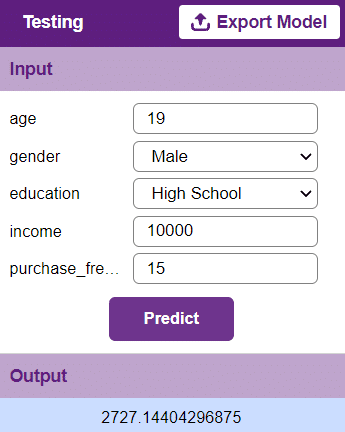
The model will return the probability of the input belonging to the classes.
Click on the “Export Model” button on the top right of the Testing box, and PictoBlox will load your model into the Block Coding Environment if you have opened the ML Environment in the Block Coding.