Quarky Connect

Quarky Connect v3_1
Extension Description
Control multiple Quarky wirelessly.

Introduction

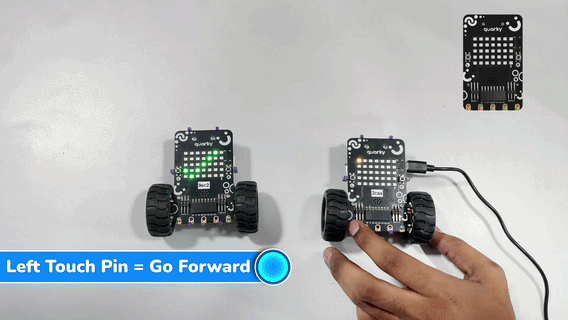
The Quarky Connect extension allows multiple Quarky devices to communicate wirelessly using ESP-NOW. With this extension, one Quarky can control others, send commands, or coordinate actions, all without needing a Wi-Fi router or internet connection.

This feature opens up endless possibilities for creative and interactive projects. Whether it’s controlling a swarm of robots or making them work in sync, Quarky Connect is perfect for classroom activities and fun challenges that involve multiple robots.

Create Exciting Projects with Quarky Connect!

With Quarky Connect, you can create innovative and exciting projects like:

  1. Go Kart: Control multiple Quarky robots in a race to the finish line, where each robot needs to avoid obstacles and follow specific paths.
  2. Pac-Man: Create a multiplayer version of Pac-Man where Quarky robots can act as the ghosts, chasing the main character in a dynamic maze.
  3. Fruit Chase: Program Quarky robots to chase and collect virtual fruits on a grid, with each robot moving based on the commands sent by the master robot.
  4. Rangoli: Use a fleet of Quarky robots to collaborate on creating intricate Rangoli patterns, where each robot fills in a section of the design simultaneously.

Updating Quarky Firmware

Before using the Quarky Connect extension, ensure that your Quarky is updated to the latest firmware version 6.0 If you are using an older Quarky firmware, this feature may not work, as Quarky Connect is supported only in the latest firmware. 

Follow the steps below to upload the latest firmware: 

Step 1: Make sure PictoBlox is installed on your device.

Please make sure to use PictoBlox version 9.1.0 or later for Quarky Connect Extension support. Click Download PictoBlox to visit the download page, select your operating system, and follow the on-screen instructions to install the latest version. Download PictoBlox

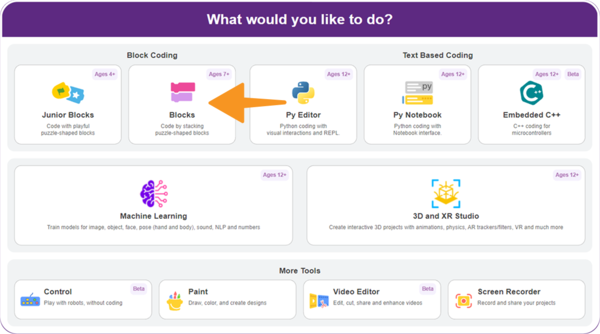
Step 2: Open PictoBlox and select the Block Coding environment.

Select the Block Coding environment

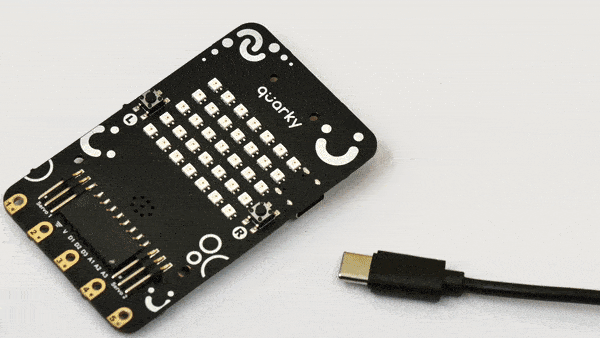
Step 3: Connect your Quarky to your computer using a USB cable.

USB-Attach

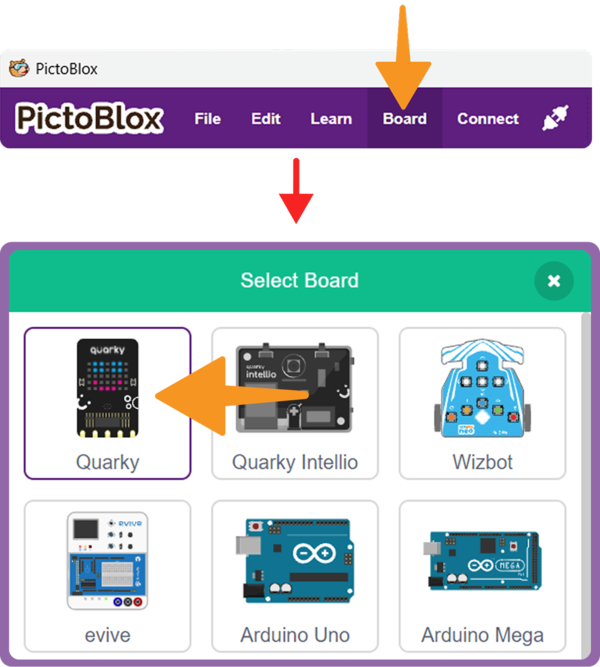
Step 4: Click on the Board button from the toolbar and select Quarky.

Select the Quarky Board

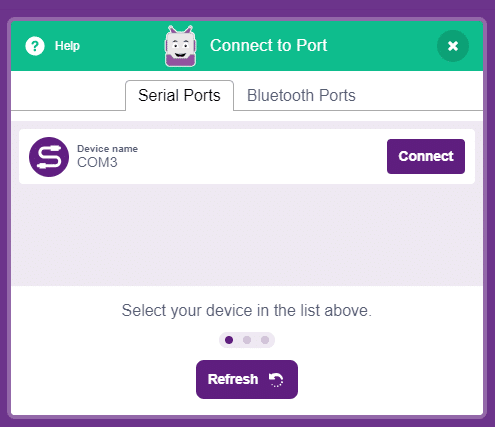
Step 5: Select the appropriate Serial Port and click Connect.

COM Port

Step 6: In the upper right corner of the PictoBlox window, you will see the Upload Firmware button. Click, and a status window will open. 

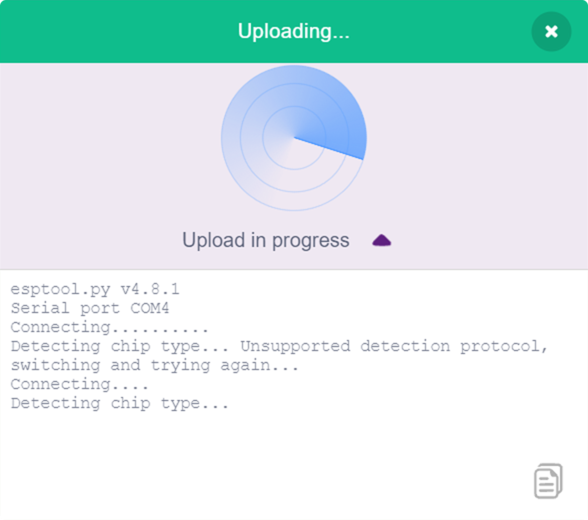
Step 7: Wait for the confirmation message on the screen.

confirmation message on the screen

Accessing Quarky Connect in Block Coding

Follow these steps to use the Quarky Connect extension:

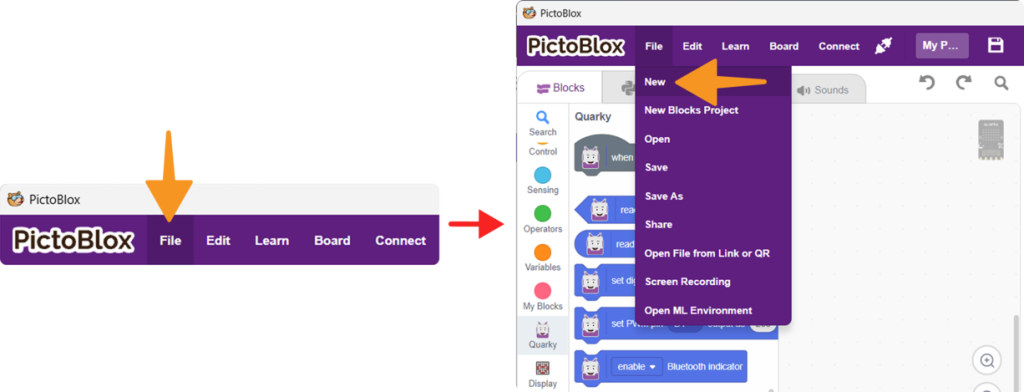
Step 1: Create a new project.

Step 2: Select the Block Coding environment.

Select the Block Coding environment

Step 3: Select the Quarky Board.

Select the Quarky Board

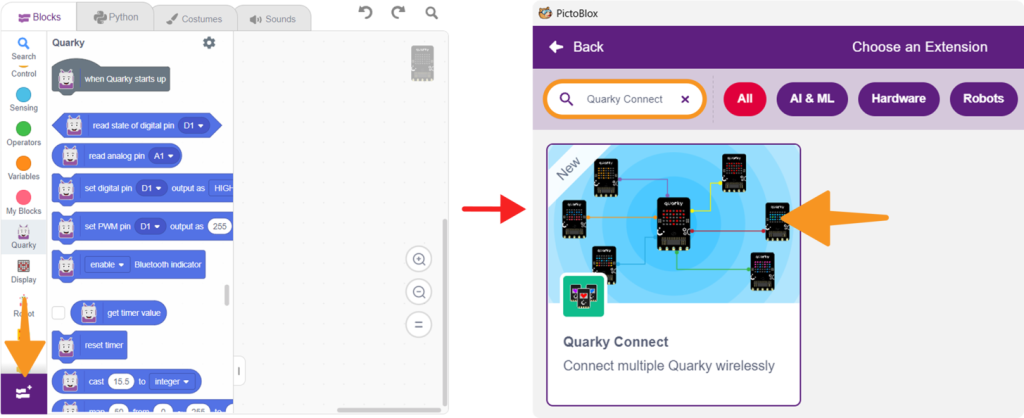
Step 4: Click on Add Extension.

Step 5: Select and add the Quarky Connect extension.

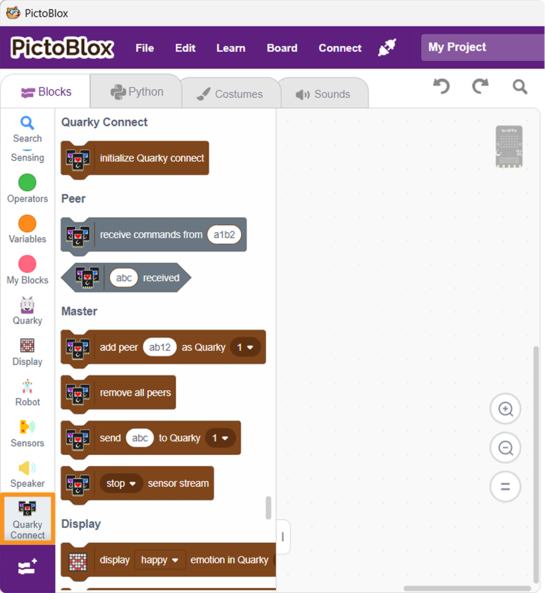
Step 6: You can now access all Quarky Connect blocks.

Master Quarky

  • Acts as the central controller in a Quarky Connect setup.
  • Sends commands to multiple Peer Quarkys to control actions such as movement, display changes, and more.
  • Operates in both Stage Mode and Upload Mode.
  • Communicates wirelessly with Peer Quarkys using the ESP-NOW protocol, without requiring a Wi-Fi router or internet connection.

Peer Quarky

  • Listens for commands from the Master Quarky.
  • Executes the specified actions.
  • Works only in Upload Mode.
  • Requires specific code to be uploaded to enable communication with the Master Quarky.

Stage Mode and Upload Mode

  • Stage Mode enables you to control multiple Quarky devices wirelessly and interactively in real-time. It is ideal for applications like gaming, where you need immediate feedback from your actions.
  • Toggle between modes using the button in the top right corner of PictoBlox.
  • Upload Mode is ideal for making autonomous robots or devices that do not need to stay connected to the computer. After uploading the code, Quarky runs the program autonomously.
  • Upload the code and switch to Upload Mode for projects that need to work offline.

You can refer to the video tutorial How to Connect Multiple Quarky Robots using PictoBlox | Quarky Connect Tutorial for more information.

Read More

PictoBlox Blocks

To initialize Quarky Connect extension
To receive the wireless command from [Master]. Master: Here we have to enter a Quarky ID, written on the top sticker.
Return true if “abc” is received.
Here we have to enter the BLE name of the peer we want to control. We will map this name as Quarky 1 or 2 or 3. In a similar way at a time we can connect up to 16 Quarky with one master.
With the help of this block we can remove all of the connected peers connected to master.
We can send message to given peer Quarky.
Sensor Stream is the collection of sensor values coming from a connected peer. With the help of this block, we can start/stop this stream. By default sensor stream is enabled, when using Expansion or Addon blocks it is recommended to stop the stream.
Display happy emotion in peer Quarky 1.
Display happy animation in peer Quarky 1.
Display rainbow pattern in peer Quarky 1.
Display ‘A’ in peer Quarky 1.
Display matrix in Quarky [No] Example: Display heart pattern in peer Quarky 1.
Clear peer Quarky 1 display.
Move peerquarky 1 in forward direction.
Stop peerquarky 1.
Set servo 1 of peerQuarky 1
Play sound in peerQuarky 1
Set D1 Pin of peerQuarky 1 High
Set PWM value on D1 Pin of peerQuarky 1
Digital Read D1 Pin of peerQuarky 1
Analog Read A1 Pin of peerQuarky 1
is left button pressed on peerQuarky 1
When left button pressed on peerQuarky 1
is left button pressed on peerQuarky 1
read left IR analog values in peerQuarky 1
is T1 is touched on peerQuarky 1
When T1 is touched on peerQuarky 1
set ultrasonic pins on peerQuarky 1
read ultrasonic 1 values on peerQuarky 1
initialise expansion board on peerQuarky 1
All articles loaded
No more articles to load

Block Coding Examples

All articles loaded
No more articles to load

Python Coding Examples

All articles loaded
No more articles to load
Table of Contents