Table of Contents

video()

Function Definition: video(video_state = "on", transparency = 1)

Parameters

NameTypeDescriptionExpected ValuesDefault Value
video_statestringSet the state of the camera feed on the stage to the specified state."on", "off", or "on flipped""on"
transparencyintSet the transparency of the video on the stage.0-1001

Description

This function helps turn the video on/off on the stage with a defined level of transparency.

On, the default option turns the video on, off switches it off, and on flipped turns on the camera feed, but flipped.

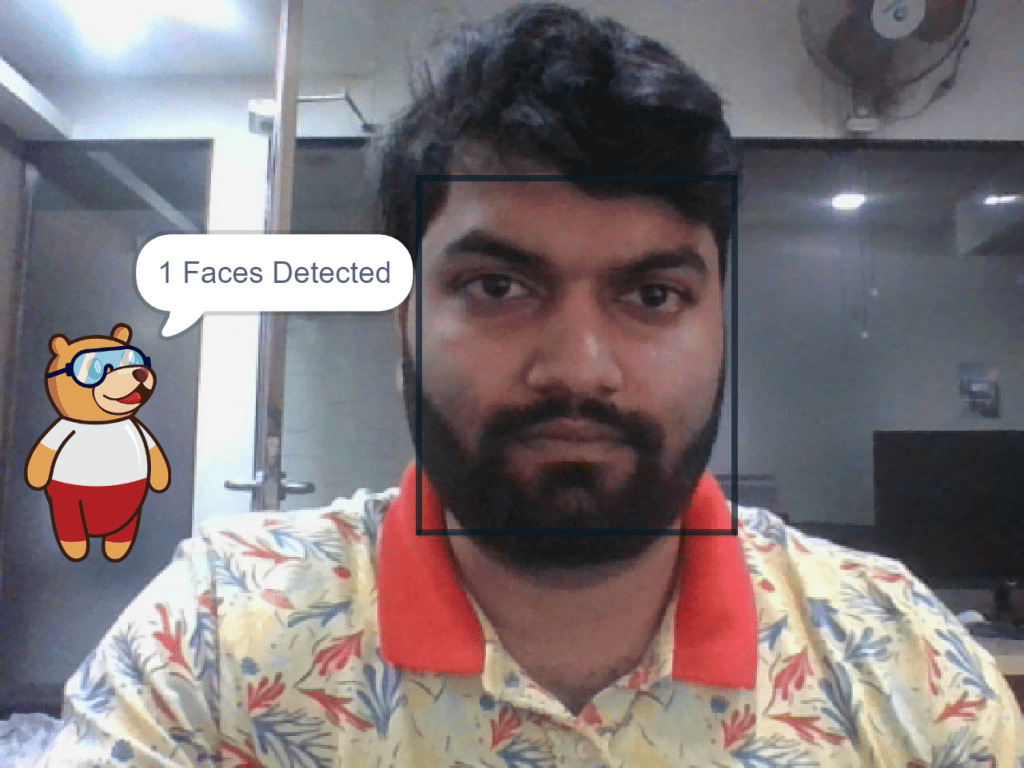
The transparency percentage can be set by entering a numeric value in the white space given:

  1. 0% would mean the video is seen on the stage at full clarity:
  2. 50% would present a partially transparent one:
  3. 100% would be white:

Example

The example demonstrates the application of face detection with a stage feed.

The example demonstrates the application of face detection with a stage feed. Following are the key steps happening:

  1. Initializing the program with parameters for the sprite and face detection library.
  2. Running face detection
  3. Running the loop to show every face and its expression

Code

sprite = Sprite('Square Box')
import time
fd = FaceDetection()

# Disable Bounding Box on the stage
fd.disablebox()

# Set Theshold of the stage
fd.setthreshold(0.4)

fd.analysestage()

print(fd.count())

for i in range(fd.count()):
  sprite.setx(fd.x(i + 1))
  sprite.sety(fd.y(i + 1))
  sprite.setsize(fd.width(i + 1))
  sprite.say("Face " + str(i + 1) + ": " + fd.expression(i + 1))
  time.sleep(1)

Output


Read More
The example demonstrates how to use face detection with a camera feed.

The example demonstrates how to use face detection with a camera feed. Following are the key steps happening:

  1. Initializing the program with parameters for the sprite, and face detection library.
  2. Running face detection.
  3. Running the loop to show every face and expression.

Code

sprite = Sprite('Square Box')
import time
fd = FaceDetection()

fd.video("on", 0)

# Enable Bounding Box on the stage
fd.enablebox()

# Set Theshold of the stage
fd.setthreshold(0.5)

while True:
  fd.analysestage()

  for i in range(fd.count()):
    sprite.setx(fd.x(i + 1))
    sprite.sety(fd.y(i + 1))
    sprite.setsize(fd.width(i + 1))
    sprite.say(fd.expression(i + 1))

Output

Read More
Learn about AI-based face expression detection, a technology that uses artificial intelligence algorithms and computer vision techniques to analyze images or videos of human faces and recognize emotions or expressions.

Introduction

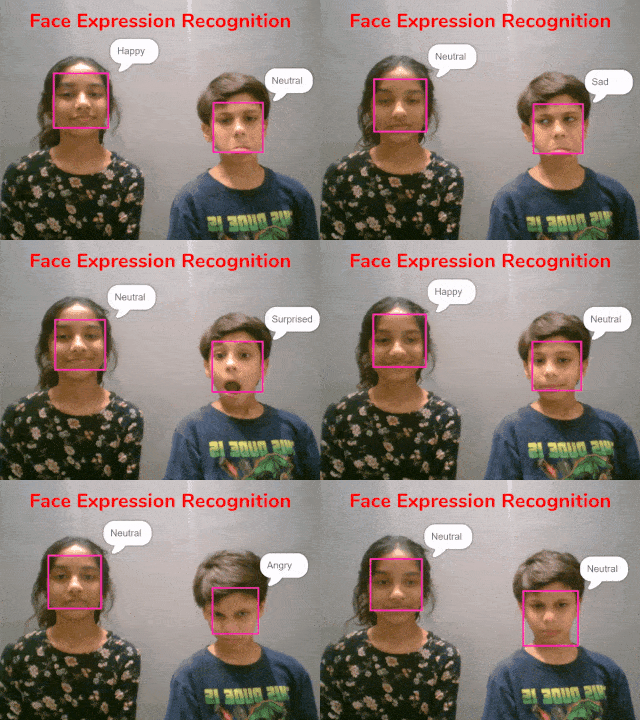
AI-based face expression detection refers to the use of artificial intelligence algorithms and computer vision techniques to analyze images or videos of human faces and recognize the emotions or expressions being displayed. The technology can detect and analyze subtle changes in facial features, such as eye movement, mouth shape, and eyebrow position, to determine whether a person is happy, sad, angry, surprised, or expressing other emotions.

Discover the various fields that utilize this technology, including psychology, marketing, and human-computer interaction. Additionally, read about the logic and code behind face detection with a camera feed, including the initialization of parameters, face detection library, loop execution, and if-else conditions. Explore how the technology continuously analyzes emotions, and how the humanoid responds with different facial expressions and movements.

Code

sprite = Sprite('Tobi')

fd = FaceDetection()

quarky = Quarky()

import time

humanoid = Humanoid(7, 2, 6, 3, 8, 1)

# Turn the video ON with 0% transparency
fd.video("ON", 0)
fd.enablebox()

# Run this script forever
while 1:
  fd.analysecamera()          # Analyse image from camera 
  sprite.say(fd.expression()) # Say the face expressions
  
  if fd.isexpression(1, "happy"): # if face expression is happy
    quarky.showemotion("happy")   # show happy emotion on Quarky
    humanoid.action("dance2", 1000, 1)
    
  if fd.isexpression(1, 'sad'):
    quarky.showemotion("crying")
    humanoid.action("updown", 1000, 1)
    
  if fd.isexpression(1, 'surprise'):
    quarky.showemotion('surprise')
    humanoid.action("moonwalker", 1000, 1)
    
  if fd.isexpression(1, 'angry'):
    quarky.showemotion('angry')    
    humanoid.action("flapping2", 1000, 1)
  else:
    humanoid.home()
    
# Comment the above script, uncomment the below script and 
# run this script to clear the stage and quarky display

fd.disablebox()
fd.video("off")    
quarky.cleardisplay()

Logic

The example demonstrates how to use face detection with a camera feed. Following are the key steps happening:

  1. The code is using face detection to recognize facial expressions and control a humanoid and a display device called Quarky accordingly.
  2. Then, the program turns on the video with 0% transparency and enables the bounding box for face detection.
  3. The code then enters an infinite loop where it continuously analyzes the image from the camera using face detection and says the detected facial expressions.
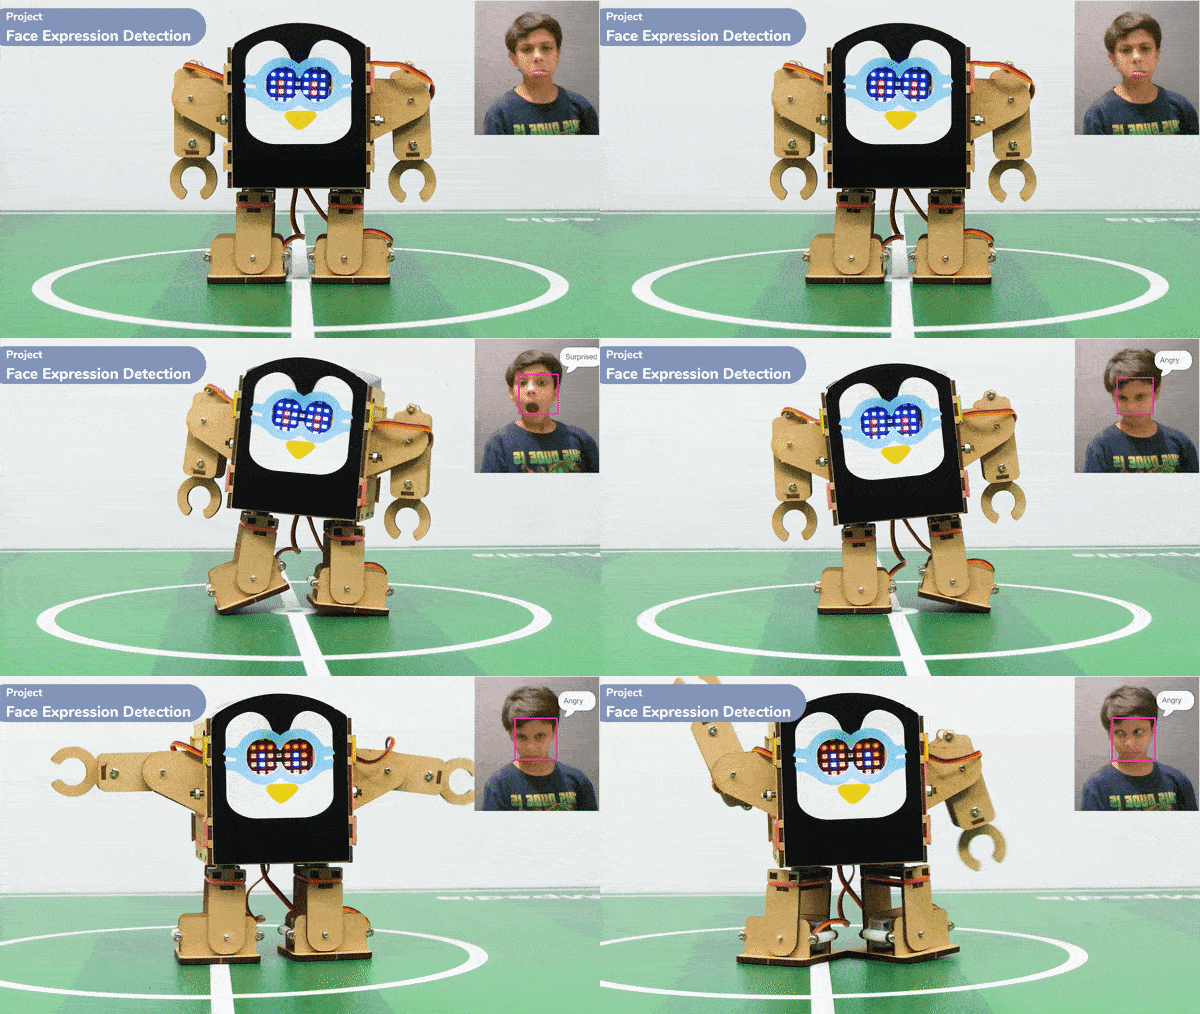
  4. The code then checks if the expression is happy, sad, surprised, or angry using the if statement. If the expression is happy, the Quarky device displays a happy emotion, and the humanoid performs the “dance2” action for specific time. Similarly, for sad, surprised, and angry expressions, Quarky displays the respective emotion, and the humanoid performs the associated action.
  5. If no facial expression is detected, the humanoid is set to its “home” position. Finally, if the program needs to be stopped.

Output
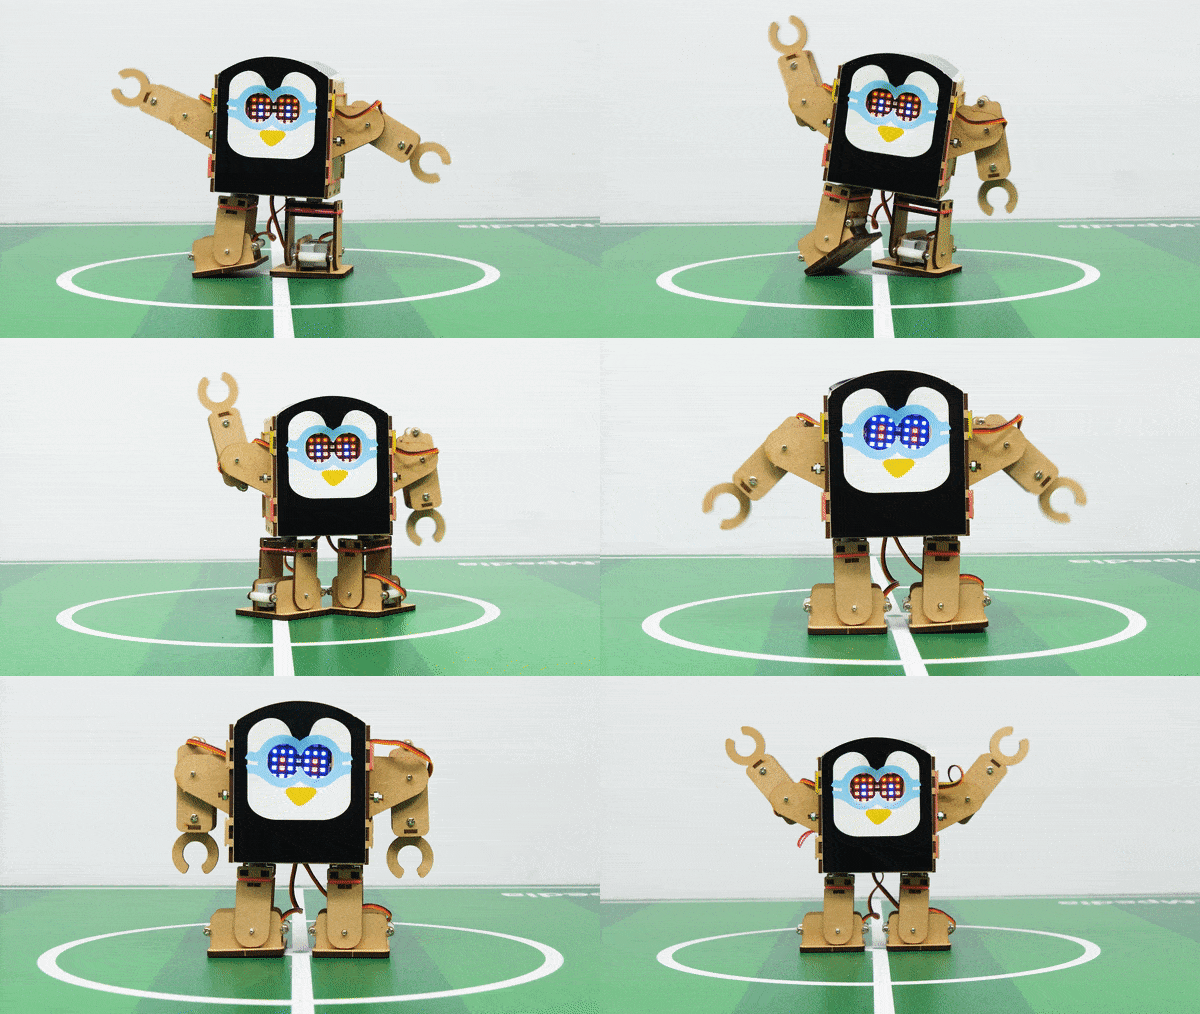
Read More
Learn about AI-based face expression detection, computer vision techniques to analyze images or videos of human faces and recognize emotions or expressions.

Introduction

AI-based face expression detection refers to the use of artificial intelligence algorithms and computer vision techniques to analyze images or videos of human faces and recognize the emotions or expressions being displayed. The technology can detect and analyze subtle changes in facial features, such as eye movement, mouth shape, and eyebrow position, to determine whether a person is happy, sad, angry, surprised, or expressing other emotions.

Discover the various fields that utilize this technology, including psychology, marketing, and human-computer interaction. Additionally, read about the logic and code behind face detection with a camera feed, including the initialization of parameters, face detection library, loop execution, and if-else conditions. Explore how the technology continuously analyzes emotions, and how the Humanoid responds with different facial expressions and movements.

Code

sprite = Sprite('Tobi')
fd = FaceDetection()
quarky = Quarky()
import time

humanoid = Humanoid(7, 2, 6, 3, 8, 1)

# Turn the video ON with 0% transparency
fd.video("ON", 0)
fd.enablebox()

# Run this script forever
while 1:
  fd.analysecamera()          # Analyse image from camera 
  sprite.say(fd.expression()) # Say the face expressions
  
  if fd.isexpression(1, "happy"): # if face expression is happy
    quarky.showemotion("happy")   # show happy emotion on Quarky
    humanoid.action("dance2", 1000, 1)
    
  if fd.isexpression(1, 'sad'):
    quarky.showemotion("crying")
    humanoid.action("updown", 1000, 1)
    
  if fd.isexpression(1, 'surprise'):
    quarky.showemotion('surprise')
    humanoid.action("moonwalker", 1000, 1)
    
  if fd.isexpression(1, 'angry'):
    quarky.showemotion('angry')    
    humanoid.action("flapping2", 1000, 1)
  else:
    humanoid.home()
    
# Comment the above script, uncomment the below script and 
# run this script to clear the stage and quarky display

fd.disablebox()
fd.video("off")    
quarky.cleardisplay()

Logic

The example demonstrates how to use face detection with a camera feed. Following are the key steps happening:

  1. Creates a sprite object named ‘Tobi’. A sprite is typically a graphical element that can be animated or displayed on a screen.also creates a Quarky object.
  2. Creates a face detection object named ‘fd’. This object is responsible for detecting faces in images or video using fd = FaceDetection()
  3. Imports the ‘time’ module, which provides functions to work with time-related operations using import time.
  4.  Creates a humanoid object with specific pins assigned to control various actions of the humanoid robot.
  5.  Turns on the video display with 0% transparency for the face detection module using fd.video(“ON”, 0).
  6.  Enables the face detection module to draw boxes around detected faces using fd.enablebox().
  7. The code enters an infinite loop using while 1, which means it will keep running indefinitely until interrupted.
  8. Analyzes the image from the camera for face detection using fd.analysecamera().
  9. The sprite says the detected face expressions obtained from the face detection module using sprite.say(fd.ex * pression()).
  10. The code checks for different face expressions using if statements and performs corresponding actions.
  11. For example, if the face expression is determined to be “happy“, the Quarky device shows a “happy” emotion, and the humanoid performs a dance action.
  12. Similarly, other face expressions like “sad”, “surprised”, and “angry” trigger specific emotional displays on Quarky and corresponding actions on the humanoid.
  13. If none of the predefined face expressions match, the humanoid goes back to its default or “home” position.

Output

Read More
Learn how to use face detection to control humanoid robot movements for interactive and responsive robotics applications. Get started now!

Introduction

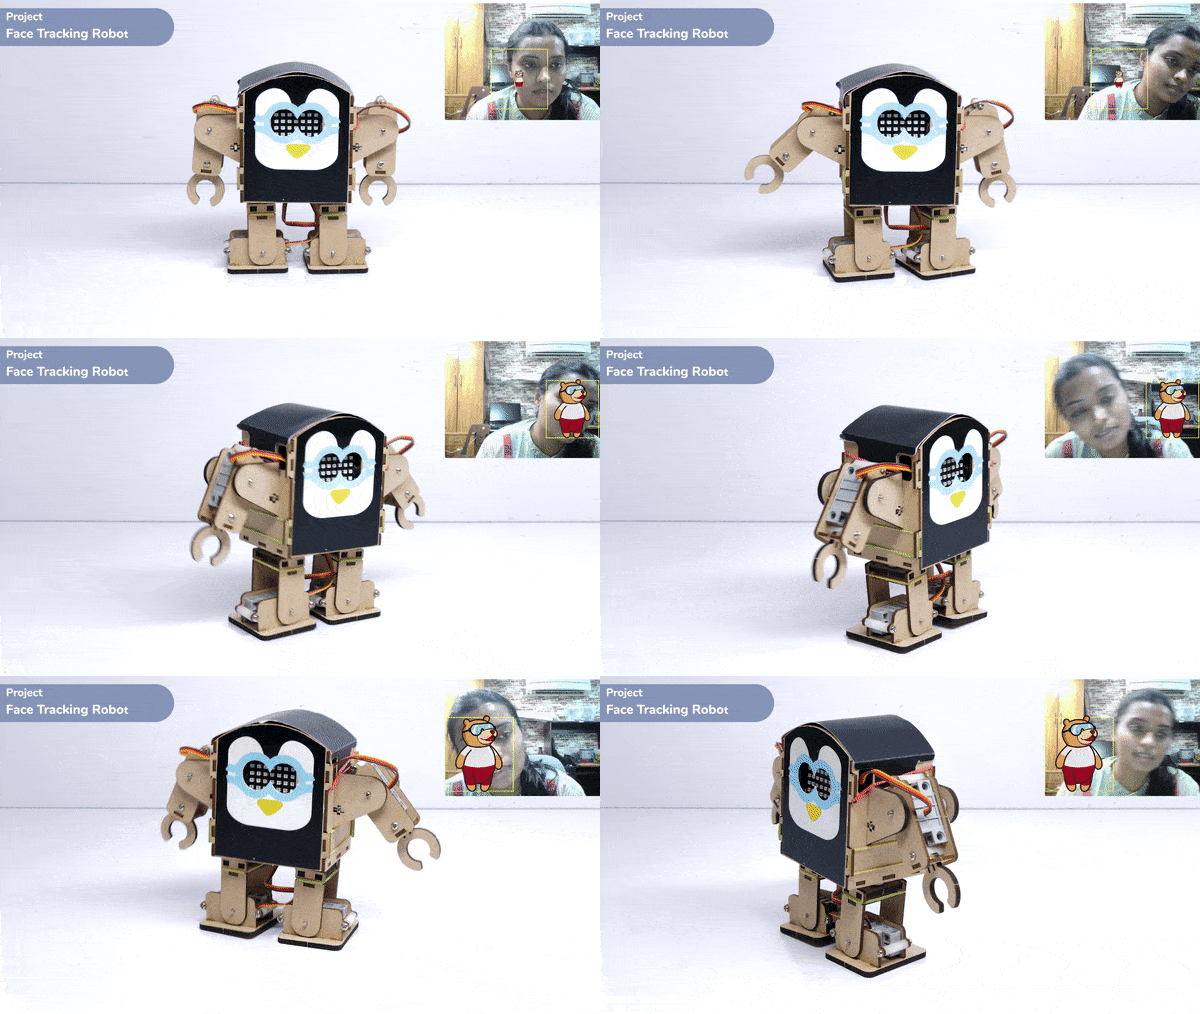
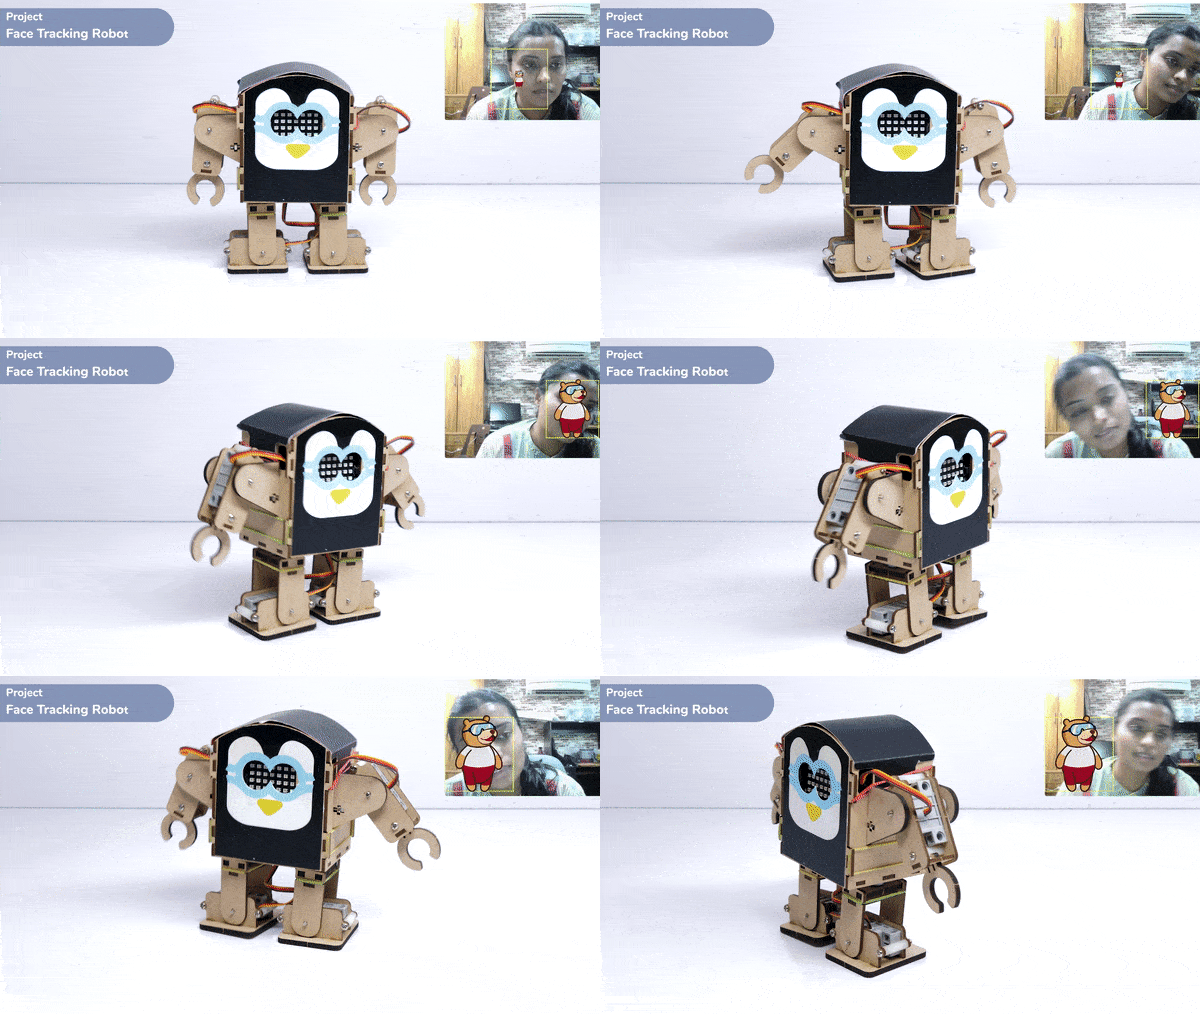
One of the most fascinating activities is face tracking, in which the Quarky can detect a face and move its head in the same direction as yours. How intriguing it sounds, so let’s get started with the coding for a face-tracking robot.

Logic

  1. If the face is tracked at the center of the stage, the humanoid should be straight.
  2. As the face moves to the left side, the humanoid will also move to the left side.
  3. As the face moves to the right side, the humanoid will also move to the right side.

Code

sprite = Sprite('Tobi')
quarky=Quarky()
import time
import math
humanoid = Humanoid(7,2,6,3,8,1)

fd = FaceDetection()
fd.video("on", 0)
fd.enablebox()
fd.setthreshold(0.5)
time.sleep(1)
Angle=0
while True:
  fd.analysestage()
  for i in range(fd.count()):
    sprite.setx(fd.x(i + 1))
    sprite.sety(fd.y(i + 1))
    sprite.setsize(fd.width(i + 1))
    Angle=fd.width(i + 1)
    angle=int(float(Angle))
    if angle>90:
      humanoid.move("left",1000,3)
    elif angle<90:
      humanoid.move("right",1000,3)
      time.sleep(1)
    else:
      humanoid.home()

Code Explanation

  1. First, we import libraries and create objects for the robot.
  2. Next, we set up the camera and enable face detection with a 0.5 threshold.
  3. We use a loop to continuously analyze the camera feed for faces and control the humanoid’s movement based on this information.
  4. When a face is detected, the humanoid sprite moves to the face’s location, and the angle of the face is used to determine the direction of movement.
  5. If the angle is greater than 90 degrees, the humanoid moves to the left.if angle is less than 90 degrees, the humanoid moves to the right.if angle is  exactly 90 degrees, the humanoid returns to its original position.
  6. This code demonstrates how to use face detection to control the movement of a humanoid robot and how to incorporate external inputs into a program to create more interactive and responsive robotics applications.

Output

Read More
All articles loaded
No more articles to load