



Introduction
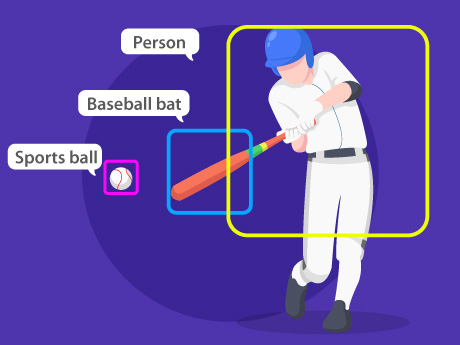
Object detection is a computer vision technology that enables AI to identify and locate multiple objects within an image or video stream. In this project, PictoBlox uses the webcam to analyse the environment and detect different objects. For every detected object, a clone of the sprite is created and positioned accordingly, making it easy to visualise and identify objects in real time.
Setting Up the Stage / Sprite
- Open PictoBlox and create a new project.
- Delete the default Tobi sprite if desired, and add any sprite you would like to use for displaying detected objects.
- Click on Choose an Extension and add the Object Detection extension.
- Ensure your computer’s webcam is enabled.
- Hide the original sprite since only its clones will be used to represent detected objects.
Step-by-Step Block Coding Guide
Step 1: Initialise the Camera and Start Detection
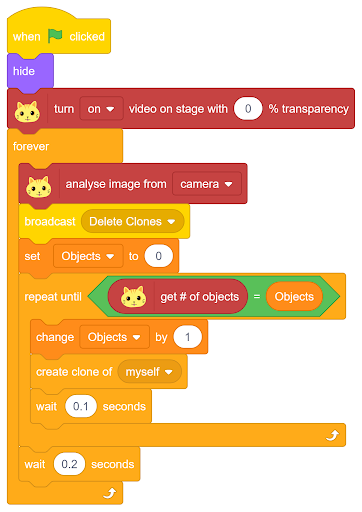
- Add the When Green Flag Clicked block to begin the program.
- Hide the original sprite using the Hide block.
- Turn on the webcam using the Turn Video On block with 0% transparency.
- Place the entire detection process inside a Forever loop so that objects are continuously detected.
Step 2: Analyse the Camera Feed and Create Clones
- Use the Analyse Image from Camera block to process the live webcam feed.
- Broadcast a Delete Clones message to remove previously created clones before detecting new objects.
- Initialise an object’s variable to zero.
- Repeat until the total number of detected objects matches the value of the Objects variable.
- Increment the Objects variable by one.
- Create a clone of the sprite for every detected object.
- Add a short delay to ensure smooth detection and cloning.
Step 3: Delete Previous Clones
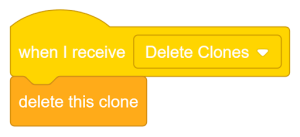
- Create a separate script using the When I Receive Delete Clones event.
- Use the Delete This Clone block so that all previously created clones are removed before new detections are displayed.
- This prevents duplicate or outdated object markers from remaining on the stage.
Step 4: Configure Each Clone
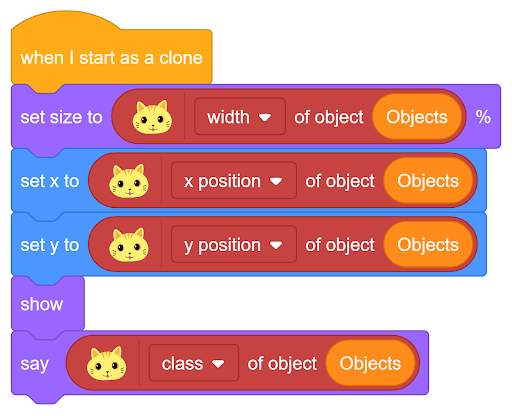
- Use the When I Start as a Clone block.
- Set the clone’s size based on the detected object’s width.
- Position the clone using the detected object’s X coordinate.
- Position the clone using the detected object’s Y coordinate.
- Show the clone on the stage.
- Display the detected object’s class name using the Say block.
As a result, every detected object appears with its own correctly positioned and sized sprite that identifies what the AI has recognised.
Conclusion
The AI Object Detection System demonstrates how computer vision can be used to recognise and track multiple objects in real time using PictoBlox. By combining live camera analysis with sprite cloning, the project provides an interactive visualisation of detected objects and their positions. It is an excellent introduction to artificial intelligence, image processing, and computer vision concepts, while showcasing how AI can interpret and interact with the real world.