Table of Contents

Function Definition: cleardisplay()

Parameters

Description

The function turns off all the LEDs of the Quarky.

Example

The example demonstrates how to calibrate the IR sensors to detect black lines on the white surface in Python Coding Environment.

Logic

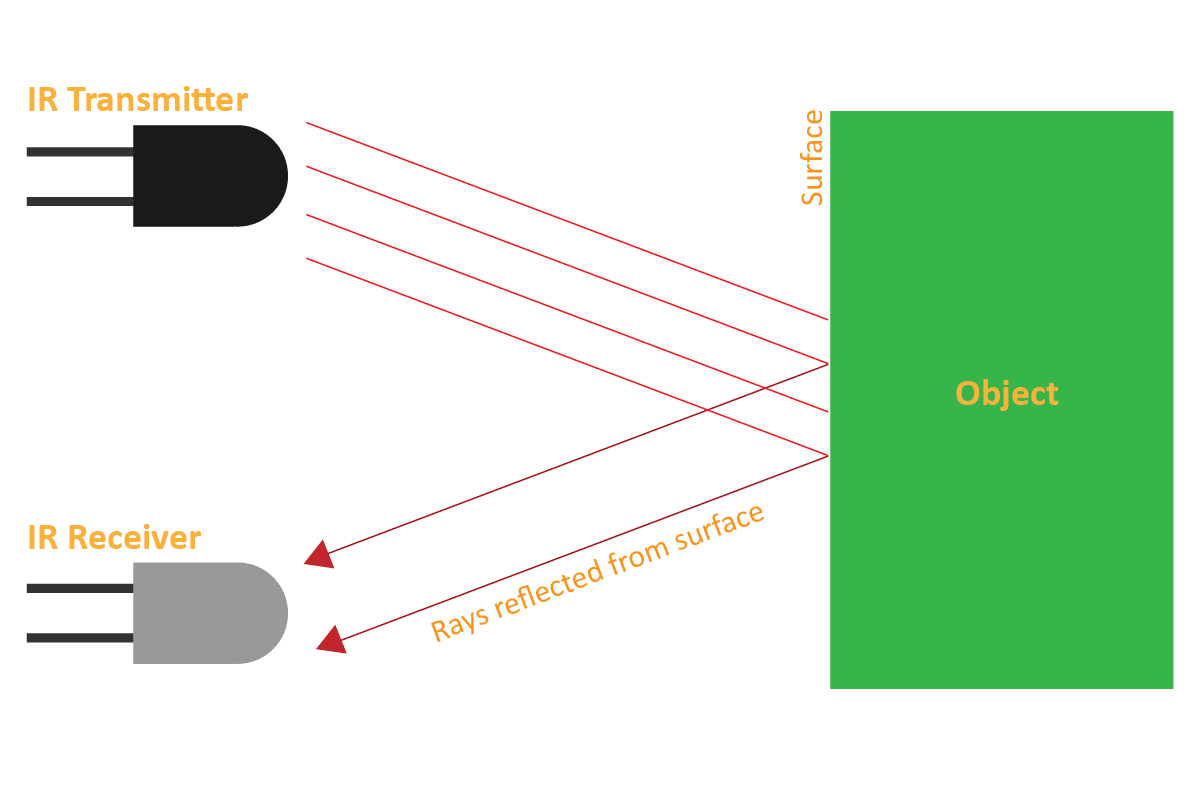
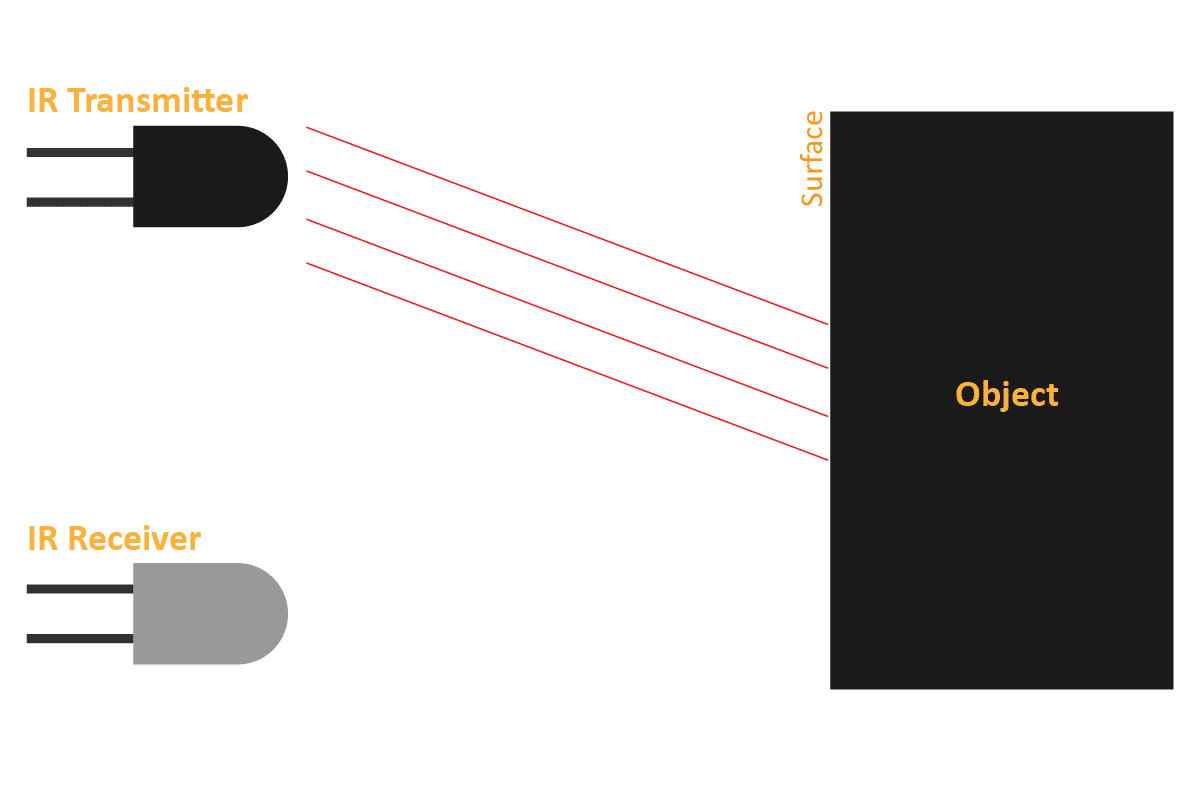
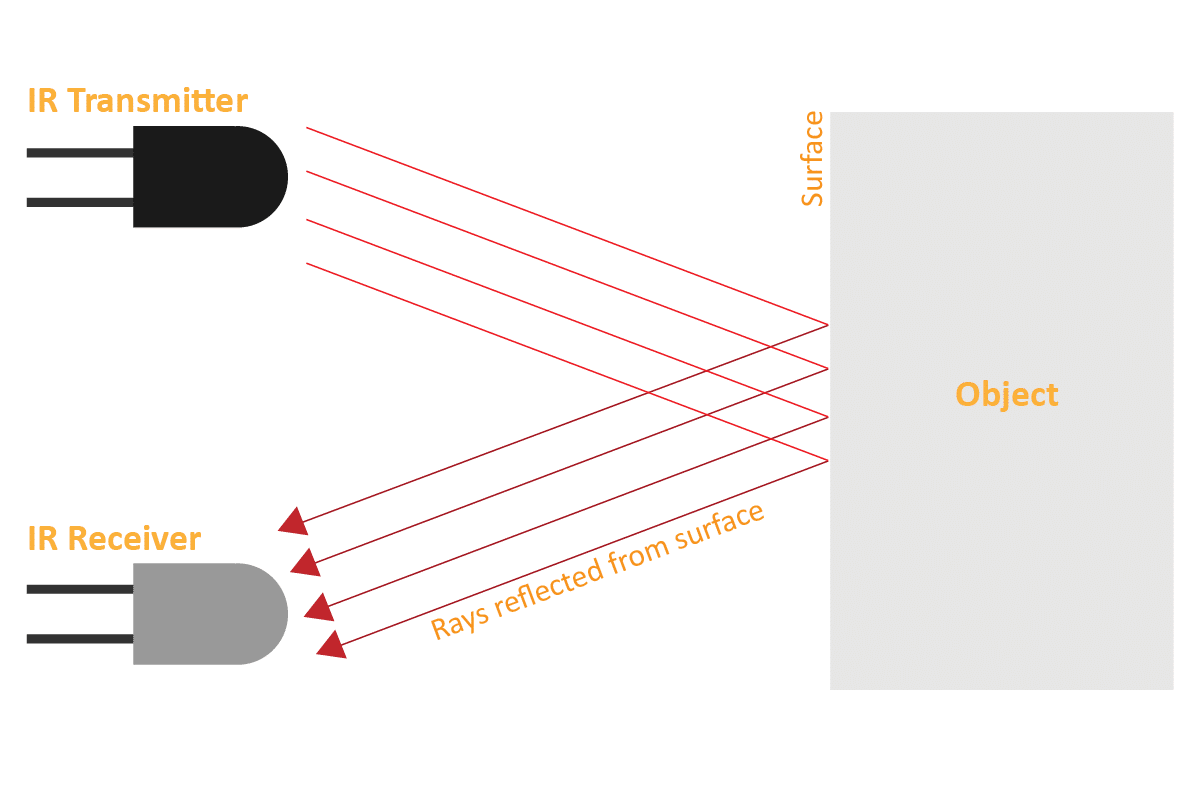
An IR sensor consists of 2 LEDs: one which transmits the IR light and one which receives the IR light. When the IR rays are transmitted, they bounce from the nearest surface and get back to the receiver LED. That’s how an IR sensor detects an object.

But to detect colors, we depend on the number of rays the surface reflects:

  1. The dark surface will absorb more IR rays and as a result, the receiver will get fewer IR rays.
  2. White or shiny objects will absorb fewer IR rays and as a result, the receiver will get more IR rays.

We can get the sensor values in PictoBlox and based on that value we can estimate whether the surface is black or white.

  1. If the sensor detects the black line, its output value is increased. This means that the sensor is active.
  2. If it detects the white area, its output value decreases. This means that the sensor is inactive.

We will call the threshold value above which the sensor detects the black line. If the sensor value is less than the threshold, it means that the sensor hasn’t detected the line yet.

Alert: IR sensors DON’T work in sunlight. IR rays from the sun increase the overall threshold of the sensors therefore they stay active all time. A closed environment or nighttime is the place/time to work with your line following robot.

Code

sprite = Sprite('Tobi')

quarky = Quarky()

quarky.cleardisplay()
quarky.setirthreshold("IRL", 3000)
quarky.setirthreshold("IRR", 3000)

while True:
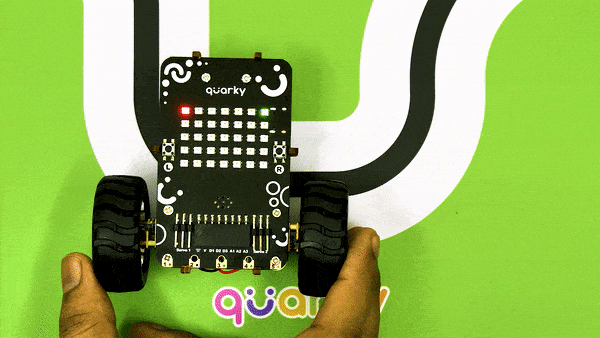
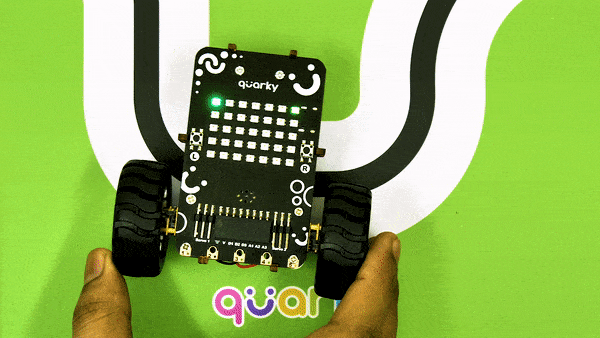
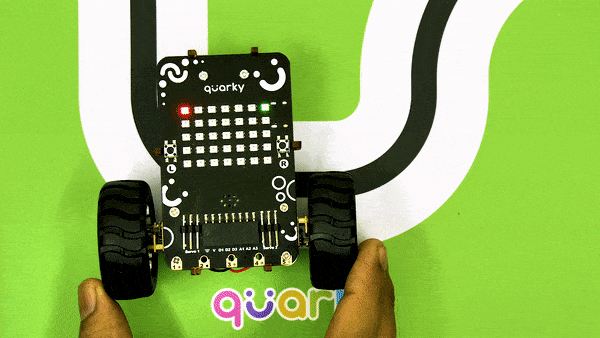
  if quarky.getirstate("IRL"):
    quarky.setled(1, 1, [0, 255, 0], 20)
  else:
    quarky.setled(1, 1, [255, 0, 0], 20)
  
  if quarky.getirstate("IRR"):
    quarky.setled(7, 1, [0, 255, 0], 20)
  else:
    quarky.setled(7, 1, [255, 0, 0], 20)


Calibrating the IR Sensors

Now, run the code by clicking the green flag and bringing the black line of the track close to the IR sensor. One of the following three conditions will happen:

  1. Your calibration value is HIGH: The black region will not be detected in this case. Reduce the calibration value.
  2. Your calibration value is LOW: The white region will not be detected in this case. Therefore, increase the calibration value.
  3. Your calibration value is OK. The white and black regions are detected accurately.

Now modify the script to add the detection value for the right IR sensor.

Output

Read More
The example demonstrates how to create a random colored LED pattern on Quarky in the Python Coding Environment.

Code

sprite = Sprite('Tobi')
quarky = Quarky()
import random

quarky.cleardisplay()

for x in range(1, 8):
  red = random.randrange(0, 255)
  green = random.randrange(0, 255)
  blue = random.randrange(0, 255)
  
  quarky.setled(x, 1, [red, green, blue], 100)

Output

Read More
The example demonstrates how to control the glowing LED using the keyboard keys in the Python Coding Environment.

Code

sprite = Sprite('Tobi')
quarky = Quarky()
import time

curr_x = 4
curr_y = 3
brightness = 50

quarky.cleardisplay()
quarky.setled(curr_x, curr_y, (0, 255, 0), brightness)

while True:
  
  if sprite.iskeypressed("up arrow"):
    curr_y = curr_y - 1
    quarky.setled(curr_x, curr_y + 1, (0, 0, 0), brightness)
    time.sleep(0.2)
    quarky.setled(curr_x, curr_y, (0, 255, 0), brightness)

  if sprite.iskeypressed("down arrow"):
    curr_y = curr_y + 1
    quarky.setled(curr_x, curr_y - 1, (0, 0, 0), brightness)
    time.sleep(0.2)
    quarky.setled(curr_x, curr_y, (0, 255, 0), brightness)
    
  if sprite.iskeypressed("left arrow"):
    curr_x = curr_x - 1
    quarky.setled(curr_x + 1, curr_y, (0, 0, 0), brightness)
    time.sleep(0.2)
    quarky.setled(curr_x, curr_y, (0, 255, 0), brightness)
    
  if sprite.iskeypressed("right arrow"):
    curr_x = curr_x + 1
    quarky.setled(curr_x - 1, curr_y, (0, 0, 0), brightness)
    time.sleep(0.2)
    quarky.setled(curr_x, curr_y, (0, 255, 0), brightness)
  
  time.sleep(0.2)
Read More
The example demonstrates how to control the individual LEDs of the Quarky and run patterns using the loops in Python Coding Environment.

Code

sprite = Sprite('Tobi')
quarky = Quarky()

quarky.cleardisplay()
Y = 1
for i in range(0, 5):
  X = 1
  for i in range(0, Y):
    quarky.setled(X, Y, [101, 255, 0], 100)
    X += 1
  Y += 1

Output

Read More
Learn about AI-based face expression detection, a technology that uses artificial intelligence algorithms and computer vision techniques to analyze images or videos of human faces and recognize emotions or expressions.

Introduction

AI-based face expression detection refers to the use of artificial intelligence algorithms and computer vision techniques to analyze images or videos of human faces and recognize the emotions or expressions being displayed. The technology can detect and analyze subtle changes in facial features, such as eye movement, mouth shape, and eyebrow position, to determine whether a person is happy, sad, angry, surprised, or expressing other emotions.

Discover the various fields that utilize this technology, including psychology, marketing, and human-computer interaction. Additionally, read about the logic and code behind face detection with a camera feed, including the initialization of parameters, face detection library, loop execution, and if-else conditions. Explore how the technology continuously analyzes emotions, and how the humanoid responds with different facial expressions and movements.

Code

sprite = Sprite('Tobi')

fd = FaceDetection()

quarky = Quarky()

import time

humanoid = Humanoid(7, 2, 6, 3, 8, 1)

# Turn the video ON with 0% transparency
fd.video("ON", 0)
fd.enablebox()

# Run this script forever
while 1:
  fd.analysecamera()          # Analyse image from camera 
  sprite.say(fd.expression()) # Say the face expressions
  
  if fd.isexpression(1, "happy"): # if face expression is happy
    quarky.showemotion("happy")   # show happy emotion on Quarky
    humanoid.action("dance2", 1000, 1)
    
  if fd.isexpression(1, 'sad'):
    quarky.showemotion("crying")
    humanoid.action("updown", 1000, 1)
    
  if fd.isexpression(1, 'surprise'):
    quarky.showemotion('surprise')
    humanoid.action("moonwalker", 1000, 1)
    
  if fd.isexpression(1, 'angry'):
    quarky.showemotion('angry')    
    humanoid.action("flapping2", 1000, 1)
  else:
    humanoid.home()
    
# Comment the above script, uncomment the below script and 
# run this script to clear the stage and quarky display

fd.disablebox()
fd.video("off")    
quarky.cleardisplay()

Logic

The example demonstrates how to use face detection with a camera feed. Following are the key steps happening:

  1. The code is using face detection to recognize facial expressions and control a humanoid and a display device called Quarky accordingly.
  2. Then, the program turns on the video with 0% transparency and enables the bounding box for face detection.
  3. The code then enters an infinite loop where it continuously analyzes the image from the camera using face detection and says the detected facial expressions.
  4. The code then checks if the expression is happy, sad, surprised, or angry using the if statement. If the expression is happy, the Quarky device displays a happy emotion, and the humanoid performs the “dance2” action for specific time. Similarly, for sad, surprised, and angry expressions, Quarky displays the respective emotion, and the humanoid performs the associated action.
  5. If no facial expression is detected, the humanoid is set to its “home” position. Finally, if the program needs to be stopped.

Output

Read More
Learn to move your Quarky Mecanum Wheel Robot in a square and make an axe figure with PictoBlox's Python Interface. Use the arrow keys to activate the custom movements!

In this activity, we will create a custom activity where you will be able to move the Mecanum robot in a square effortlessly along with making an Axe type figure.

The Quarky Mecanum Wheel Robot is a type of robot that uses a special type of wheel to move. The wheel is made of four rollers mounted at 45- degree angles to the wheel’s hub. Each roller has its own motor and can spin in either direction. This allows the wheel to move in any direction, making it an ideal choice for navigating around obstacles.

Coding Steps

Follow the steps:

  1. Open a new project in PictoBlox and select Python Coding Environment.
  2. Connect Quarky to PictoBlox.
  3. Click on the Add Extension button and add the Quarky Mecanum extension.
  4. Now we will first initialize the Mecanum robots and the servos before starting the main code.
  5. Here there are two parts specifically : To make a Square and To make an Axe

To make a Square (Logic):

The main steps would include to display the lights in arrow forms before implementing the specific move. The moves would be implemented in the following order:

Forward -> Lateral Right -> Backward -> Lateral Left.

Code for Square Motion:

def Square():
    quarky.drawpattern("jjjgjjjjjgggjjjgggggjjjjgjjjjjjgjjj")
    meca.runtimedrobot("forward",Speed,1)
    quarky.drawpattern("jjjjfjjjjjjffjfffffffjjjjffjjjjjfjj")
    meca.runtimedrobot("lateral right",Speed,1)
    quarky.drawpattern("jjjcjjjjjjcjjjjcccccjjjcccjjjjjcjjj")
    meca.runtimedrobot("backward",Speed,1)
    quarky.drawpattern("jjgjjjjjggjjjjgggggggjggjjjjjjgjjjj")
    meca.runtimedrobot("lateral left",Speed,1)
    quarky.drawpattern("ccccccccccccccccccccccccccccccccccc")
    time.sleep(1)
    quarky.cleardisplay()

To make an Axe (Logic):

The main steps would include to display the lights in arrow forms before implementing the specific move. The moves would be implemented in the following order:

Forward ( 2 steps ) -> Lateral Left ( 1 step ) -> Backward Right ( 1 step ) -> Backward ( 1 step )

We will display the arrows with the help of Quarky LED’s and implement the code.

Code for Axe Motion:

def Axe():
    quarky.drawpattern("jjjcjjjjjcccjjjcccccjjjjcjjjjjjcjjj")
    meca.runtimedrobot("forward",Speed,2)
    quarky.drawpattern("jjgjjjjjggjjjjgggggggjggjjjjjjgjjjj")
    meca.runtimedrobot("lateral left",Speed,1)
    quarky.drawpattern("jjhjjjjjjjhjjjjjjjhjhjjjjjhhjjjhhhh")
    meca.runtimedrobot("backward right",Speed,1)
    quarky.drawpattern("jjjdjjjjjjdjjjjdddddjjjdddjjjjjdjjj")
    meca.runtimedrobot("backward",Speed,1)
    quarky.drawpattern("ccccccccccccccccccccccccccccccccccc")
    time.sleep(1)
    quarky.cleardisplay()

Main Code

Now we will keep a specific condition on when to activate the Square Motion and when to activate the Axe Motion.

We will use the if-else conditions where on pressing the “up” arrow key, we will initiate the Square Motion and on pressing the “down” arrow key, we will initiate the Axe Motion with the help of Mecanum Robot.

sprite = Sprite('Tobi')
quarky=Quarky()
import time

def Square():
    quarky.drawpattern("jjjgjjjjjgggjjjgggggjjjjgjjjjjjgjjj")
    meca.runtimedrobot("forward",Speed,1)
    quarky.drawpattern("jjjjfjjjjjjffjfffffffjjjjffjjjjjfjj")
    meca.runtimedrobot("lateral right",Speed,1)
    quarky.drawpattern("jjjcjjjjjjcjjjjcccccjjjcccjjjjjcjjj")
    meca.runtimedrobot("backward",Speed,1)
    quarky.drawpattern("jjgjjjjjggjjjjgggggggjggjjjjjjgjjjj")
    meca.runtimedrobot("lateral left",Speed,1)
    quarky.drawpattern("ccccccccccccccccccccccccccccccccccc")
    time.sleep(1)
    quarky.cleardisplay()

def Axe():
    quarky.drawpattern("jjjcjjjjjcccjjjcccccjjjjcjjjjjjcjjj")
    meca.runtimedrobot("forward",Speed,2)
    quarky.drawpattern("jjgjjjjjggjjjjgggggggjggjjjjjjgjjjj")
    meca.runtimedrobot("lateral left",Speed,1)
    quarky.drawpattern("jjhjjjjjjjhjjjjjjjhjhjjjjjhhjjjhhhh")
    meca.runtimedrobot("backward right",Speed,1)
    quarky.drawpattern("jjjdjjjjjjdjjjjdddddjjjdddjjjjjdjjj")
    meca.runtimedrobot("backward",Speed,1)
    quarky.drawpattern("ccccccccccccccccccccccccccccccccccc")
    time.sleep(1)
    quarky.cleardisplay()


meca=Mecanum(1,2,7,8)


Speed = 100
quarky.drawpattern("jjjjjjjjjjjjjjjjjjjjjjjjjjjjjjjjjjj")
while True:
  if sprite.iskeypressed("up arrow"):
    Square()
  else:
    if sprite.iskeypressed("down arrow"):
      Axe()

Final Output

Square Motion:

Axe Motion:

Read More
Learn about AI-based face expression detection, computer vision techniques to analyze images or videos of human faces and recognize emotions or expressions.

Introduction

AI-based face expression detection refers to the use of artificial intelligence algorithms and computer vision techniques to analyze images or videos of human faces and recognize the emotions or expressions being displayed. The technology can detect and analyze subtle changes in facial features, such as eye movement, mouth shape, and eyebrow position, to determine whether a person is happy, sad, angry, surprised, or expressing other emotions.

Discover the various fields that utilize this technology, including psychology, marketing, and human-computer interaction. Additionally, read about the logic and code behind face detection with a camera feed, including the initialization of parameters, face detection library, loop execution, and if-else conditions. Explore how the technology continuously analyzes emotions, and how the Humanoid responds with different facial expressions and movements.

Code

sprite = Sprite('Tobi')
fd = FaceDetection()
quarky = Quarky()
import time

humanoid = Humanoid(7, 2, 6, 3, 8, 1)

# Turn the video ON with 0% transparency
fd.video("ON", 0)
fd.enablebox()

# Run this script forever
while 1:
  fd.analysecamera()          # Analyse image from camera 
  sprite.say(fd.expression()) # Say the face expressions
  
  if fd.isexpression(1, "happy"): # if face expression is happy
    quarky.showemotion("happy")   # show happy emotion on Quarky
    humanoid.action("dance2", 1000, 1)
    
  if fd.isexpression(1, 'sad'):
    quarky.showemotion("crying")
    humanoid.action("updown", 1000, 1)
    
  if fd.isexpression(1, 'surprise'):
    quarky.showemotion('surprise')
    humanoid.action("moonwalker", 1000, 1)
    
  if fd.isexpression(1, 'angry'):
    quarky.showemotion('angry')    
    humanoid.action("flapping2", 1000, 1)
  else:
    humanoid.home()
    
# Comment the above script, uncomment the below script and 
# run this script to clear the stage and quarky display

fd.disablebox()
fd.video("off")    
quarky.cleardisplay()

Logic

The example demonstrates how to use face detection with a camera feed. Following are the key steps happening:

  1. Creates a sprite object named ‘Tobi’. A sprite is typically a graphical element that can be animated or displayed on a screen.also creates a Quarky object.
  2. Creates a face detection object named ‘fd’. This object is responsible for detecting faces in images or video using fd = FaceDetection()
  3. Imports the ‘time’ module, which provides functions to work with time-related operations using import time.
  4.  Creates a humanoid object with specific pins assigned to control various actions of the humanoid robot.
  5.  Turns on the video display with 0% transparency for the face detection module using fd.video(“ON”, 0).
  6.  Enables the face detection module to draw boxes around detected faces using fd.enablebox().
  7. The code enters an infinite loop using while 1, which means it will keep running indefinitely until interrupted.
  8. Analyzes the image from the camera for face detection using fd.analysecamera().
  9. The sprite says the detected face expressions obtained from the face detection module using sprite.say(fd.ex * pression()).
  10. The code checks for different face expressions using if statements and performs corresponding actions.
  11. For example, if the face expression is determined to be “happy“, the Quarky device shows a “happy” emotion, and the humanoid performs a dance action.
  12. Similarly, other face expressions like “sad”, “surprised”, and “angry” trigger specific emotional displays on Quarky and corresponding actions on the humanoid.
  13. If none of the predefined face expressions match, the humanoid goes back to its default or “home” position.

Output

Read More
All articles loaded
No more articles to load