Table of Contents

stop ()

Description

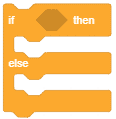
Depending on the argument, it is either a Cap block (all or this script), or a Stack block (other scripts in sprite). It is the only block that changes its shape.

Example

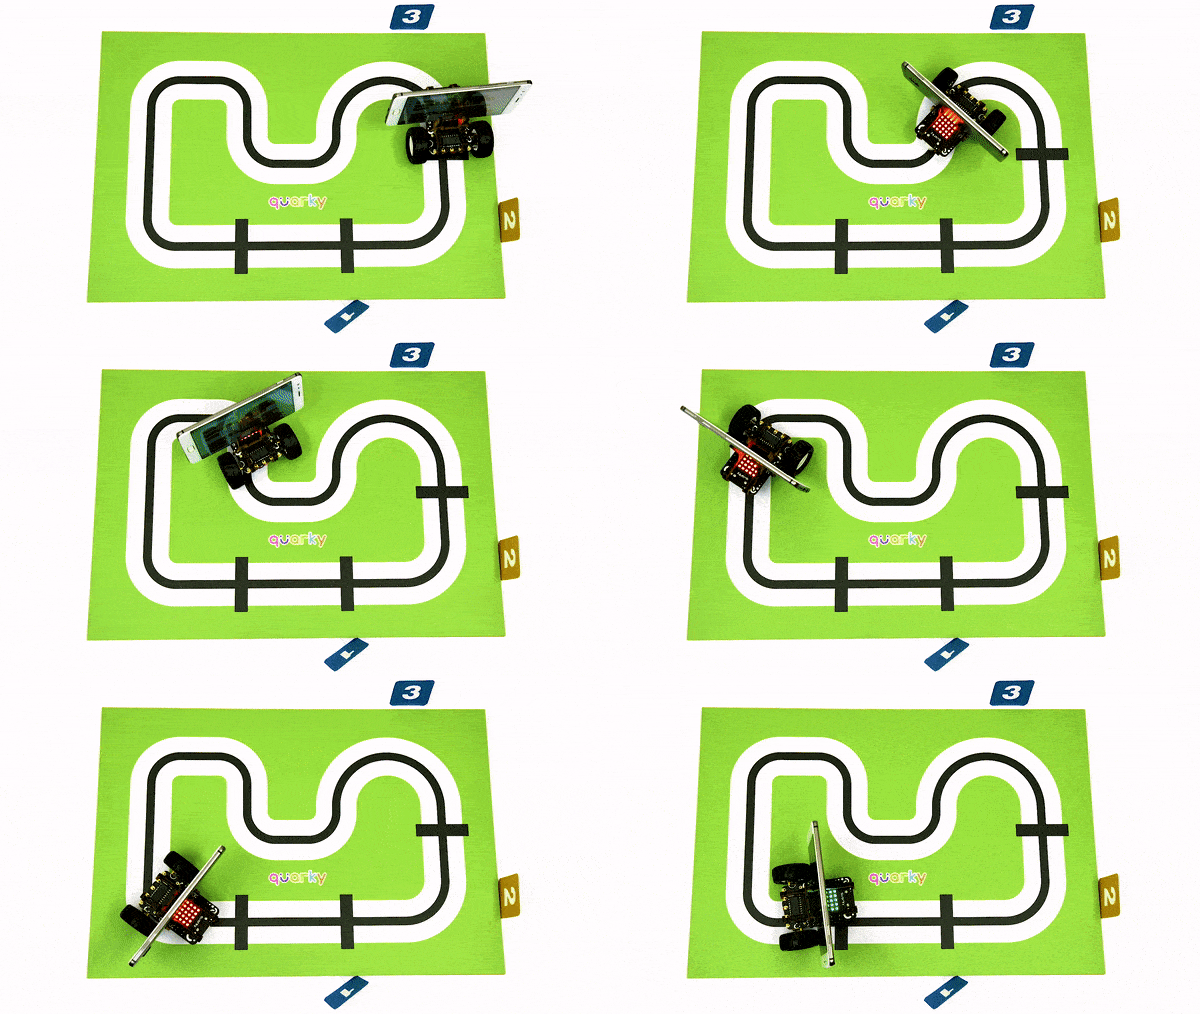
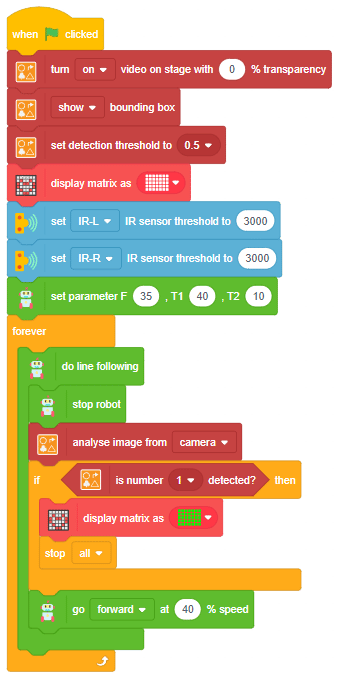
The example demonstrates how to make a delivery robot that follows the line and stops when it reaches checkpoint 1.

Script

Alert: You need to calibrate the IR sensor to get the best line detection by the robot. Also, you need to calibrate the speeds to make the robot follow the line correctly.

Output


Read More
Learn how to code logic for video input detection with this example block code. You will be able to direct your own Mars Rover easily by just showing signs through the camera input.

Introduction

A sign detector Mars Rover robot is a robot that can recognize and interpret certain signs or signals, such as hand gestures or verbal commands, given by a human. The robot uses sensors, cameras, and machine learning algorithms to detect and understand the sign, and then performs a corresponding action based on the signal detected.

These robots are often used in manufacturing, healthcare, and customer service industries to assist with tasks that require human-like interaction and decision making.

Code

Initializing the Functions:
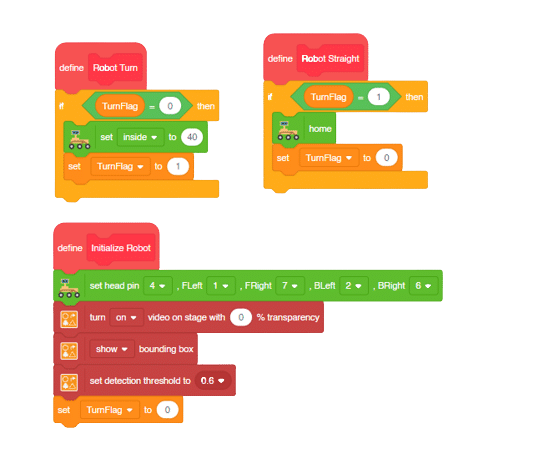
Main Code
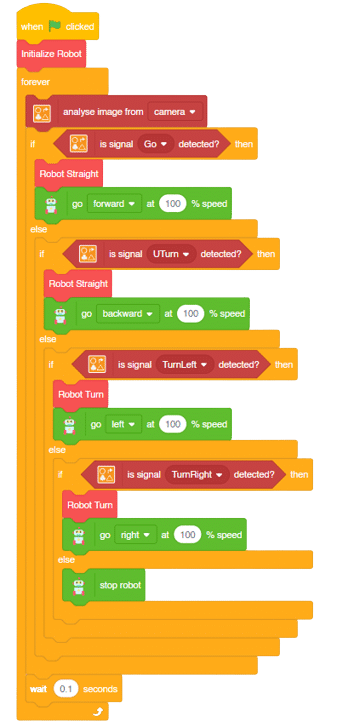
Logic

  1. Firstly, the code sets up the stage camera to look for signs and detects and recognizes the signs showed on the camera.
  2. Next, the code starts a loop where the stage camera continuously checks for the signs.
  3. Finally, if the robot sees certain signs (like ‘Go’, ‘Turn Left’, ‘Turn Right’, or ‘U Turn’), it moves in a certain direction (forward, backward, left, or backward) based on the respective signs.
  4. This can help the Mars Rover to manoeuvre through the terrain easily by just showing signs on the camera.

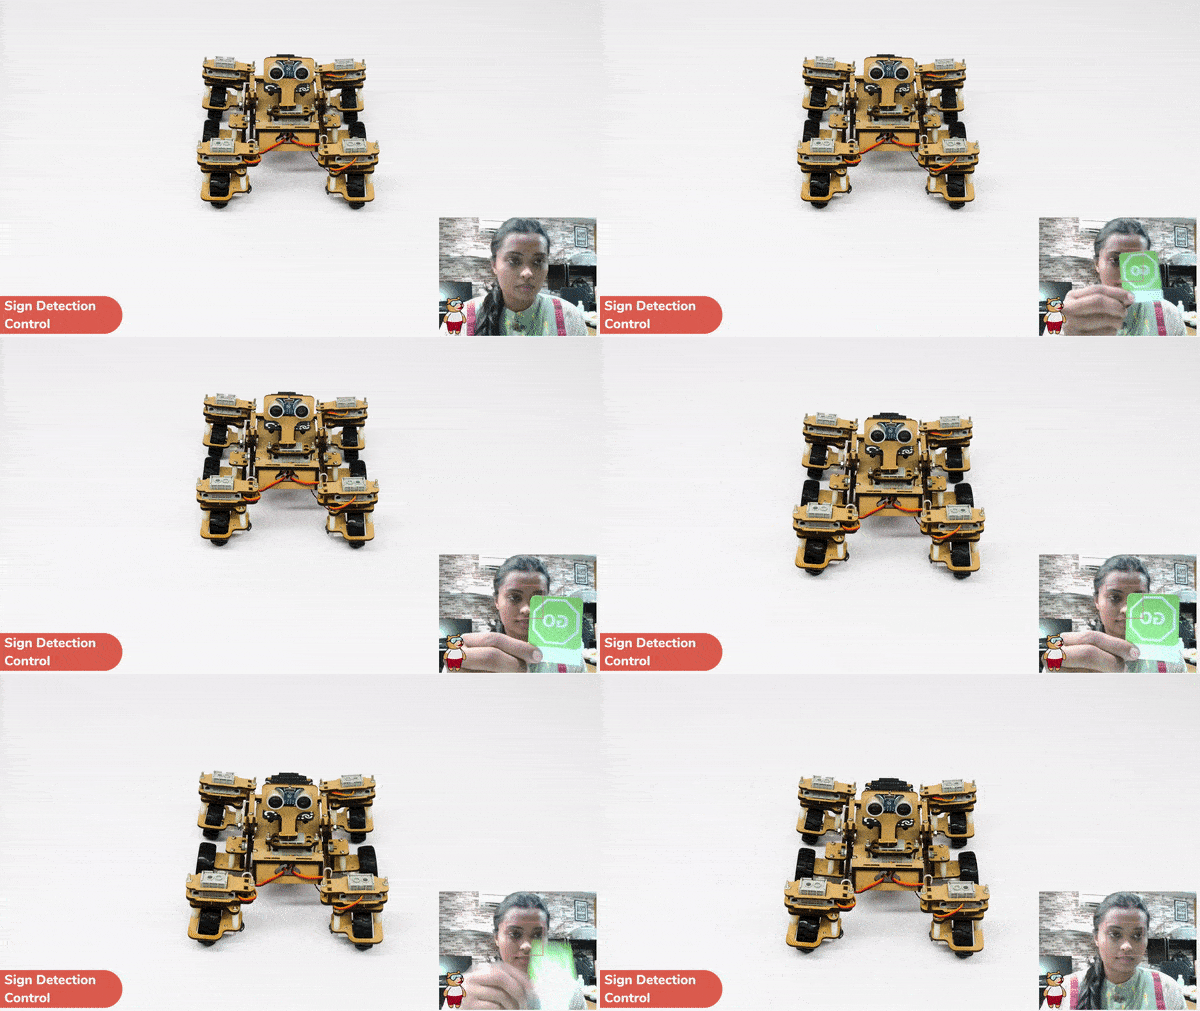
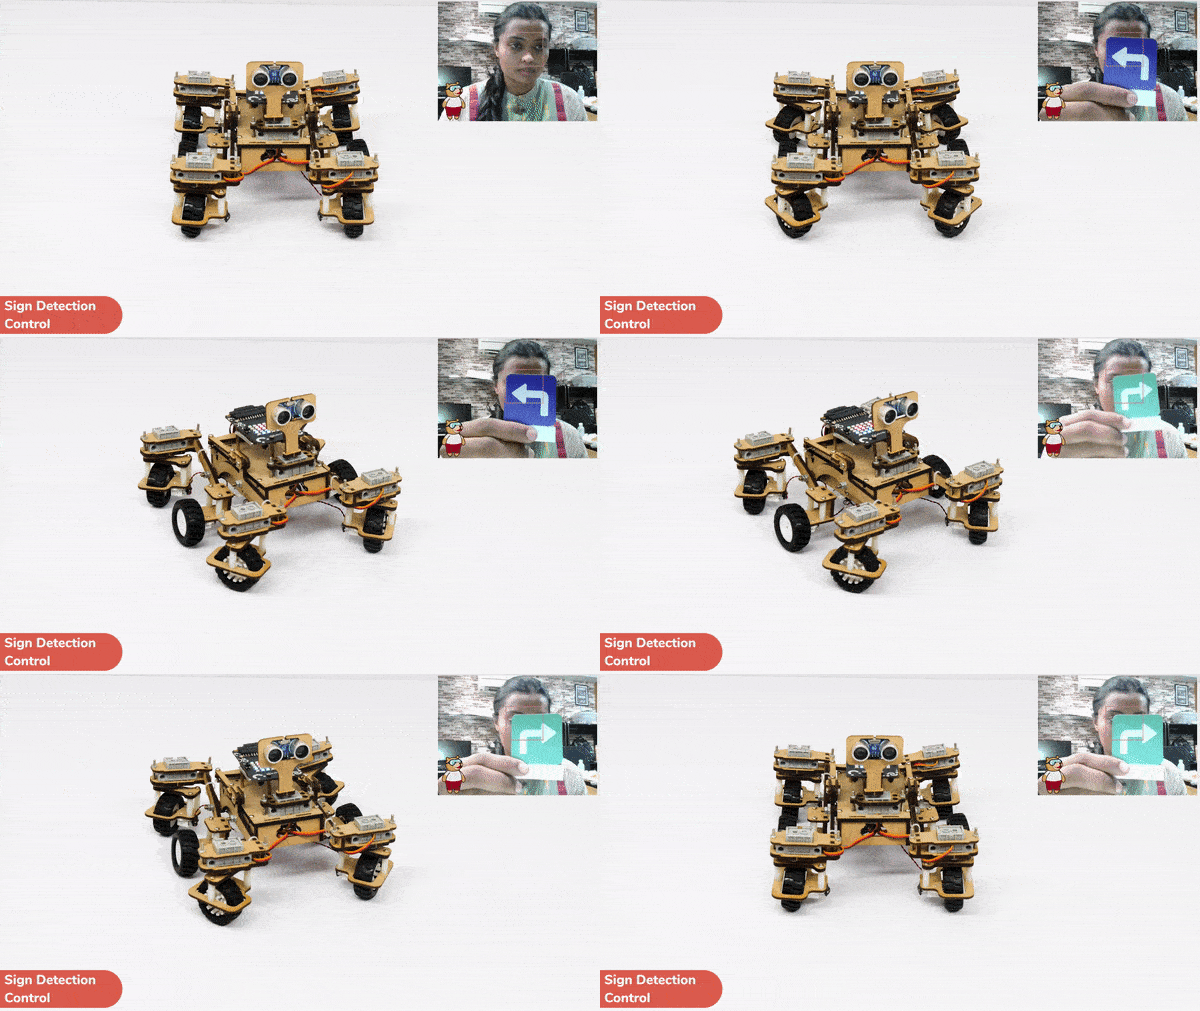
Output

Forward-Backward Motions:
Right-Left Motions:
Read More
The examples show how to use pose recognition in PictoBlox to maintain a yoga pose for a particular time interval.

Script

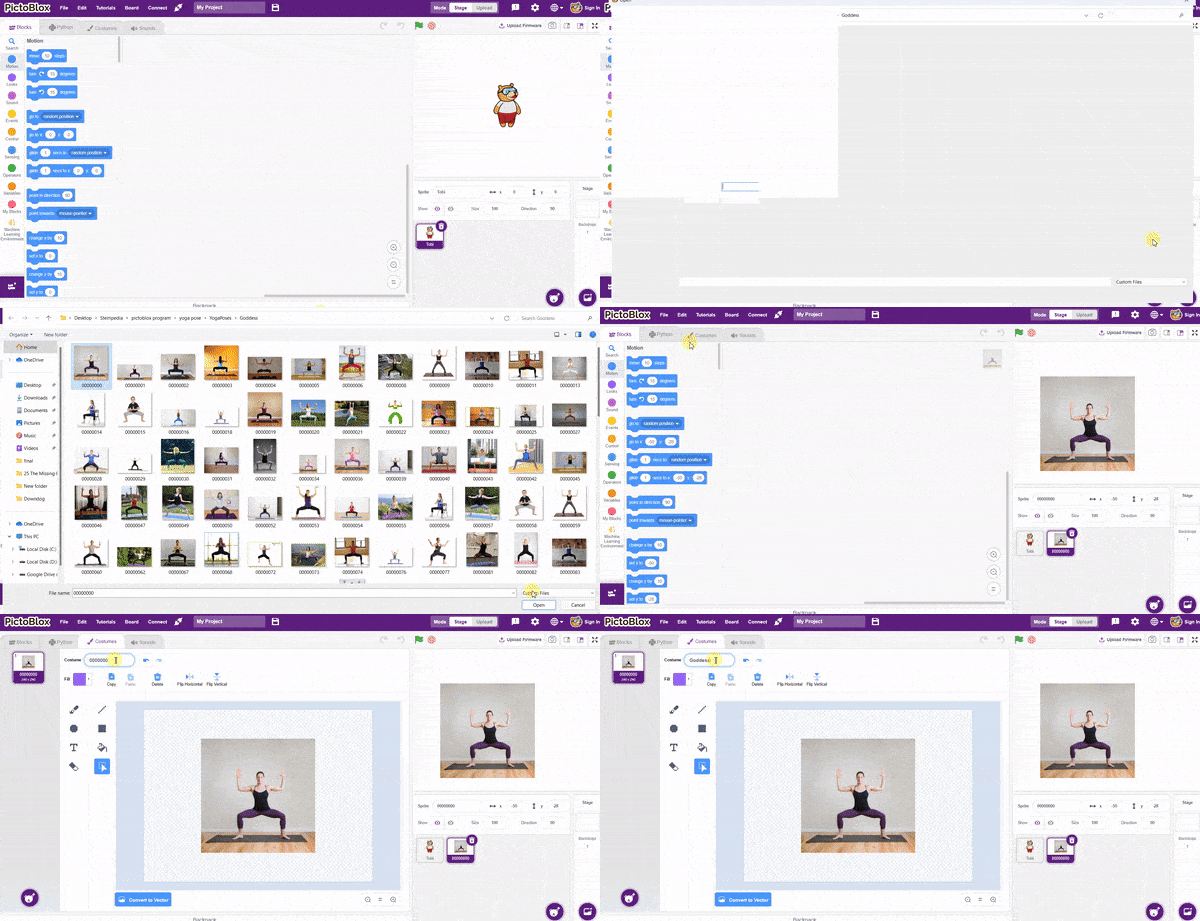
The idea is simple, we’ll add one image of  each class in the “costume” column by making one new sprite which will we display on the stage according to input from user. we’ll also change name of the image according to pose.

  1. Add testing images to the backdrop and delete the default backdrop.
  2. Now, come back to the coding tab and select the Tobi sprite.
  3. We’ll start by adding a when flag clicked block from the Events palette.
  4. We made the new variable “count” by choosing the “Make a Variable” option from the Variables palette.
  5. Add the “hide variable () block from the Variables palette. Select count.
  6. Add the “turn () video on stage with () transparency” block from the Machine Learning palette. Select the off option at the first empty place, and for the second, write a 0 value.
  7. Add an “ask () and wait” block from the Sensing palette. Write an appropriate statement in an empty place.
  8. Add the “if () then” block from the control palette for checking the user’s input.
  9. In the empty place of the “if () then” block, add a condition checking block from the operators palette block. At the first empty place, put the answer block from the sensing palette, and at the second place, write an appropriate statement.
  10. Inside the “if () then” block, add a “broadcast ()” block from the Events palette block. Select the “New message” option and write an appropriate statement for broadcasting a message to another sprite.
  11. Add the “turn () video on stage with () transparency” block from the Machine Learning palette. Select the option at the first empty place, and for the second, write a 0 value.
  12. Add the “() key points” block from the Machine Learning palette. Select the show option.
  13. Add the “Set () to ()” block from the Variables palette. Select the count option at the first empty place, and for the second, write a 30 value.
  14. Add the Show variable () block from the Variables palette. Select count.
  15. Add “forever” from the Control palette.
  16. Inside the “forever” block, add an “analysis image from ()” block from the Machine Learning palette. Select the Web camera option.
  17. Inside the “forever” block, add an “if () then” block from the Control palette.
  18. In the empty place of the “if () then” block, add an “is identified class ()” block from the Machine Learning palette. Select the appropriate class from the options.
  19. Inside the “if () then” block, add an “say ()” block from the Looks palette block. Write an appropriate statement in an empty place.
  20. Add “change () by ()” from the Variables palette. Select the count option in the first empty place, and for the second, write a -1 value.

  21. Add the “if () then” block from the control palette for checking the user’s input.
  22. In the empty place of the “if () then” block, add a condition checking block from the operators palette block. In the first empty place, put the “count” block from the sensing palette, and in the second place, write 0.
  23. Add the “Set () to ()” block from the Variables palette. Select the count option at the first empty place, and for the second, write a 30 value.
  24. Add the “turn () video on stage with () transparency” block from the Machine Learning palette. Select the off option at the first empty place, and for the second, write a 0 value.
  25. Inside the “if () then” block, add an “say ()” block from the Looks palette block. Write an appropriate statement in an empty place.
  26. Add the “() key points” block from the Machine Learning palette. Select the hide option
  27. Add the “stop ()” block to the control pallet. Select all options.
  28. Repeat “if () then” block code for other classes, make appropriate changes in copying block code according to other classes, and add code just below it.
  29. The final block code looks like
  30. Now click on another sprite and write code.
  31. We’ll start writing code for this sprite by adding a when flag is clicked block from the Events palette.
  32. Add the “hide” block from the Looks pallet.
  33. Write a new code in the same sprite according to class and add the “when I receive ()” block from the Events palette. Select the appropriate class from the options.
  34. Add the “show” block from the Looks pallet.
  35. Add the “switch costume to ()” block from the Looks palette. Select the appropriate class from the options.
  36. Repeat the same code for other classes and make changes according to the class.

    Final Result

Read More
All articles loaded
No more articles to load