


Introduction
In this project, we are going to build a guess the number game using Arduino and the Serial Monitor! The aim of the game is to guess the “Secret Number” that the computer has hidden in its memory between 1 and 20.
We are going to use random number generation to make the game different every time you play and conditional logic to give you hints. If you guess wrong, the computer will tell you if you are too high or too low. You’ll need to use your detective skills to find the right answer!
Let’s make the guess-the-number game.
Connecting your Arduino to Pictoblox Embedded C++
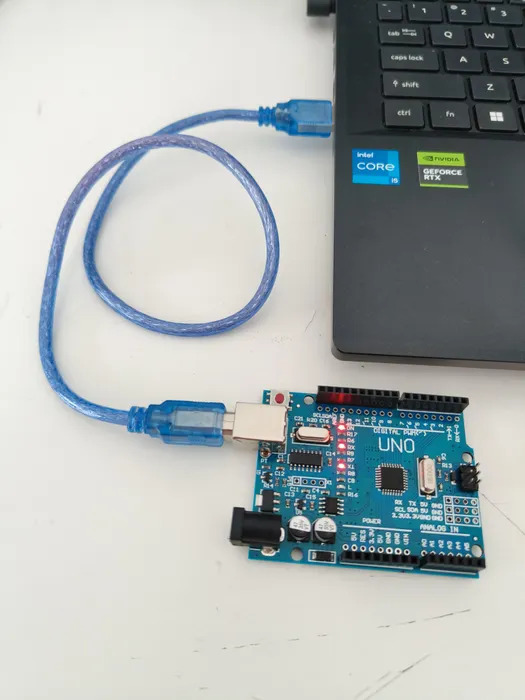
- Connect your Arduino to your computer with the USB type B cable.
- Select the Arduino board you have and connect using serial ports.
Step 1 – Understanding the Code Structure
Before writing a single line, let’s understand the two essential building blocks of every Arduino program. Think of an Arduino sketch like a recipe: you first gather your ingredients (variables), then prepare everything once (setup), then keep cooking forever (loop).
The Two Core Functions
- setup() runs exactly once when the Arduino is powered on or reset. You use it to configure settings – like turning on the serial monitor.
- loop() runs over and over again forever, non-stop. The Arduino keeps looping through this function as long as it has power.
Think of it like this: setup() is you waking up in the morning (happens once), and loop() is breathing – it keeps happening automatically forever.
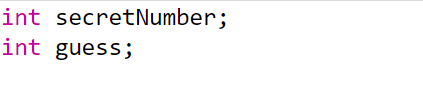
Step 2 – Declaring Variables
A variable is a named box where your program stores a value. In Arduino (C++), you must tell the program what type of value the box will hold before you use it. Here are the first two lines of our program:
Breaking It Down
- int means integer – a whole number (no decimals). Arduino needs to know this before it can allocate memory for the variable.
- secretNumber is the name we give the box. The Arduino will pick a secret number and store it here. We chose a meaningful name so the code reads like plain English.
- guess is the name of the box that will store whatever number the player types in.
- ; – Every statement in Arduino code ends with a semicolon. Think of it as the full stop at the end of a sentence. Forgetting it is the most common beginner mistake!
- These two variables are declared outside both functions (at the top of the file). This makes them global – accessible from both setup() and loop(). If you declared them inside a function, only that function could use them.
Step 3 – Writing the setup() Function
Line-by-Line Explanation
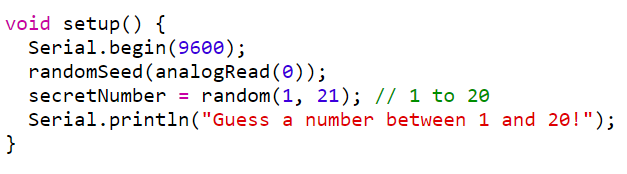
- void setup() { ‘void’ means this function does not return any value — it just does things. The curly braces { } wrap everything that belongs inside the function. This opening brace { starts the function body.
- Serial.begin(9600); This activates the Serial communication channel between your Arduino and your computer over the USB cable. The number 9600 is the baud rate — the speed at which data is transmitted, measured in bits per second. Both the Arduino and the Serial Monitor must use the same baud rate to understand each other. 9600 is a safe, standard speed for beginners.
- randomSeed(analogRead(0)); This is about making the random numbers truly random. Here is what each part does:
- analogRead(0) reads the electrical noise on analogue pin A0 of the Arduino. Since this pin is not connected to anything, it picks up tiny random electrical fluctuations from the environment, giving us a different number every time.
- randomSeed(…) uses that noisy number to seed (initialise) the random number generator. Without this, Arduino would produce the same sequence of random numbers every time it restarted – making the game predictable!
- secretNumber = random(1, 21); This generates a random whole number and stores it in secretNumber. The random(min, max) function returns a number from min up to (but NOT including) max. So random(1, 21) gives us a number from 1 to 20 inclusive — exactly what we want. Important: random(1, 21) gives 1 to 20, NOT 1 to 21. The upper limit is always excluded. This is a very common beginner gotcha!
- Serial.println(“Guess a number between 1 and 20!”); ‘println’ stands for ‘print line’. It sends the text inside the quotes to the serial monitor and then moves to a new line (like pressing Enter). The text in double quotes is called a string — it is displayed exactly as written. This is the welcome message the player sees when the game starts.
Step 4 – Writing the loop() Function
Line-by-Line Explanation
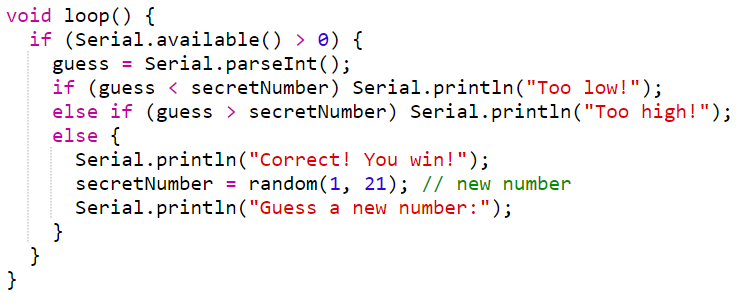
- if (Serial.available() > 0), Serial.available() returns the number of bytes (characters) waiting in the Serial input buffer — basically, it counts how many characters the player has typed and sent. The condition > 0 means only proceed if the player has actually typed something. Without this check, parseInt() would run constantly even when nothing has been typed, returning 0 every time and making the game behave erratically.
- guess = Serial.parseInt(); parseInt() reads the incoming serial data and extracts the first whole number it finds. For example, if the player types 7 and presses Enter, parseInt() returns the integer 7 and stores it in the guess variable. It automatically ignores non-numeric characters like spaces and newlines. How the player types a guess: Open the Serial Monitor (Tools > Serial Monitor or Ctrl+Shift+M), type a number in the input box at the top, and press Enter or click Send. The Arduino receives the number via Serial.parseInt().
- if (guess < secretNumber) This is the first condition check. The ‘<‘ operator means less than. If the player’s guess is smaller than the secret number, the Arduino prints Too low! Notice there are no curly braces here — when an if statement has only one action, the braces are optional. The action is simply the Serial.println() on the same line.
- else if (guess > secretNumber) If the first condition (too low) were false, the program checks this second condition. The > operator means greater than. If the guess is too big, Too high! is printed. Else if only runs when the preceding if was false — it will never run at the same time as the first if.
- else { … } If neither of the above conditions were true — meaning the guess was not too low and not too high — then it must be exactly correct. The else block runs. Notice this one uses curly braces because it contains multiple actions:
- Serial.println(“Correct! You win!”) – prints the winning message.
- secretNumber = random(1, 21) – immediately generates a brand new secret number, resetting the game.
- Serial.println(“Guess a new number:”) – prompts the player to keep playing.
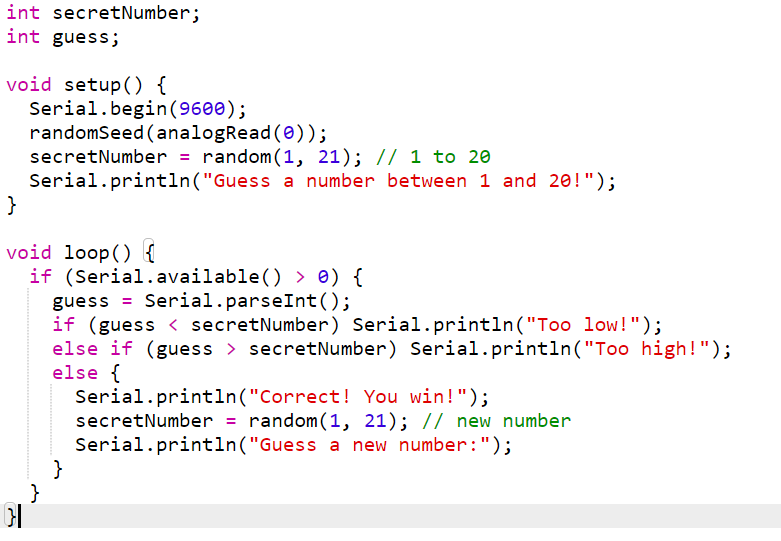
Step 5 – The Complete Code
Here is the entire program together, ready to copy into the embedded C++:
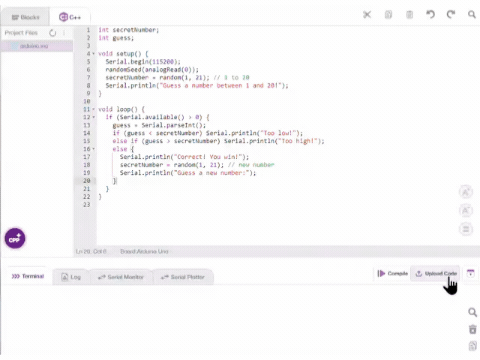
Step 6 – Upload and Play
- Upload: Click the upload button (bottom right). Wait for ‘Done uploading‘.
- Open Serial Monitor: Go to Serial Monitor. Ensure that the baud rate in the bottom right of the serial monitor is set to 9600.
- Click Compile to Play!: You will see the message. Guess a number between 1 and 20! Type a number in the top input box and press Enter to play!
Output
Conclusion
In this project, we learnt how to build a Guess the Number game on Arduino using embedded C++ in PictoBlox. We required an Arduino board, a USB Type-B cable, and a computer with Pictoblox installed in embedded C++ mode. We used global integer variables to store the secret number and the player’s guess, the setup() function to initialise serial communication and generate the first random number, and the loop() function to continuously read player input and respond with ‘Too low’, ‘Too high’, or ‘Correct’. We also used randomSeed(analogRead(0)) to ensure the random numbers are truly unpredictable. With this project, kids and learners will have a better understanding of C++ syntax, the setup-and-loop structure of Arduino programs, serial communication, and how conditional logic drives real-time interactive embedded systems.