


Introduction
How does a self-driving car know where it is on the road? How does a warehouse robot navigate to the correct shelf? How does a delivery drone find its landing pad? The answer in many cases involves a combination of computer vision — the ability of AI systems to interpret visual information from cameras — and spatial mathematics — the calculation of position, distance, and direction in a coordinate space.
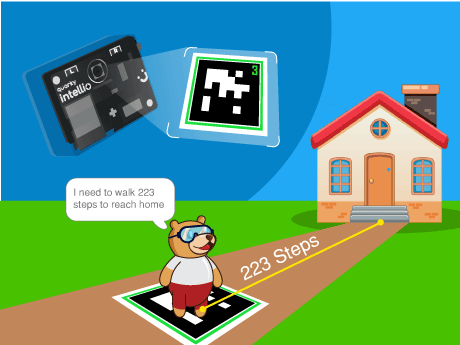
In this project, we are going to build a simplified but conceptually accurate version of this exact technology inside PictoBlox. Using April tags (augmented reality) — specially designed printed markers that AI systems can detect and localise in a camera image — we will program a character called Tobi to scan its environment through a live camera feed, detect a target AR tag, calculate how many steps it needs to travel to reach the tag’s position, and announce its navigation plan with a spoken message.
What Are AR Tags?
AR tags (also known as fiducial markers or visual markers) are specially designed black-and-white square patterns that computer vision AI systems can detect, identify, and localise in a camera image with exceptional accuracy. The most widely used AR tag families include ArUco markers, AprilTags, and ARToolKit markers – all used extensively in robotics, drone navigation, and augmented reality applications.
Each AR tag has a unique ID encoded in its binary pattern, allowing the AI system to distinguish between multiple different tags in the same scene. The AI can also extract the tag’s position (X, Y coordinates), orientation (angle), and distance from the camera – making AR tags one of the most powerful and cost-effective positioning tools available for robotics and AI education.
In this project we used the April tags for identifying the distance between the sprite and the home.
Prerequisites
Step 1
- Quarky Intellio device (charged and powered on)
- AprilTags
- PictoBlox installed on a Wi-Fi connected device
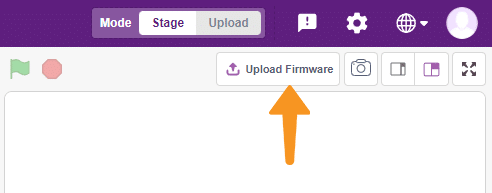
- Firmware uploaded to Quarky Intellio via the Upload Firmware button in PictoBlox
Connecting your intellio to Pictoblox Blocks
Step 2
- Add the face filter sprite using the ‘Choose a sprite’ option. Delete the Tobi sprite.
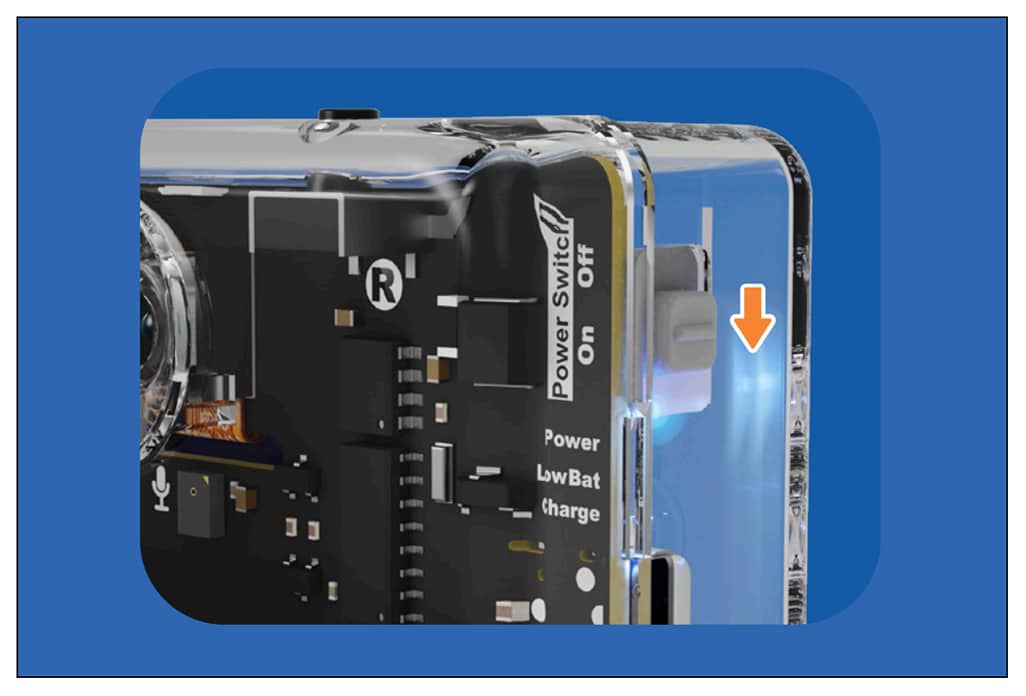
- Slide up the power switch to turn on Quarky Intellio. A blue light will turn on – that means Intellio is ON.
- Click on Board at the top of your screen. Select Quarky Intellio!
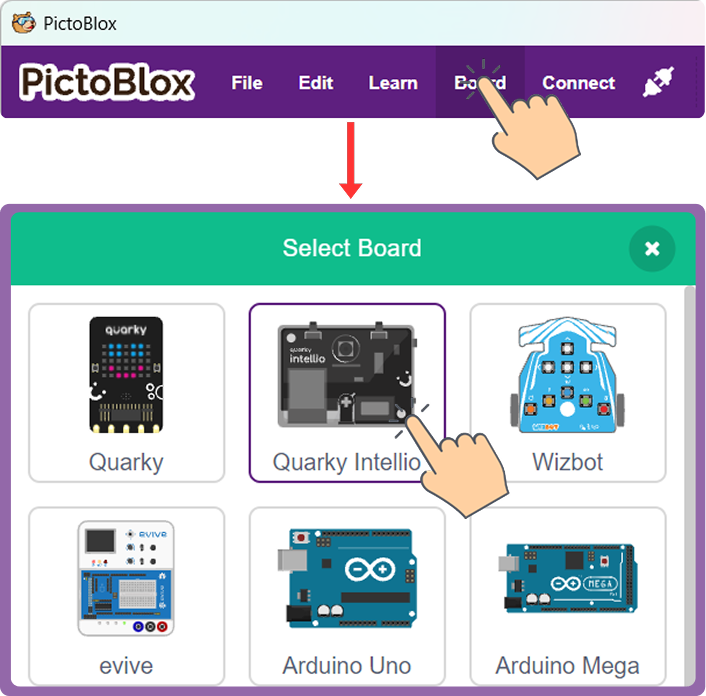
- Click on Board at the top of your screen and select Quarky Intellio.
- Click the Connect tab in the top menu to connect with the serial port (USB). Be sure to Upload Firmware (top-right corner) for Intellio.
- Once the Upload Firmware is done, choose the Wi-Fi tab to connect Intellio with PictoBlox.
- Check out the Connection guide for Wi-Fi method – https://ai.thestempedia.com/docs/quarky-intellio/quarky-intellio-getting-started/quarky-intellio-connection-guide/#method
Step 3:
- Open PictoBlox and log in.
- Click the Add Extension button and search for AR Tag Detection (sometimes listed under Image Recognition or Artificial Intelligence). Add it to your project. This extension provides all the camera, tag detection, and coordinate extraction blocks used in this project.
Step 4: Choose and Position Your Sprite
- Use Tobi or any sprite of your choice.
- The Home X position — the X coordinate of where you want Tobi to “live” — is a key reference value for the step calculation in this project. In the script shown, the Home X position is the value is subtracted from the detected tag’s X coordinate. Note this value for your own setup; it may differ depending on where you place your sprite on the stage.
Step-by-Step Block Coding Guide
From the Control palette, place a forever loop immediately after the say block. Everything from this point forward sits inside the forever loop, enabling continuous real-time scanning of the camera feed for AR tags.
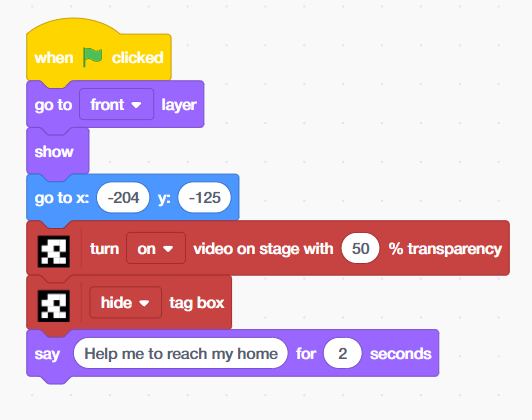
- Add the ‘when flag clicked’ block from the Events palette, then place the ‘go to front layer’ and ‘show’ blocks from the Looks palette.
- Place ‘go to x:[-204] y:[-125]’ block from motion palette.
- Add ‘turn on video on stage with [50]% transparency’ block from Apriltag extension, then add ‘hide tag box’ block.
- Drag and drop the ‘say[] for 2 seconds’ block from the Looks palette, add the text ‘help me to reach my home’
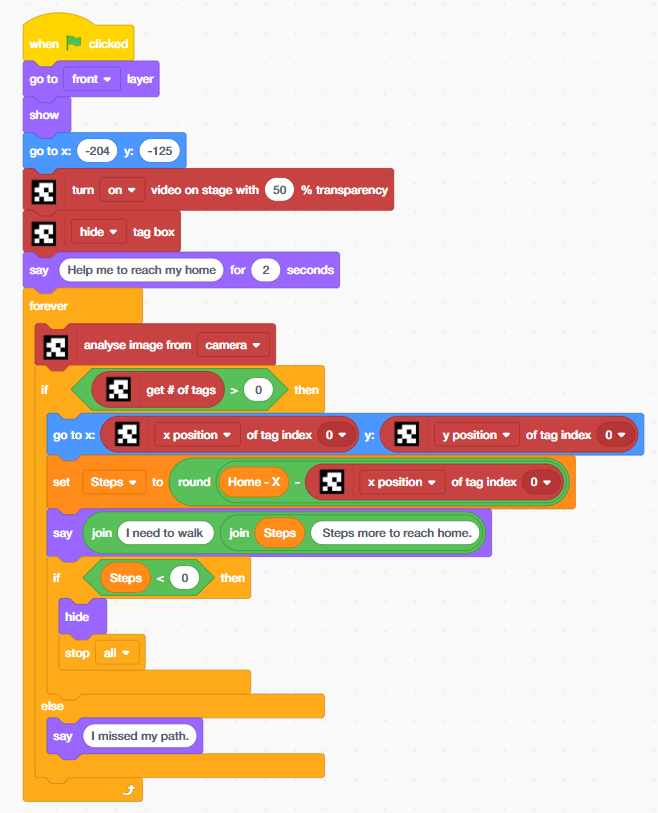
From the Control palette, place a forever loop immediately after the say block. Everything from this point forward sits inside the forever loop, enabling continuous real-time scanning of the camera feed for AR tags.
- Inside the forever loop, place an ‘analyse image from [camera]’ block from the April Tags palette. This is the core AI perception block — it triggers the computer vision model to process the current camera frame and detect any AR tags present. Every iteration of the forever loop calls this block, ensuring the system continuously scans for tags in real time.
- Place an ‘if-then’ block. Set its condition to: ‘[get # of tags] > [0]’ from Apriltag extension inside the operators block. The ‘get # of tags’ block returns the total number of April tags detected in the most recent camera frame analysis. If this value is greater than 0, at least one tag has been found and the navigation logic can proceed.
- This condition is the gateway of the entire navigation system – it separates the world into two states: tag found (navigate) or tag absent (report missed path). This binary detection check mirrors the first decision point in any real autonomous navigation pipeline.
- Inside the if branch, place a ‘go to x: [ ] y: [ ]’ block from the Motion palette. In the X field, insert the ‘[x position of tag index 0]’ block from the April Tag extension. In the Y field, insert the [y position of tag index 0] block.
- This block moves Tobi’s sprite to the exact X and Y coordinates of the detected AR tag in the camera frame — making the sprite appear to jump to the tag’s real-world position on the stage. Tag index 0 refers to the first (or only) detected tag in the scene. If multiple tags are present, higher index values (1, 2, 3…) can be used to track additional tags.
![]()
- Place a set [Steps] to [ ] block from the Variables palette. In the value field, build the following expression using Operator blocks:
- Place a ‘round [ ]’ block from the Operators palette as the outer wrapper — this rounds the calculated distance to the nearest whole number for a clean, readable step count.
- Inside round, place a ‘subtraction’ block: [Home X] – [x position of tag index 0].
- ‘Home X’ is a variable (or hardcoded value) representing the X coordinate of Tobi’s home position — the starting position set earlier (x: -204). The x position of tag index 0 is the live X coordinate of the detected April tag.
- The result stored in Steps is the horizontal distance (in stage coordinate units) that Tobi needs to travel from the April tag’s current position back to its home. This is a real-time spatial calculation – computed fresh on every loop iteration as the tag moves.
- Place a ‘say [ ]’ block. Inside it, build a dynamic message using nested join blocks from the Operators palette:
- Outer join: [“I need to walk “] joined with the result of the inner join.
- Inner join: [Steps variable] joined with [” Steps more to reach home.”]
- This produces a live spoken message like: “I need to walk 87 Steps more to reach home.” — updated every loop iteration as the AR tag moves. This is a real-time natural language generation pattern: a fixed sentence template with a dynamic variable inserted at runtime. This is the same technique used in AI chatbots, sports commentary systems, and automated news generators.
- Inside the outer if branch, place a ‘nested if-then’ block. Set its condition to: [Steps] < [0]. A negative Steps value means the AR tag is now positioned to the left of Tobi’s home position — meaning Tobi has effectively “passed” or “reached” its home relative to the tag. When this condition is true:
- ‘hide’ — Tobi’s sprite disappears, simulating the character arriving home and stepping inside.
- ‘stop all’ — the entire program halts, cleanly ending the navigation session.

- The ‘else’ branch of the outer if block handles the case where get # of tags = 0 — no AR tag is detected in the current camera frame. In this case, Tobi says: “I missed my path.”
This single line of text represents a critically important concept in AI and robotics system design: graceful degradation under sensor failure. When a real autonomous robot loses its positioning signal (GPS dropout, camera obstruction, marker out of frame), it must have a defined behaviour rather than crashing or freezing. This else branch is Tobi’s equivalent — a clear, human-readable fallback that communicates the system’s current inability to navigate.
Output
Conclusion
In this AI and STEM project, we built a complete AR tag-guided navigation system in PictoBlox — integrating live computer vision (AR tag detection), real-time coordinate extraction, 2D spatial distance calculation, dynamic natural language generation, and graceful sensor-fallback logic into a single coherent AI perception-action system using block coding. The concepts practiced in this project — computer vision, spatial navigation, coordinate geometry, real-time AI loops, and graceful degradation — are at the cutting edge of applied AI and are directly relevant to careers in autonomous vehicles, robotics, augmented reality development, AI engineering, and spatial computing.