


Introduction
This project teaches students how to break down a full-colour image into its three primary colour channels — red, green, and blue — using PictoBlox’s AI-powered Image Processing extension. Each channel reveals different information about the original image, laying the groundwork for understanding how neural networks and machine learning models process visual data.
The block-coded script runs automatically when the green flag is clicked, cycling through three stages:
- Stage 1 — Red Channel: Displays how the red colour intensity is distributed across the image
- Stage 2 — Green Channel: Reveals the green colour information within the scene
- Stage 3 — Blue Channel: Shows the blue component that completes the full RGB model
Prerequisites
Step 1: Open PictoBlox
Step 2: Add the Image Processing Extension
- Click the Add Extension button (purple icon) at the bottom left of the screen.
- Search for ‘Image Processing‘ in the extension library.
- Click Add. The Image Processing extension will now appear in your palette side.
Step 3: Prepare Your Backdrops
This project uses three custom backdrops labelled:
- Image Processing Red Channel
- Image Processing Green Channel
- Image Processing Blue Channel
To add these backdrops, click the Choose a Backdrop button and upload or create each one. These backdrops act as contextual labels that tell the audience which channel is currently being displayed.
STEM Concepts Behind RGB Image Processing
What is the RGB colour model?
Every digital image on a screen is made up of millions of tiny pixels. Each pixel contains three values – one for red, one for green, and one for blue – each ranging from 0 to 255. By combining these three channels, screens produce over 16 million colours. This is the foundation of all digital imaging systems, from smartphone cameras to satellite imagery used in AI-based remote sensing.
How AI Uses Colour Channels in Computer Vision
Modern AI and machine learning models, particularly Convolutional Neural Networks (CNNs), process images channel by channel. When a model identifies a face, detects a tumour in an X-ray, or classifies a plant species, it analyses the R, G, and B pixel values independently before combining that information. Understanding this concept is the first step toward building your own image classification models using AI.
| RED | The red channel highlights warm tones and high-contrast edges in an image. It is particularly important in face recognition and skin-tone detection algorithms. |
| GREEN | The green channel carries the most luminance (brightness) information. It is the primary channel used in night-vision imaging and vegetation analysis (NDVI) in environmental AI. |
| BLUE | The blue channel captures sky, water, and cool-tone details. It plays a key role in atmospheric correction in satellite imagery and underwater computer vision applications. |
Step-by-Step Code Walkthrough
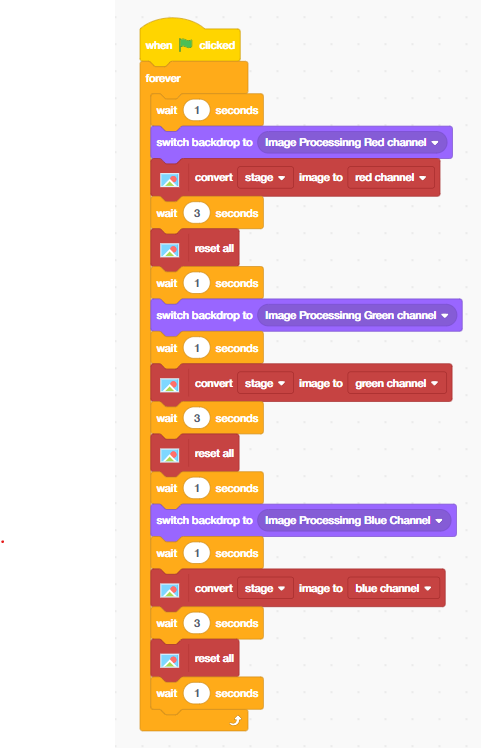
The complete script runs inside a ‘forever’ loop triggered by the ‘When Green Flag Clicked’ event. Here is how to structure each section:
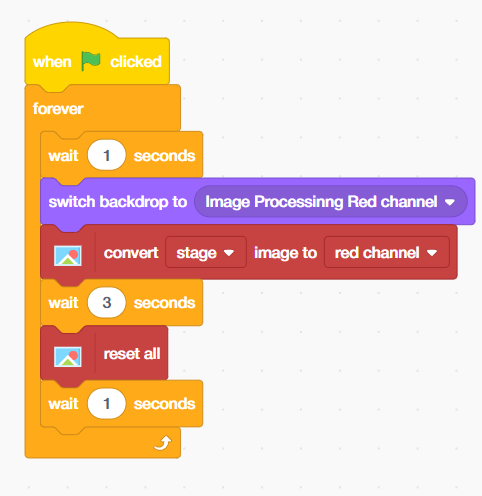
Red Channel Block Sequence
- Place a ‘Wait 1 Seconds’ block from Control palette to give the project a startup pause.
- Add a ‘Switch Backdrop to ‘Image Processing Red Channel’ block from the looks palette.
- Add a ‘Convert Stage Image to Red Channel’ block from the Image Processing palette.
- Place a ‘Wait 3 Seconds’ block to let you observe the result.
- Add a ‘Reset All’ block to restore the original image.
- Place another ‘Wait 1 Seconds’ block before transitioning to the next channel.
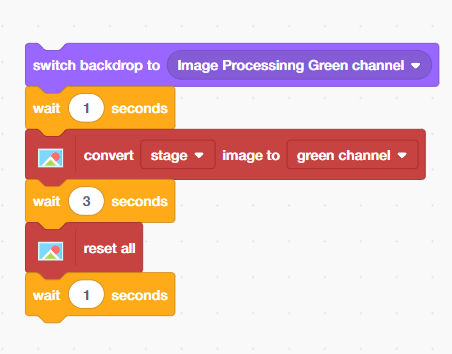
Green Channel Block Sequence
Repeat the same pattern as the Red Channel but replace the backdrop and the conversion block place inside the forever block:
- Add ‘Switch Backdrop to ‘Image Processing Green Channel’.
- Place a ‘Wait 1 Seconds’ block from the Control palette.
- Add ‘Convert Stage Image to Green Channel’.
- Add ‘Wait 3 Seconds’, then ‘Reset All’, then Wait 1 Second.
Blue Channel Block Sequence
Complete the cycle with the Blue Channel:
- Add ‘Switch Backdrop to ‘Image Processing Blue Channel’.
- Place a ‘Wait 1 Second’ block from the Control palette.
- Add ‘Convert Stage Image to Blue Channel’.
- Add ‘Wait 3 Seconds’, then ‘Reset All’, then ‘Wait 1 Second’.
Understanding the Output: What Does Each Channel Show?
When you run the project, you will observe three distinct visual outputs. Here is how to interpret what you see through an AI and computer vision lens:
- Red Channel Output: Areas that appear bright white have high red intensity (value close to 255). Dark areas have little to no red pigment. This is similar to how thermal imaging highlights heat signatures.
- Green Channel Output: The green channel often appears brightest in natural scenes because human eyes are most sensitive to green light. AI-based plant health monitoring systems exploit this channel heavily.
- Blue Channel Output: Blue dominates in sky, water, and artificially lit scenes. Security cameras and face-detection systems often rely on blue-channel data in low-light conditions.
Real-World AI and Machine Learning Connections
- This project is not just a visual exercise — it directly connects to how professional AI systems operate:
- Medical Imaging AI: MRI and CT scan analysis software separates image channels to detect anomalies in tissue that are invisible to the naked eye.
- Autonomous Vehicles: Self-driving car AI processes RGB frames from cameras at 30+ frames per second, extracting lane markings, traffic signs, and obstacles from each colour channel.
- Agricultural Drones: Precision farming drones use colour channel separation to assess crop health using the Normalised Difference Vegetation Index (NDVI) — a key metric derived from red and green channel data.
- Facial Recognition Systems: Modern biometric systems use colour channel decomposition as a preprocessing step before running face-matching algorithms.
Output
Conclusion
Congratulations! You have successfully built an RGB image processing project in PictoBlox that demonstrates one of the most fundamental concepts in artificial intelligence and machine learning — colour channel analysis. In this project, you learned how digital images are structured using the RGB colour model, how AI systems process image data channel by channel, and how to use block coding to automate a sequential image analysis workflow. These skills form the foundation of computer vision — one of the fastest-growing areas of AI and technology today.