Introduction
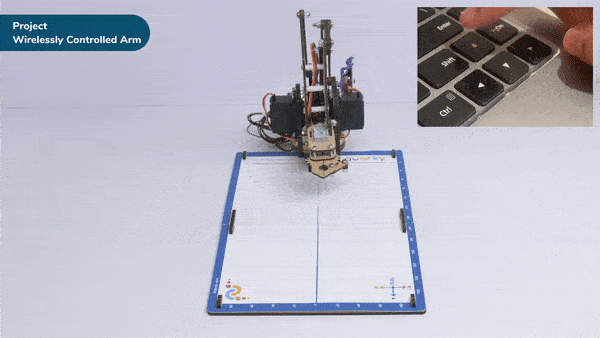
A wireless controlled robotic arm revolutionizes how we interact with robots by eliminating the need for physical connections. Users can remotely manipulate the arm’s movements without being tied to it, offering flexibility and convenience.
Wireless control allows operating the robotic arm from a distance, ensuring safety and versatility. It can be controlled through a smartphone app, remote control, or computer software. Wireless communication protocols like Bluetooth or Wi-Fi enable seamless transmission of commands.
These robotic arms have applications in industrial automation, healthcare, research, and education. They provide precise movements for delicate tasks and complex maneuvers, such as object manipulation, surgeries, or hazardous environment exploration.
Wireless control enables automation, remote operation, and collaboration. Multiple arms can be controlled simultaneously, enhancing productivity and enabling cooperative tasks. Integration with smart systems and the Internet of Things (IoT) ecosystem is facilitated.
Code
sprite = Sprite('Tobi')

import time

roboticArm = RoboticArm(1,2,3,4)


roboticArm.sethome()
roboticArm.setgripperangle(90,148)
while True:
	if sprite.iskeypressed("up arrow"):
		roboticArm.movebyinoneaxis(10,"X",10)

	if sprite.iskeypressed("down arrow"):
			roboticArm.movebyinoneaxis(-10,"X",1000)

	if sprite.iskeypressed("left arrow"):
	 roboticArm.movebyinoneaxis(10,"Y",1000)

	if sprite.iskeypressed("right arrow"):
		roboticArm.movebyinoneaxis(-10,"Y",1000)

	if sprite.iskeypressed("o"):
	 roboticArm.movebyinoneaxis(10,"Z",1000)

	if sprite.iskeypressed("c"):
		roboticArm.movebyinoneaxis(-10,"Z",1000)
Logic
User control the robotic arm’s movements using arrow keys for X and Y axes and the ‘o‘ and ‘c‘ keys for the Z-axis. The specific movements and functions may vary depending on the implementation of the Roboti Arm class.
- Open the Pictoblox application.
- Select the Python-based environment.
- Click on the robotic arm extension available in the left corner.
- First initialize the robotic arm‘s pin with pictoblox.
- Imports the time module, which provides functions for time-related operations.
- Initializes a robotic arm object named ‘roboticArm‘ with four parameters.
- Sets the home position for the robotic arm. This is usually a predefined position that serves as a reference point.
- Sets the angle of the gripper of the robotic arm. This function likely controls the opening and closing of the gripper.
- Everything inside this loop will repeat indefinitely until the program is manually stopped.
- If the up arrow key is pressed, it moves the robotic arm by 10 units in the positive X-axis direction.
- If the down arrow key is pressed, it moves the robotic arm by 10 units in the negative X-axis direction.
- If the left arrow key is pressed, it moves the robotic arm by 10 units in the positive Y-axis direction.
- If the Right Arow key is pressed, it moves the robotic arm by 10 units in the negative Y-axis direction.
- The code repeats the same pattern for the other arrow keys (down, left, and right) and performs movements in the corresponding axis directions.
- If the ‘o‘ key is pressed, it moves the robotic arm by 10 units in the positive Z-axis direction.
- If the ‘c‘ key is pressed, it moves the robotic arm by 10 units in the negative Z-axis direction.
- Press Run to run the code.
Output