


Introduction
In this example project, we are going to create a Machine Learning Model where beetle automatically feed on randomly generated food in space.
Data Collection
- Now, we are going to collect the data of “BeetleBot: Autonomous Feeding in Space” game.
- This data will contain the actions that we have taken to accomplish the game successfully.
- We will use the data we collect here, to teach our device how to play the “BeetleBot: Autonomous Feeding in Space” game, i.e. to perform machine learning.
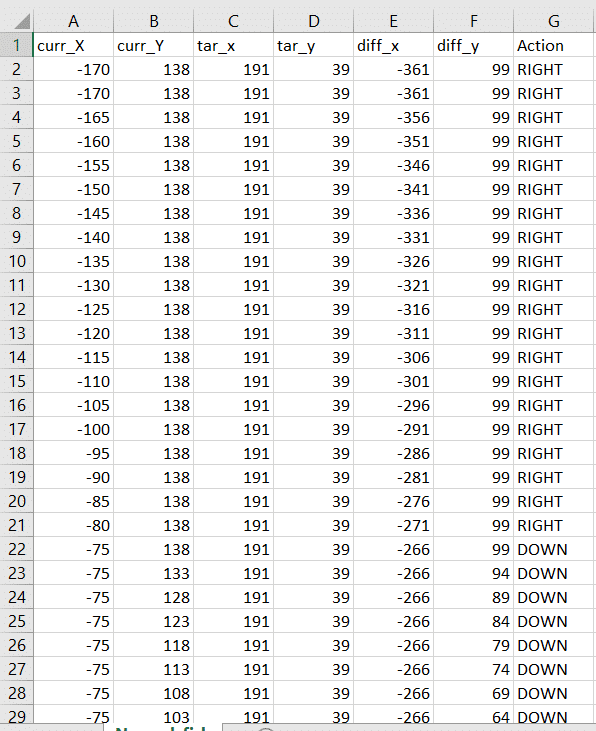
- The data that you collect will get saved in your device as a csv (comma separated values) file. If you open this file in Microsoft Excel, it will look as shown below:
Follow the steps below
- Open PictoBlox and create a new file.

- Select the coding environment as Python Coding Environment.

- Now write code in python.
Code for making dataset
- Click on the Beetle.py file from the Project files section.
sprite = Sprite('Beetle') - Similarly, declare new sprite on the Beetle.py file.
sprite1 = Sprite('Strawberry') - Then we will import the time, random, os, math, TensorFlow as tf and Pandas as pd modules using the import keyword for using delay in the program later.
- Time – For using delay in the program.
- Random – For using random position.
- Pandas as pd – For using Data Frame.
- Os– For reading files from Program files.
import random
import time
import tensorflow as tf
import pandas as pd
import os
- Now, make 3 variables curr_x, curr_y, ,beetle_m, angle and score with initial values -170, 138, 5,0 and 90 respectively.
- curr_x – To store the initial x – position of beetle.
- curr_y – To store the initial y – position of beetle.
- beetle_m– To store increment value in movement of beetle on pressing specific key.
- angle – To store initial angle of beetle.
- score – To store the score while playing the game.
curr_x = -170
curr_y = 138
mov_f= 5
score = 0
angle = 90
- Now set initial position and angle of beetle.
sprite.setx(curr_x) sprite.sety(curr_y) sprite.setdirection(DIRECTION=angle) - Now, make a function settarget() in which we are generating food at a random position. We pass one argument “t” in the function for generating target food in the greed position of the t gap.
- x and y – To generate the food at random position on stage.
- time.sleep – For giving the time delay.
- sprite1.set()– To Set the position of food at random position on stage.
def settarget(t):
x = random.randrange(-200, 200, t)
y = random.randrange(-155, 155, t)
time.sleep(0.1)
sprite1.setx(x)
sprite1.sety(y)
return x, y
- Now set the target (). In this, beetle are chasing the target, and target_x and target_y should be equal to the x and y positions of the food.
target_x, target_y = settarget(40) - Now create a data frame of name “Chase_Data.csv” to collect the data for machine learning and if this name csv exist then directly add data in it.
if(os.path.isfile('Chase_Data.csv')): data=pd.read_csv('Chase_Data.csv') else: data = pd.DataFrame({"curr_X": curr_x, "curr_Y": curr_y, "tar_x": target_x, "tar_y": target_y, "diff_x":curr_x-target_x, "diff_y":curr_y-target_y, "Action": "RIGHT"}, index=[0]) - After that, we will use the while True loop to run the code indefinitely. Don’t forget to add a colon ‘:’ just after the loop to avoid errors.
while True: - Now write the script for moving the Beetle in upward direction, downward direction, left direction and right direction by fix value with the help of a conditional statement.
- If the up arrow key is pressed then beetle will move beetle_m position in y direction by adding fix value in beetle’s y position.
- After pressing the up arrow key action taken should be stored in the Data frame with data.append command.
 if sprite.iskeypressed("up arrow"):
    data = data.append({"curr_X": curr_x, "curr_Y": curr_y, "tar_x": target_x, "tar_y": target_y, "diff_x":curr_x-target_x, "diff_y":curr_y-target_y, "Action": "UP"}, ignore_index=True)
    curr_y = curr_y + beetle_m
    sprite.setdirection(DIRECTION=0)
    sprite.setx(curr_x)
    sprite.sety(curr_y)
- Repeat the process for the set direction and position of beetle for down, left and right movement.
if sprite.iskeypressed("down arrow"): data = data.append({"curr_X": curr_x, "curr_Y": curr_y, "tar_x": target_x, "tar_y": target_y, "diff_x":curr_x-target_x, "diff_y":curr_y-target_y, "Action": "DOWN"}, ignore_index=True) curr_y = curr_y - beetle_m sprite.setdirection(DIRECTION=-180) sprite.setx(curr_x) sprite.sety(curr_y) if sprite.iskeypressed("left arrow"): data = data.append({"curr_X": curr_x, "curr_Y": curr_y, "tar_x": target_x, "tar_y": target_y, "diff_x":curr_x-target_x, "diff_y":curr_y-target_y, "Action": "LEFT"}, ignore_index=True) curr_x = curr_x - beetle_m sprite.setdirection(DIRECTION=-90) sprite.setx(curr_x) sprite.sety(curr_y) if sprite.iskeypressed("right arrow"): data = data.append({"curr_X": curr_x, "curr_Y": curr_y, "tar_x": target_x, "tar_y": target_y, "diff_x":curr_x-target_x, "diff_y":curr_y-target_y, "Action": "RIGHT"}, ignore_index=True) curr_x = curr_x + beetle_m sprite.setdirection(DIRECTION=90) sprite.setx(curr_x) sprite.sety(curr_y) - Write the conditional statement for the storing data in csv file after few score.
if(score>0 and score%10==0): data.to_csv('Chase_Data.csv',index=False) - Again write the conditional statement for the score variable if the fish and food position difference is less then 20 then the score should be increased by one.
if abs(curr_x-target_x)<20 and abs(curr_y-target_y)<20: score = score + 1 sprite.say(("your score is: {}".format(score))) - If the score is equal to or greater than 20 then data should be printed on Chase Data.csv file.
if (score >= 20): print(data) data.to_csv('Chase Data.csv') break target_x, target_y = settarget() - The final code is as follows:
sprite = Sprite('Fish') sprite1 = Sprite('Orange') import random import time import numpy as np import tensorflow as tf import pandas as pd import os curr_x = -170 curr_y = 138 score=0 angle=90 beetle_m=5 sprite.say(("your score is: {}".format(score))) sprite.setx(-170) sprite.sety(138) sprite.setdirection(DIRECTION=angle) def settarget(t): x = random.randrange(-200, 200, t) y = random.randrange(-155, 155, t) time.sleep(0.1) sprite1.setx(x) sprite1.sety(y) return x, y target_x, target_y = settarget(40) if(os.path.isfile('Chase_Data.csv')): data=pd.read_csv('Chase_Data.csv') else: data = pd.DataFrame({"curr_X": curr_x, "curr_Y": curr_y, "tar_x": target_x, "tar_y": target_y, "diff_x":curr_x-target_x, "diff_y":curr_y-target_y, "Action": "RIGHT"}, index=[0]) while True: if sprite.iskeypressed("up arrow"): data = data.append({"curr_X": curr_x, "curr_Y": curr_y, "tar_x": target_x, "tar_y": target_y, "diff_x":curr_x-target_x, "diff_y":curr_y-target_y, "Action": "UP"}, ignore_index=True) curr_y = curr_y + beetle_m sprite.setdirection(DIRECTION=0) sprite.setx(curr_x) sprite.sety(curr_y) if sprite.iskeypressed("down arrow"): data = data.append({"curr_X": curr_x, "curr_Y": curr_y, "tar_x": target_x, "tar_y": target_y, "diff_x":curr_x-target_x, "diff_y":curr_y-target_y, "Action": "DOWN"}, ignore_index=True) curr_y = curr_y - beetle_m sprite.setdirection(DIRECTION=-180) sprite.setx(curr_x) sprite.sety(curr_y) if sprite.iskeypressed("left arrow"): data = data.append({"curr_X": curr_x, "curr_Y": curr_y, "tar_x": target_x, "tar_y": target_y, "diff_x":curr_x-target_x, "diff_y":curr_y-target_y, "Action": "LEFT"}, ignore_index=True) curr_x = curr_x - beetle_m sprite.setdirection(DIRECTION=-90) sprite.setx(curr_x) sprite.sety(curr_y) if sprite.iskeypressed("right arrow"): data = data.append({"curr_X": curr_x, "curr_Y": curr_y, "tar_x": target_x, "tar_y": target_y, "diff_x":curr_x-target_x, "diff_y":curr_y-target_y, "Action": "RIGHT"}, ignore_index=True) curr_x = curr_x + beetle_m sprite.setdirection(DIRECTION=90) sprite.setx(curr_x) sprite.sety(curr_y) if(score>0 and score%10==0): data.to_csv('Chase_Data.csv',index=False) if abs(curr_x-target_x)<20 and abs(curr_y-target_y)<20: score = score + 1 sprite.say(("your score is: {}".format(score))) if (score >= 20): data.to_csv('Chase_Data.csv',index=False) break target_x, target_y = settarget(40) - Press the Run button and play “BeetleBot: Autonomous Feeding in Space” game to collect data.
- Store this dataset on your local computer.

Alert: The Machine Learning Environment for model creation is available in the only desktop version of PictoBlox for Windows, macOS, or Linux. It is not available in Web, Android, and iOS versions.
Follow the steps below:
- Open PictoBlox and create a new file.
- Select the coding environment as Block Coding Environment.
- Select the “Open ML Environment” option under the “Files” tab to access the ML Environment.
- You’ll be greeted with the following screen.
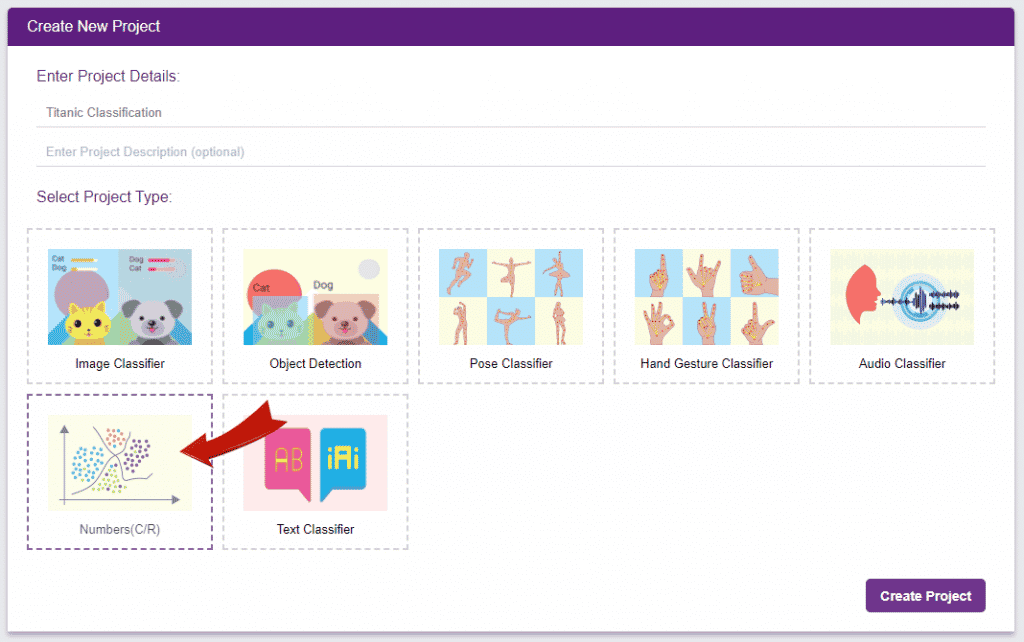
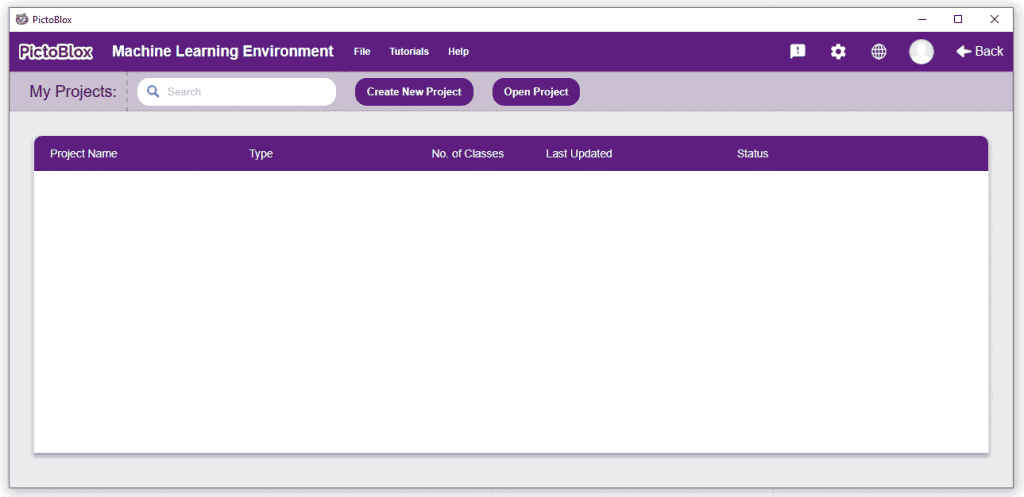 Click on “Create New Project“.
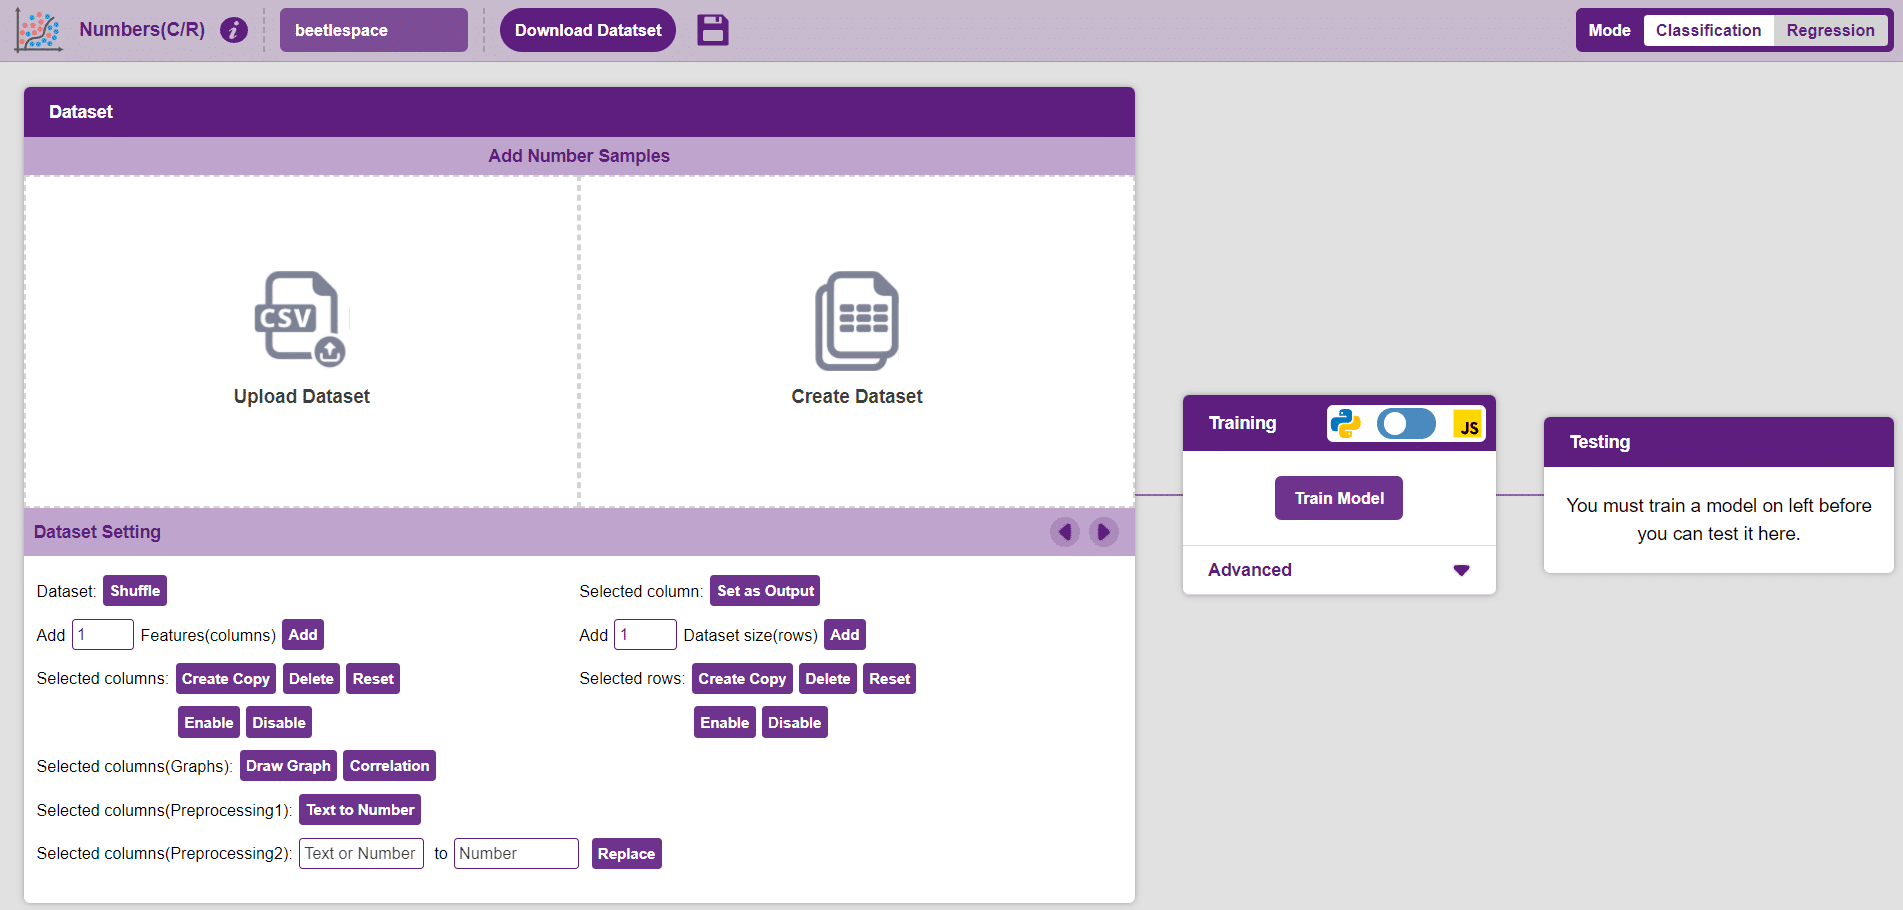
 - You shall see the Numbers C/R workflow with an option to either “Upload Dataset” or “Create Dataset”.
Uploading/Creating Dataset
Datasets can either be uploaded or created on the ML Environment. Lets see how it is done.
Uploading a dataset
- To upload a dataset, click on the Upload Dataset button and the Choose CSV from your files button.
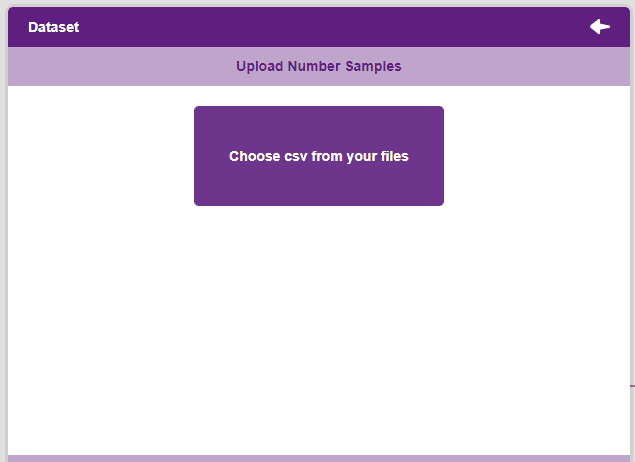
 Note: An uploaded dataset must be a “.csv” file.
 - Once uploaded the first 50 rows of the uploaded CSV document will show up in the window.
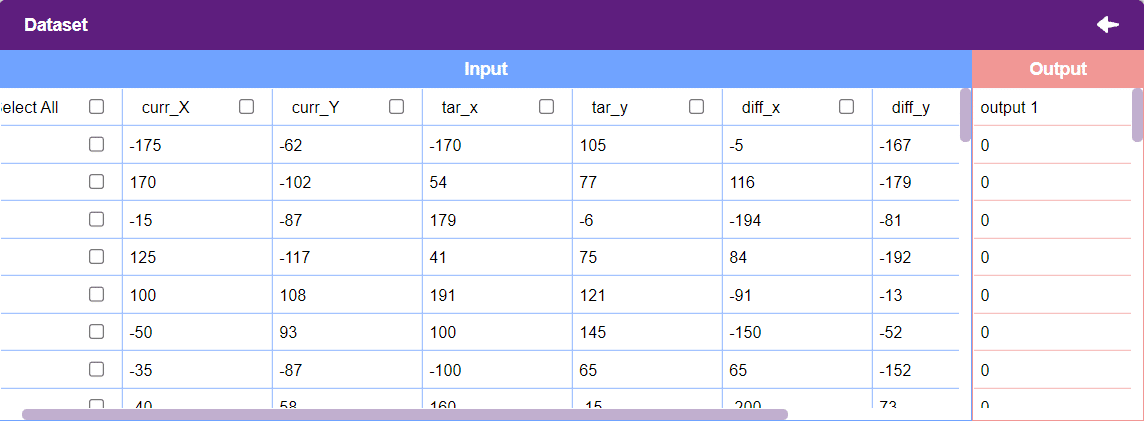
- If you look at the output column, all the values are currently “0”. Hence, first we need to create an output column.
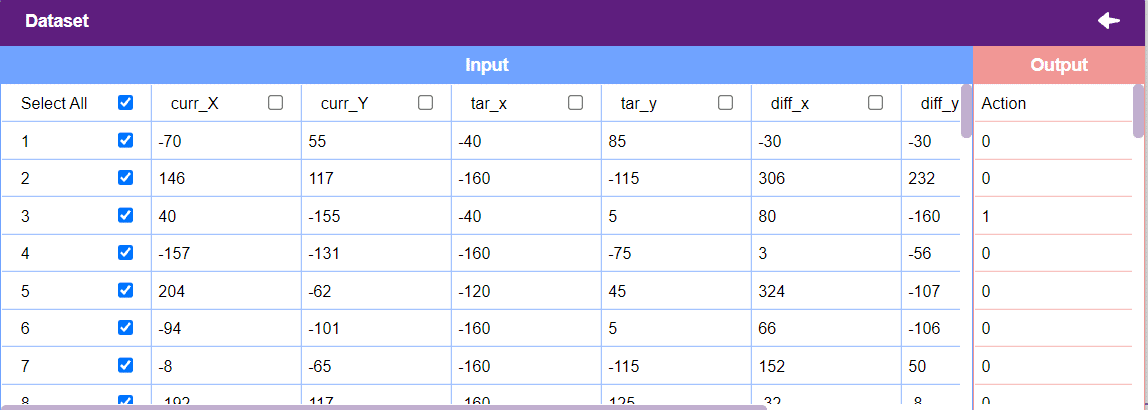
- In the Dataset table, click on the tick near Select All to de-select all the columns.
- click on the tick of Action column to select it. We will make this column the output.
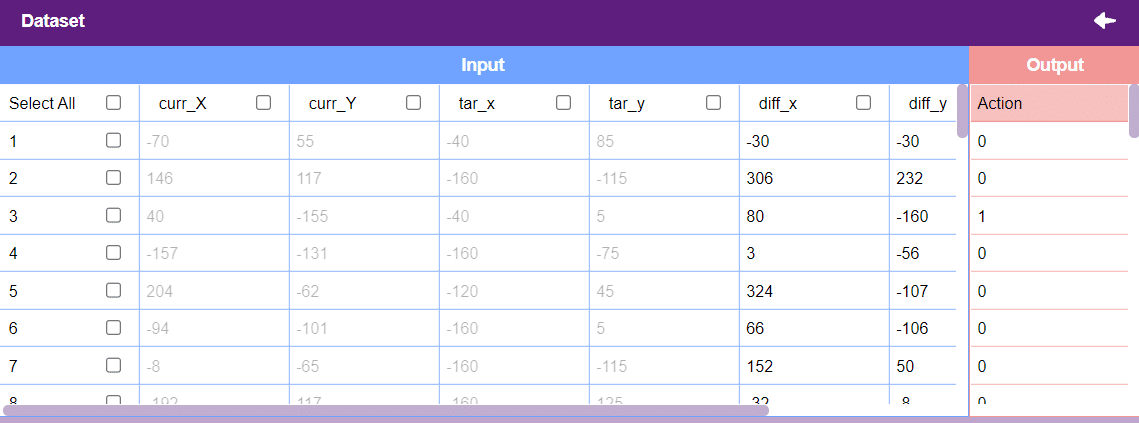
- The output column must always be numerical. Hence click on the button Text to Number to convert the data within this column to numerical type.
- Now select it again and press the Set as Output button to set this column as Output.
- There is also many which is not useful in training our model and needs to be disable. So select it and click the Disable button in the Selected columns section.
Creating a Dataset
- To create a dataset, click on the Create Dataset button.
- Select the number of rows and columns that are to be added and click on the Create button. More rows and columns can be added as and when needed.
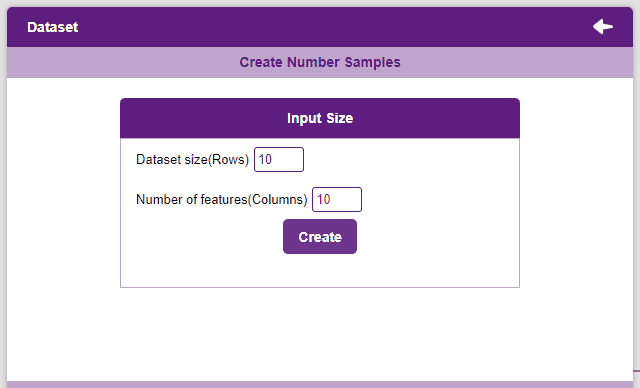
Notes:
- Each column represents a feature. These are the values used by the model to train itself.
- The “Output” column contains the target values. These are the values that we expect the model to return when features are passed.
- The window only shows the first 50 rows of the dataset.
- Un-check the “Select All” checkbox to un-select all the columns.
Training the Model
After data is pre-processed and optimized, it’s fit to be used in model training. To train the model, simply click the “Train Model” button found in the “Training” panel.
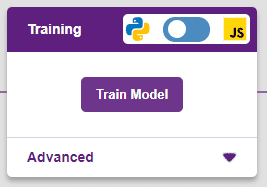
By training the model, meaningful information is extracted from the numbers, and that in turn updates the weights. Once these weights are saved, the model can be used to make predictions on data previously unseen.
The model’s function is to use the input data and predict the output. The target column must always contain numbers.
However, before training the model, there are a few hyperparameters that need to be understood. Click on the “Advanced” tab to view them.
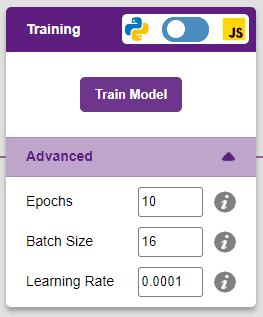
There are three hyperparameters that can be altered in the Numbers(C/R) Extension:
- Epochs– The total number of times the data will be fed through the training model. Therefore, in 10 epochs, the dataset will be fed through the training model 10 times. Increasing the number of epochs can often lead to better performance.
- Batch Size– The size of the set of samples that will be used in one step. For example, if there are 160 data samples in the dataset, and the batch size is set to 16, each epoch will be completed in 160/16=10 steps. This hyperparameter rarely needs any altering.
- Learning Rate– It dictates the speed at which the model updates the weights after iterating through a step. Even small changes in this parameter can have a huge impact on the model performance. The usual range lies between 0.001 and 0.0001.
Note: Hover the mouse pointer over the question mark next to the hyperparameters to see their description.It’s a good idea to train a numeric classification model for a high number of epochs. The model can be trained in both JavaScript and Python. In order to choose between the two, click on the switch on top of the Training panel.
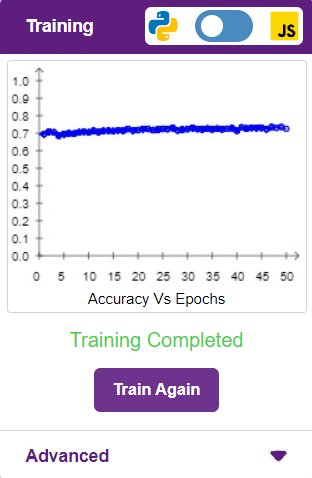
Alert: Dependencies must be downloaded to train the model in Python, JavaScript will be chosen by default.The accuracy of the model should increase over time. The x-axis of the graph shows the epochs, and the y-axis represents the accuracy at the corresponding epoch.
A window will open. Type in a project name of your choice and select the “Numbers(C/R)” extension. Click the “Create Project” button to open the Numbers(C/R) window.
Testing the Model
To test the model, simply enter the input values in the “Testing” panel and click on the “Predict” button.
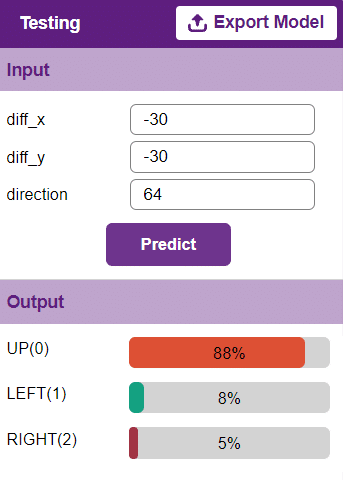
The model will return the probability of the input belonging to the classes.
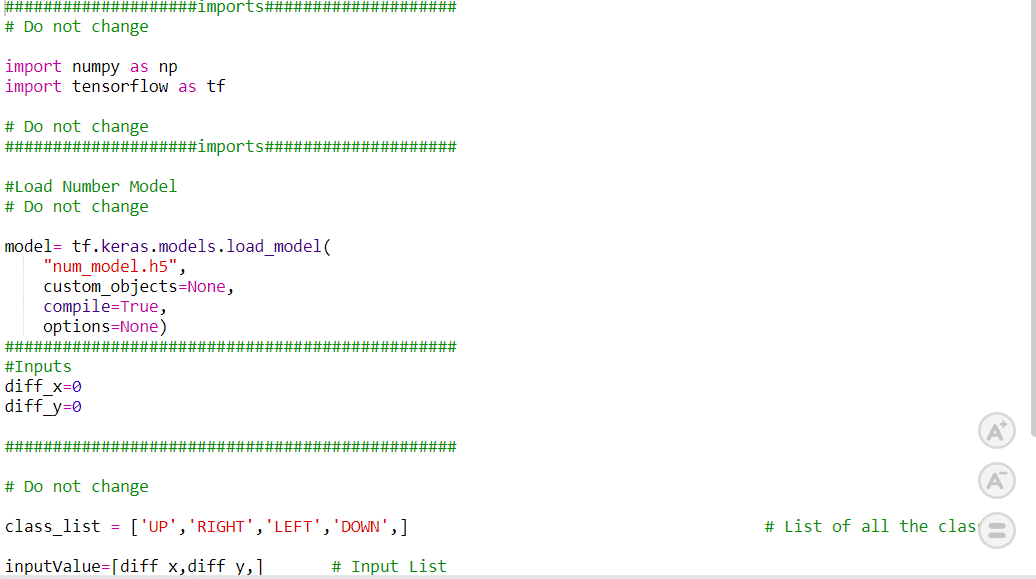
Export in Python Coding
Click on the “PictoBlox” button, and PictoBlox will load your model into the Python Coding Environment if you have opened the ML Environment in Python Coding.
- To upload a dataset, click on the Upload Dataset button and the Choose CSV from your files button.
Code
- Click on the Beetle.py file from the Project files section.
sprite = Sprite('Beetle') - Similarly, declare new sprite on the Beetle.py file.
sprite1 = Sprite('Strawberry') - Then we will import the time, random, TensorFlow as tf and Pandas as pd modules using the import keyword for using delay in the program later.
- Time – For using delay in the program.
- Random – For using random position.
- Pandas as pd – For using Data Frame.
- TensorFlow – For loading model.
import random
import time
import tensorflow as tf
import pandas as pd
- Now, make 3 variables curr_x, curr_y, beetle_m, angle and score with initial values -170, 138, 15, 90 and 0 respectively.
- curr_x – To store the initial x – position of beetle.
- curr_y – To store the initial y – position of beetle.
- beetle_m – To store increment value in movement of beetle on pressing specific key.
- angle – To store initial angle of beetle.
- score – To store the score while playing the game.
curr_x = -170
curr_y = 138
beetle_m= 15
angle = 90
score = 0
- Now set initial position and angle of beetle.
sprite.setx(curr_x) sprite.sety(curr_y) sprite.setdirection(DIRECTION=90) - Now, make a function settarget() in which we are generating strawberry at a random position. We pass one argument “t” in the function for generating target strawberry in the greed position of the t gap.
- x and y – To generate the food(strawberry) at random position on stage.
- time.sleep – For giving the time delay.
- sprite1.set()– To Set the position of food at random position on stage.
def settarget(t):
x = random.randrange(-200, 200, t)
y = random.randrange(-155, 155, t)
time.sleep(0.1)
sprite1.setx(x)
sprite1.sety(y)
return x, y
- Now set the position of strawberry. In this, beetle are chasing the strawberry, and target_x and target_y should be equal to the x and y positions of the strawberry.
target_x, target_y = settarget(40) - Now, make a function runprediction() in which we are predicting class (Left, Up, Right, Down) by taking argument from user . We pass three arguments “diff_x”, “diff_y” in the function.
- inputvalue – To store input parameters of function in array.
- model.predict() – For predicting output from trained model.
- np.argmax(,)– To find the most probable prediction output.
def runprediction(diff_x, diff_y):
  inputValue=[diff_x, diff_y]
  #Input Tensor
  inputTensor = tf.expand_dims(inputValue, 0)
  #Predict
  predict = model.predict(inputTensor)
  predict_index = np.argmax(predict[0], axis=0)
  #Output
  predicted_class = class_list[predict_index]
  return predicted_class
- After that, we will use the while True loop to run the code indefinitely. Don’t forget to add a colon ‘:’ just after the loop to avoid errors.
while True: - In while loop find angle of sprite and call runprediction function by passing arguments in it.
angle=sprite.direction() move = runprediction(curr_x- target_x, curr_y-target_y, angle) - Now write the script for moving the Beetle in forward direction, Upward direction, Left direction and Right direction by fix value with the help of a conditional statement.
- If the predicted value is “UP” then beetle will move beetle_m position in direction=0.
- If the predicted value is “LEFT” then beetle will move beetle_m position in direction=-90.
- If the predicted value is “RIGHT” then beetle will move beetle_m position in direction=90.
- If the predicted value is “DOWN” then beetle will move beetle_m position in direction=-180.
if move == "UP": curr_y = curr_y + beetle_m sprite.setdirection(DIRECTION=0) sprite.setx(curr_x) sprite.sety(curr_y) if move == "LEFT": curr_x = curr_x - beetle_m sprite.setdirection(DIRECTION=-90) sprite.setx(curr_x) sprite.sety(curr_y) if move == "RIGHT": curr_x = curr_x + beetle_m sprite.setdirection(DIRECTION=90) sprite.setx(curr_x) sprite.sety(curr_y)if move == "DOWN": curr_y = curr_y - beetle_m sprite.setdirection(DIRECTION=-180) sprite.setx(curr_x) sprite.sety(curr_y)
- Again write the conditional statement for the score variable if the beetle and strawberry position difference is less then 20 then the score should be increased by one also set new position of target.
if abs(curr_x-target_x)<20 and abs(curr_y-target_y)<20: score = score + 1 sprite.say(("your score is: {}".format(score))) target_x, target_y = settarget() - Now add delay function for delaying movement by 0.02 seconds.
time.sleep(0.02) - The final code is as follows:
sprite = Sprite('Beetle')
sprite1 = Sprite('Strawberry')

import random
import time
import numpy as np
import tensorflow as tf

#Load Number Model
model= tf.keras.models.load_model(
		"num_model.h5",
		custom_objects=None,
		compile=True,
		options=None)

#List of classes
class_list = ['RIGHT','LEFT','DOWN','UP',]

curr_x = -170
curr_y = 138
score=0
beetle_m=30
angle=90

sprite.say(("your score is: {}".format(score)))
sprite.setx(-170)
sprite.sety(138)
sprite.setdirection(DIRECTION=angle)

def settarget():
  x = random.randrange(-200, 200, 1)
  y = random.randrange(-155, 155, 1)
  time.sleep(0.1)
  sprite1.setx(x)
  sprite1.sety(y)
  return x, y

target_x, target_y = settarget()

def runprediction(diff_x, diff_y):
  inputValue=[diff_x, diff_y]
  #Input Tensor
  inputTensor = tf.expand_dims(inputValue, 0)
  #Predict
  predict = model.predict(inputTensor)
  predict_index = np.argmax(predict[0], axis=0)
  #Output
  predicted_class = class_list[predict_index]
  return predicted_class

while True:

  move = runprediction(curr_x- target_x, curr_y-target_y)

  if move == "UP":
    curr_y = curr_y + beetle_m
    sprite.setdirection(DIRECTION=0)
    sprite.setx(curr_x)
    sprite.sety(curr_y)

  if move == "DOWN":
    curr_y = curr_y - beetle_m
    sprite.setdirection(DIRECTION=-180)
    sprite.setx(curr_x)
    sprite.sety(curr_y)

  if move == "LEFT":
    curr_x = curr_x - beetle_m
    sprite.setdirection(DIRECTION=-90)
    sprite.setx(curr_x)
    sprite.sety(curr_y)


  if move == "RIGHT":
    curr_x = curr_x + beetle_m
    sprite.setdirection(DIRECTION=90)
    sprite.setx(curr_x)
    sprite.sety(curr_y)


  if abs(curr_x-target_x)<20 and abs(curr_y-target_y)<20:
    score = score + 1
    sprite.say(("your score is: {}".format(score)))
    target_x, target_y = settarget()

  time.sleep(0.2)
Final Result
Conclusion
Creating a Machine Learning Model of “Beetle’s Cosmic Feast: Strawberry Space Adventure” can be both complex and time-consuming. Through the steps demonstrated in this project, you can create your own Machine Learning Model of automated game. Once trained, you can export the model into the Python Coding Environment, where you can tweak it further to give you the desired output. Try creating a Machine Learning Model of your own today and explore the possibilities of Number Classifier in PictoBlox!
- Open PictoBlox and create a new file.