
Introduction
There are two inbuilt 3-way slide switches in evive.
Slide switch 1 is connected to Arduino pins 40 and 41, both active high. This means that when the switch is slid up, pin 40 is high. When it slides down, pin 41 is high while both are low when the switch is in the middle.
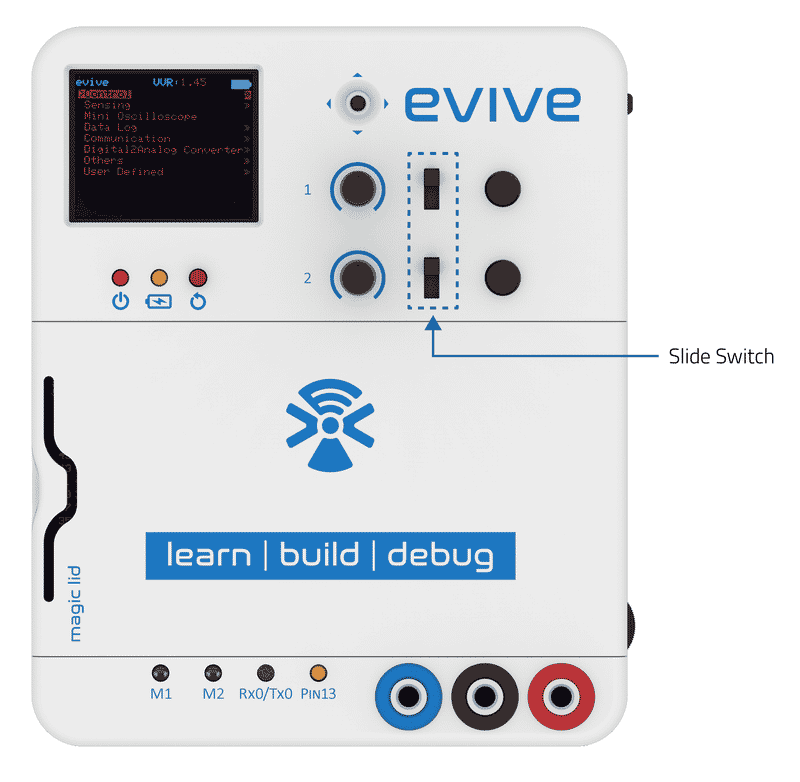
Slide switch 2 is connected to pins 42 and 43, and behaves similarly as above.

Slide switches are used in motor control to control the direction of the motor.
Programming in Arduino IDE
The test code for the slide switch is:
/*
 evive inbuit slideswitch code

Slideswitch 1 is connected to digital pin 40 and 41.
 Slideswitch 2 is connected to digital pin 42 and 43.

This code demonstrates how to use evive inbuilt slideswitches switches.
 The code turns on and off a bi-dectional LED connected to digital
 pin 28 and 29, when sliding the switch to either sides.

Created by Pankaj Kumar Verma and Akshat Agarwal
 On 12 Dec, 2016
 This example code is in the public domain.
 */

// set pin numbers:
int slidePin1 = 40; // the number of the slideswitch 1 pin 1
int slidePin2 = 41; // the number of the slideswitch 1 pin 2

//int slidePin1 = 42; // the number of the slideswitch 2 pin 1
//int slidePin2 = 43; // the number of the slideswitch 2 pin 2

// Note: This code is meant to run for only one slideswitch. Please initialise only one slideswitch.

int ledPin1 = 30; // the number of the LED pin
int ledPin2 = 31;

int buttonState1 = 0; // variable for reading the pushbutton pin 1 status
int buttonState2 = 0; // variable for reading the pushbutton pin 2 status

void setup() {
 // initialize the LED pins as an output:
 pinMode(ledPin1, OUTPUT);
 pinMode(ledPin2, OUTPUT);
 // initialize the slideswitch pins as an input:
 pinMode(slidePin1, INPUT);
 pinMode(slidePin1, INPUT);
 // open serial port, set data rate at 9600 bps:
 Serial.begin(9600);
}

void loop() {
 // read the state of the pushbutton value:
 buttonState1 = digitalRead(slidePin1);
 buttonState2 = digitalRead(slidePin2);

 // check if the slideswitch is in state 1.
 // if it is, the buttonState1 is HIGH:
 if (buttonState1 == HIGH) {
 // print on serial monitor
 Serial.println("The slideswitch is in state 1");
 delay(100);
 // turn LED leg 1 on:
 digitalWrite(ledPin1, HIGH);
 // turn LED leg 2 off:
 digitalWrite(ledPin2, LOW);
 }

// check if the slideswitch is in state 2.
 // if it is, the buttonState2 is HIGH:
 else if (buttonState2 == HIGH) {
 // print on serial monitor
 Serial.println("The slideswitch is in state 2");
 delay(100);
 // turn LED leg 1 off:
 digitalWrite(ledPin1, LOW);
 // turn LED leg 2 on:
 digitalWrite(ledPin2, HIGH);
 }

 else {
 // turn LED leg 1 off:
 digitalWrite(ledPin1, LOW);
 // turn LED leg 2 off:
 digitalWrite(ledPin2, LOW);
 }
}
Programming in PictoBlox
To get the state of the slide switch in PictoBlox, we will use slide switch () is in state () block. This block can be found under the evive extension.
This block takes the slide switch number (1 or 2) and state to be checked for (Up or Down) as input and returns “True” if the slide switch is in the specified state and “False” if it is not in the specified state.
![]()
This block can be used in Upload Mode as well as in Stage Mode.
Example
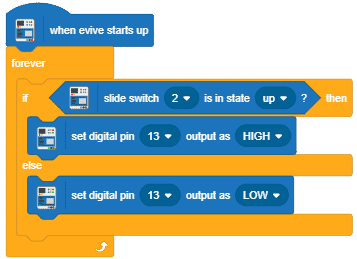
- In this script, if slide switch 2 is slid up (state 1), the LED on evive (connected to pin 13), glows.
Conclusion
In conclusion, slide switches are used to control the direction of motors in evive. Two inbuilt 3–way slide switches are connected to Arduino pins 40 and 41 and 42 and 43 respectively. Programming in Arduino IDE and PictoBlox can be used to read the state of the slide switch. The slide switch () is in state () block and can be used to check if the slide switch is in the specified state.