Introduction
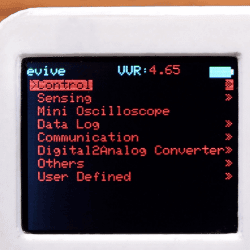
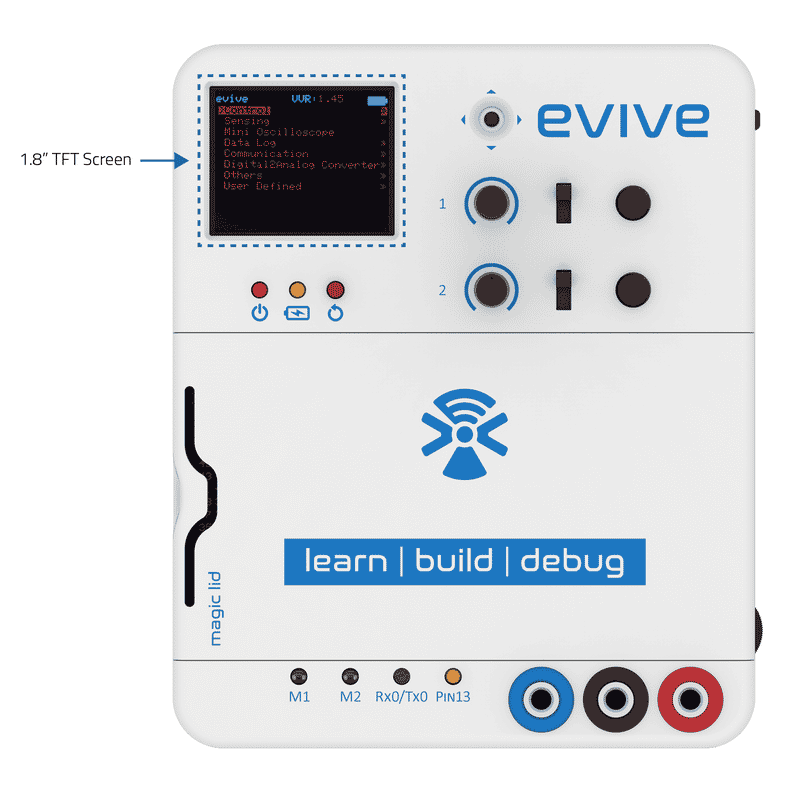
evive has a 1.8” TFT Display which is mainly used for visual feedback. The display has 128 x 160 color pixels. The TFT driver (ST7735R) can display full 18-bit color (262,144 shades).
ST7735R Driver
The ST7735 is a single-chip controller/driver for 262K-color, graphics type TFT-LCD. It consists of 396 source lines and 162 gate line driving circuits. This chip is capable of connecting directly to an external microprocessor and accepts Serial Peripheral Interface (SPI), 8-bit/9-bit/16-bit/18-bit parallel interface. Display data can be stored in the on-chip display data RAM of 132 x 162 x 18 bits. It can perform display data RAM read/write operation with no external operation clock to minimize power consumption.
Controlling display using Arduino IDE
We will use evive Library to control the TFT display in Arduino IDE. You can download it from here. If you don’t know how to install a library, click here to see the tutorial.
Display Functions
Following are the functions available for use:
| Function | Description |
|---|---|
| drawLine(int16_t x0, int16_t y0, int16_t x1, int16_t y1, uint16_t color) | Draw a line using two points |
| drawFastVLine(int16_t x, int16_t y, int16_t h, uint16_t color) | Draw a vertical line |
| drawFastHLine(int16_t x, int16_t y, int16_t w, uint16_t color) | Draw a horizontal line |
| drawRect(int16_t x, int16_t y, int16_t w, int16_t h, uint16_t color) | Draw a rectangle using one point coordinate, width and height |
| fillRect(int16_t x, int16_t y, int16_t w, int16_t h, uint16_t color) | Draw a filled rectangle using one point coordinate, width and height |
| fillScreen(uint16_t color) | Change screen colour |
| drawCircle(int16_t x0, int16_t y0, int16_t r, uint16_t color) | Draw a circle using center point coordinate and radius of the circle |
| fillCircle(int16_t x0, int16_t y0, int16_t r, uint16_t color) | Draw a filled circle using center point coordinate and radius of the circle |
| drawTriangle(int16_t x0, int16_t y0, int16_t x1, int16_t y1, int16_t x2, int16_t y2, uint16_t color) | Draw a triangle using three points coordinate |
| fillTriangle(int16_t x0, int16_t y0, int16_t x1, int16_t y1, int16_t x2, int16_t y2, uint16_t color) | Draw a filled triangle using three points coordinate |
| drawRoundRect(int16_t x0, int16_t y0, int16_t w, int16_t h, int16_t radius, uint16_t color) | Draw a round rectangle using one point coordinate, width, height and radius |
| fillRoundRect(int16_t x0, int16_t y0, int16_t w, int16_t h, int16_t radius, uint16_t color) | Draw a filled round rectangle using one point coordinate, width, height and radius |
| drawBitmap(int16_t x, int16_t y, const uint8_t *bitmap, int16_t w, int16_t h, uint16_t color) | Draw a Bitmap |
| drawBitmap(int16_t x, int16_t y, const uint8_t *bitmap, int16_t w, int16_t h, uint16_t color, uint16_t bg) | Draw a Bitmap |
| setCursor(int16_t x, int16_t y) | Set cursor to a location |
| setTextColor(uint16_t c) | Set text colour |
| setTextColor(uint16_t c, uint16_t bg) | Set text colour |
| setTextSize(uint8_t s) | Set text size |
| setTextWrap(boolean w) | Set text wrap |
| setRotation(uint8_t r) | Set rotation |
| int16_t height(void) const; | Get height |
| int16_t width(void) const; | Get width |
| uint8_t getRotation(void) const; | Get Rotation |
| int16_t getCursorX(void) const; | Get curser X position |
| int16_t getCursorY(void) const; | Get curser Y position |
| println(text) | Write text |
Example 1: All functions of Display


/*
 * evive TFT Display
 *
 * This code demonstrates how to use TFT Display functions.
 *
 * Created by Pankaj Kumar Verma
 * On 7 Mar, 2017
 */

#include<evive.h>

void setup() {
  Serial.begin(9600);
  tft.init(INITR_BLACKTAB);   // initialize a ST7735S chip, black tab
  tft.setRotation(1);
  Serial.println("Initialized");
  tft.fillScreen(ST7735_BLACK);
}

void loop() {
  // Drawing Lines
  tft.drawLine(10, 10, 150, 118, ST7735_RED);
  tft.drawLine(10, 118, 150, 10, ST7735_RED);
  delay(1000);
  tft.fillScreen(ST7735_BLACK);

  // Drawing Fast Verticle Lines
  for(int i = 10; i< 151; i = i+10)
    {
      tft.drawFastVLine(i, 1, 128, ST7735_RED);
    }

  // Drawing Fast Horizontal Lines
  for(int i=10; i<121; i = i+10)
    {
      tft.drawFastHLine(1, i, 160, ST7735_RED);
    }
  delay(1000);
  tft.fillScreen(ST7735_BLACK);

  // Draw Rectangle
  tft.drawRect(10, 10, 140, 108, ST7735_WHITE);
  tft.fillRect(20, 20, 120, 88, ST7735_RED);
  delay(1000);
  tft.fillScreen(ST7735_BLACK);

  // Draw Round Rectangle
  tft.drawRoundRect(10, 10, 140, 108, 10, ST7735_WHITE);
  tft.fillRoundRect(20, 20, 120, 88, 4, ST7735_RED);
  delay(1000);
  tft.fillScreen(ST7735_BLACK);

  // Draw Circle
  tft.drawCircle(80, 64, 60, ST7735_WHITE);
  tft.fillCircle(80, 64, 50, ST7735_RED);
  delay(1000);
  tft.fillScreen(ST7735_BLACK);

  // Draw Triangle
  tft.drawTriangle(80, 10, 10, 118, 150, 118, ST7735_WHITE);
  tft.fillTriangle(80, 30, 30, 108, 130, 108, ST7735_RED);
  delay(1000);
  tft.fillScreen(ST7735_BLACK);

  // Write text
  tft.setCursor(0,5);
  tft.setTextColor(ST7735_WHITE);
  for(int i = 1; i < 6; i++)
    {
      tft.setTextSize(i);
      tft.println("evive");
      delay(100);
    }
  delay(1000);
  tft.fillScreen(ST7735_BLACK);
}
Example 2: Hello World!
/*
  Using TFT Display

  This code shows how to use TFT display attached on evive.
  Explore more on:https://thestempedia.com/tutorials/tft-hello/
*/

#include <evive.h>
void setup() {
tft_init(INITR_BLACKTAB); // this is used to initialize TFT display
tft.setRotation(1); // this rotates screen by 90 degree
tft.fillScreen(ST7735_BLACK); // this filles display with black colour
tft.setCursor(0,10); // this sets corser to write on (0,10) location
tft.setTextColor(ST7735_WHITE);
tft.println("Hello World!"); //print function
tft.println("");
tft.print("My name is evive and this is my first TFT display code.");

// put your setup code here, to run once:
}

void loop() {
// put your main code here, to run repeatedly:

}
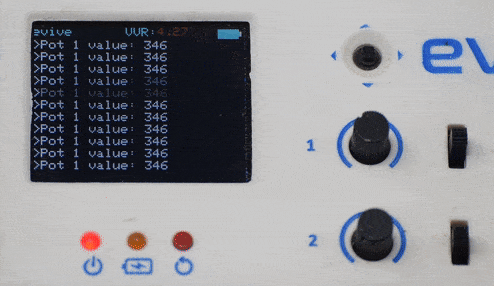
Example 3: Display values of variables on evive’s TFT screen line by line
In this example, you will learn to print the value of the variable on TFT display screen of evive line by line. It is printed in the same way as the value of variables is printed on a serial monitor continuously in Arduino IDE.
In this example analog value of Pot 1(pin A9) is read and printed on Tft monitor using function print() and println() functions.
/*
	This example shows how to plot any variable on evive TFT display.

  Explore more on: https://thestempedia.com/tutorials/tft-monitor/
  Created by Dhrupal Shah.

  This code is in public domain.

*/

#include<evive.h>                         //include evive library

TftMonitor tft_Monitor;                     // Initialize a class object

void setup(){
  tft_init(INITR_BLACKTAB);               //Use either INITR_BLACKTAB or INITR_GREENTAB. Initialize TFT screen in library screen.cpp
  tft_Monitor.begin();                     // Begins tftMonitor
  pinMode(A9,INPUT);                      // Set pin as input mode (POT1 = A9)
}

// the loop function runs continuously when you select the user defined function
void loop(){
  tft.setTextColor(ST7735_WHITE,ST7735_BLACK);
  tft_Monitor.print("Pot 1 value: ");
  tft_Monitor.println(analogRead(A9));     // Pot1 Value is printed on TFT Monitor
  delay(50);
}
Controlling Display using PictoBlox
Using the Display Extension blocks you can control the TFT display of evive.

Conclusion
In conclusion, the evive 1.8” TFT Display is a great tool for providing visual feedback on projects. It is easy to control using the Arduino IDE and Scratch, making it a great choice for projects that require visual feedback. With its wide range of functions, it can be used to create unique displays and visuals.