Introduction
Bluetooth (Wikipedia) is a wireless technology standard for exchanging data over short distances (using short-wavelength UHF radio waves in the ISM band from 2.4 to 2.485 GHz) from fixed and mobile devices, and building personal area networks (PANs).
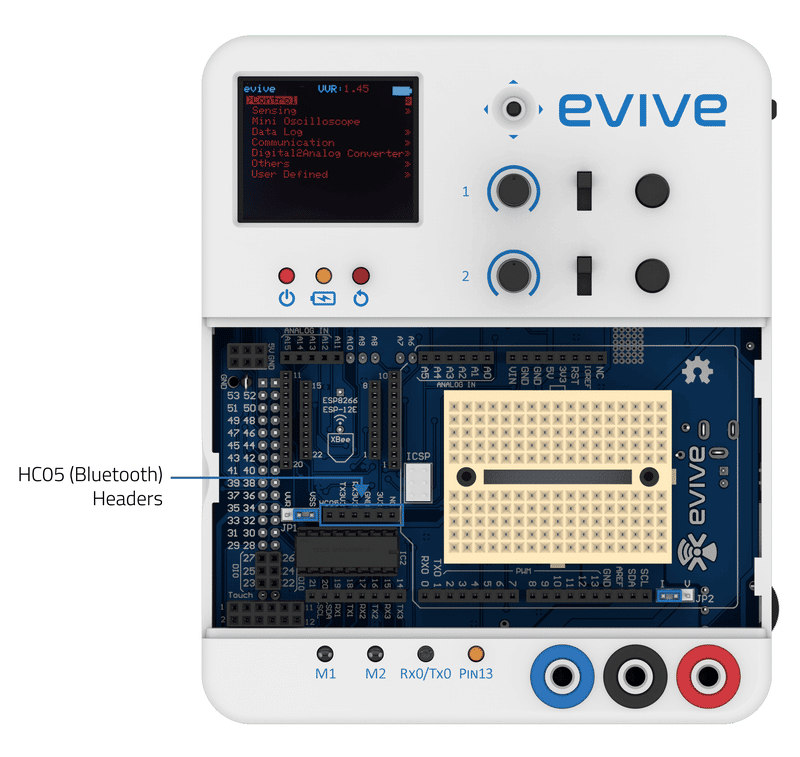
evive has dedicated Bluetooth (HC05) headers, which just require you to connect the HC05 Bluetooth module.
HC05 Bluetooth Module
The HC-05 module is an easy-to-use Bluetooth SPP (Serial Port Protocol) module, designed for transparent wireless serial connection setup. Serial port Bluetooth module is fully qualified Bluetooth V2.0+EDR (Enhanced Data Rate) 3Mbps Modulation with a complete 2.4GHz radio transceiver and baseband.

HM10 Module
The HM-10 is a readily available Bluetooth 4.0 module based on the Texas Instruments CC2540 or CC2541 Bluetooth low energy (BLE) System on Chip (SoC).
- The HM-10 is rated to operate at a supply voltage of 2.0 to 3.7 volts, and its I/O are 3.3V tolerant!
- HM-10, 11 and 12 all use TI’s BLE4.0 CC2540 chip.
- To put the device in sleep mode: send AT+SLEEP. To wake up from sleep mode, you can send a long string (>80 characters).
Programming in Arduino IDE
Serial Port 3 of evive is directly connected to the serial ports of Bluetooth. All the data transmission hence happens through serial port 3.
Example
/*
	This example is used to communicate with peripherals connected to Serial3 Port.
	Messages/Data read from Seripa Port 3 will be sent to Serial Port 0 (connected to USB) and vice-versa.

	Just simply change BAUD rate to your desired and open Serial Monitor in Arduino IDE

	Note: Make sure you have selected Both NL and CR at bottom of Serial monitor with proper baud

	Made by Nihar Shah, Agilo Research
	On 12 October 2017.
*/

void setup() {
  Serial.begin(250000);							// Start Serial 0 (USB) at BAUD rate 250000
  Serial3.begin(115200);						// Start Serial 3 at BAUD here as per the module
  delay(50);
  Serial3.print("AT\r\n");    			// AT to check whether device is connected or not? Typically Replies with OK
}

void loop() {

  while (Serial.available())				//Checks wether any data is recieved on Serial (USB) (Serial Port 0)
  {
    Serial3.write(Serial.read());		//Reads the data from Serial Port 0 and send/write it to Serial Port 3
  }

  while (Serial3.available())				//Checks wether any data is recieved on Serial Port 3
  {
    Serial.write(Serial3.read());		//Reads the data from Serial Port 3 and send/write it to Serial Port 0
  }
  delay(100);
}
Configure the HC05 Bluetooth Module using AT Commands
This section discusses how to set up the Bluetooth module with the help of an Arduino IDE sketch. You will set up the Bluetooth device by changing its Name, Password, and Baud rate.
Set Bluetooth in AT mode
- Upload the code to evive (DO NOT connect Bluetooth).
- Turn off evive ( Remove the cable or turn the power switch OFF).
- Plug Hc-05 in evive.
- Press and hold the push button on the Hc-05 module.
- Switch evive ON.
- Release the push button now if the led on Hc-05 starts blinking with a time difference of approx 2 seconds this means that Hc-05 successfully went into AT mode.
- In AT mode Bluetooth always communicates at a baud of 38400 and with each command, it is mandatory to send ‘\r’ and ‘\n’ while using the HC-05 module. For example, if you want to send the command “AT+NAME=evive” then it should be sent like “AT+NAME=evive\r\n”. This will be more clear from example given below.
Working of code
- As mentioned in the point above that Bluetooth always communicates at a baud rate of 38400 in AT mode hence baud of communication between evive and Bluetooth is set to 38400 in command Serial3.begin(38400);”
- Once the Bluetooth goes in AT mode it gets AT commands from evive to change the name, password, and baud rate of evive. AT Command for displaying the address of Bluetooth is also given.
- As soon as the code is uploaded open the Serial monitor and set the baud rate of the serial monitor to the value written in Serial.begin().
- evive continuously sends one type of AT command until it gets a response from Hc-05. As evive gets a proper response it sends the next command. For each command sent to Hc-05 if it responds successfully, its response is printed on the Serial monitor.
 Note: The baud set by AT+UART=115200,0,0 is the baud at which Bluetooth communicates with evive in pairing mode. And also AT+UART command only changes the baud of Bluetooth for communication in pairing mode. Bluetooth always works at a baud of 38400 in AT mode.
 - As soon as Bluetooth gets “AT+INIT\r\n” command from the code it exits from AT mode and goes into pairing mode.
- Pin-13 also turns on. This suggests that Bluetooth has been configured successfully as per the commands given in the code. When Bluetooth is in pairing mode the led of Bluetooth blinks fast showing that it is ready to get paired.
Note: After Bluetooth gets “AT+INIT\r\n” command if the led still blinks in the same pattern as in AT mode it means that Bluetooth is still in AT mode and not in pairing mode. In that case, just unplug Hc-05 and plug it again in evive. But this time without pressing the push button of Bluetooth.
- “AT+INIT\r\n” is for getting Bluetooth in pairing mode. But this command works on only some firmware versions of Bluetooth.
Arduino IDE Sketch
Below is the Arduino IDE sketch:
/*
  evive Bluetooth Setup

  An example of using the evive to Setup HC-05 Bluetooth.
  This example changes some configurations like name, baud rate, password of
  HC-05 module.
  In order to change all this parameters it is necessary to make sure that HC-05
  is in AT mode.
  There are two ways of getting Bluetooth in ATmode:

  1) For getting HC-05 in AT mode press the push button on HC-05 before powering it and keep
  it in pushed state even after powering it. If the led of bluetooth starts blinking after time
  duration of two seconds then bluetooth is in AT mode. Release the button after that.

  2) One can also connect 5V to EN/KEY pin of HC-05 to bring it in AT mode.

  The LED on HC-05 starts blinking after every
  2 seconds approx, this blink is different from the blink of led in pairing mode.

  Explore more at:   https://thestempedia.com/tutorials/bluetooth-setup/

*/
#include<evive.h>
bool response = 0;
String response_data = "";
void setup() {
  // initialize Serial3 communication of bluetooth which is on Serial3 3:
  // bluetooth setup is done at 38400 baud with New line and Carriage Return
  Serial3.begin(38400);              //Baud for communication in ATmode
  Serial.begin(250000);
  // initialize the LED pin as an output:
  pinMode(LED_BUILTIN, OUTPUT);
  while (!(response))
  {
    Serial3.print("AT+ADDR\r\n");
    response_data = Serial3.readString();
    if (response_data != '\0')
    {
    Serial.println("AT+ADDR");
    Serial.println(response_data);
    response++;
    }
  }
  response = 0;
  while (!(response))
  {
    Serial3.print("AT+UART=115200,0,0\r\n");
    response_data = Serial3.readString();
    if (response_data == "OK\r\n")
    {
     Serial.println("AT+UART=115200,0,0");
     Serial.println(response_data);
     response++;
    }
  }
  response = 0;
  while (!(response))
  {
    Serial3.print("AT+NAME=evive\r\n");
    response_data = Serial3.readString();
    if (response_data == "OK\r\n")
     {
      Serial.println("AT+NAME=evive");
      Serial.println(response_data);
      response++;
     }
  }
  response = 0;
  while (!(response))
  {
    Serial3.print("AT+PSWD=\"0000\"\r\n");
    response_data = Serial3.readString();
    if (response_data == "OK\r\n")
    {
      Serial.println("AT+PSWD=\"0000\"");
      Serial.println(response_data);
      response++;
    }
  }
  response = 0;
  //To initialize pairing mode of HC-05
  Serial3.print("AT+INIT\r\n");     //when HC-05 responds to this command sucessfully the led on HC-05 starts blinking in speed suggesting that bluetooth is in pairing mode.
  Serial.println("AT+INIT");
  digitalWrite(LED_BUILTIN, HIGH);
}

void loop() {

  // put your main code here, to run repeatedly:

}
You can enter your own AT commands by uploading the code given below. After uploading the code open the serial monitor and set “No line ending” to “Both NL and CR” in serial monitor. Then start giving your desired AT command.
#include <evive.h>
void setup() {
Serial.begin(115200);
Serial.println("Enter AT commands:");
Serial3.begin(38400);
}

void loop()
{
if (Serial3.available())
Serial.write(Serial3.read());
if (Serial.available())
Serial3.write(Serial.read());
}
Conclusion
In conclusion, Bluetooth is a wireless technology standard for exchanging data over short distances, and evive has dedicated Bluetooth (HC05) headers. The HC–05 module is an easy–to–use Bluetooth SPP (Serial Port Protocol) module, and the HM–10 Module is a readily available Bluetooth 4.0 module based on the Texas Instruments CC2540 or CC2541 Bluetooth low energy (BLE) System on Chip (SoC). With the help of an Arduino IDE Sketch, the HC–05 module can be configured using AT commands. By entering the AT commands, it is possible to change the name, password, and baud rate of the HC–05 module. After the HC–05 is configured, it is possible to pair it with other devices.