Introduction
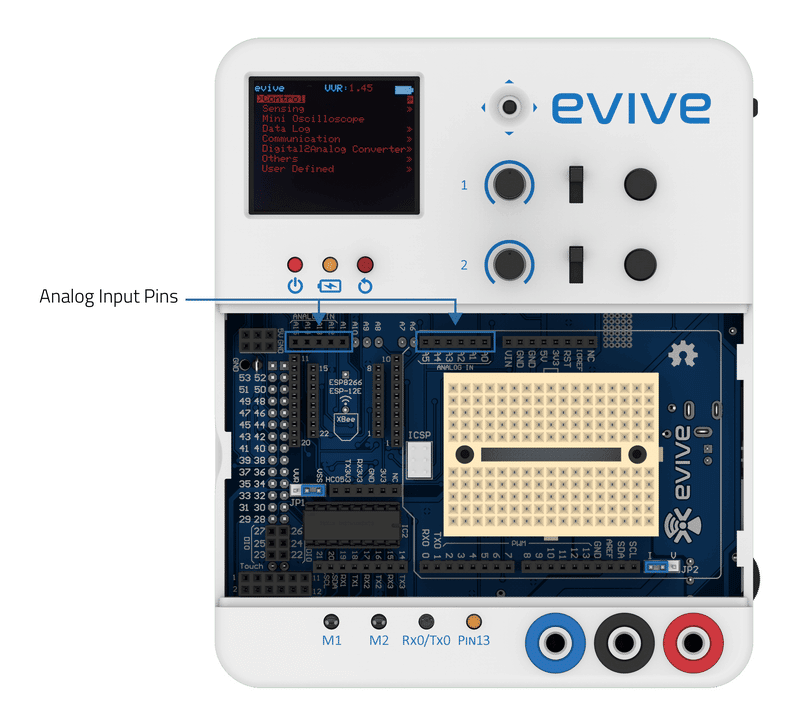
evive has 10 analog input pins behind Magic Lid. The Atmega controllers used for evive contain a total of 16 channel analog-to-digital (A/D) converters. Out of these, only 10 analog inputs are available to the user. The converter has 10-bit resolution, returning integers from 0 to 1023. While the main function of the analog pins for most Arduino users is to read analog sensors, the analog pins also have all the functionality of General Purpose Input/Output (GPIO) pins (the same as digital pins 0 – 13).
The analog pins can be used identically to the digital pins, using the aliases A0 (for analog input 0), A1, etc. For example, the code would look like this to set analog pin 0 to an output, and to set it HIGH.
Available pins in evive:
- 10 analog pins are available for the user, A0 to A5 & A12 to A15
- Two potentiometers: Potentiometer_1 (A9), Potentiometer_2 (A10)
- VSS_Voltage_Sense (for sensing input voltage – A7)
- VVR_Voltage_Sense (for sensing variable voltage output – A8)
How to use Analog Pin in Arduino IDE
To read analog input from an analog pin in Arduino IDE, you have to use analogRead(pin) function.
analogRead(pin) function reads the value from the specific analog pin. The output is an integer value between 0 and 1023 (Due to a 10-bit analog to digital converter), which is mapped between 0 and 5 volts input voltage. This yields a resolution between readings of 5 volts / 1024 units or, .0049 volts (4.9 mV) per unit.
It takes about 112 microseconds (0.000112 s) to read an analog input, so the maximum reading rate is about 9,000 times a second.

Example
/*
	 This code demonstrate the use of analogRead(). According to the value
	 of the potentiometer 1 of evive, the delay between the change of state
	 of the LED changes
	 */

	int LEDPin = 13;   // LED connected to digital pin 13
	int PotPin = A9;   // Potentiometer connected to analog pin A9
	int val;           // variable to store the read value\

	void setup() {
	  // put your setup code here, to run once:
	  pinMode(LEDPin, OUTPUT);
	}

	void loop() {
	  // put your main code here, to run repeatedly:
	  val = analogRead(PotPin);
	  digitalWrite(LEDPin, HIGH);    // sets the LED on (5V on pin 13)
	  delay(val);
	  digitalWrite(LEDPin, LOW);     // sets the LED off (0V on pin 13)
	  delay(val);
	}
How to use Analog Pin in PictoBlox (Scratch)
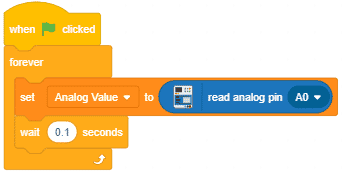
To read analog input from an analog pin in Scratch, you have to use the read analog pin () block, available in the evive extension.
This block returns the value of analog pins available in evive. Analog reading is of 10-bit resolution, hence the range of value is 0 to 1023. This range is mapped to the voltage of the pin (normally 0 to 5V). If the value received is 512, the voltage value will be around 2.5V.
To know more visit the block documentation here.
Example
Displaying the analog value of potentiometer 1 in Stage Mode:
Conclusion
In conclusion, evive has 10 analog input pins behind Magic Lid which can be used to read analog sensors as well as all the functionality of General Purpose Input/Output (GPIO) pins. To read analog input from an analog pin in Arduino IDE, you have to use analogRead(pin) function. To read analog input from an analog pin in Scratch, you have to use the read analog pin () block, available in the evive extension. This block returns the value of analog pins available in evive. The range of value is 0 to 1023 which is mapped to the voltage of the pin (normally 0 to 5V).


