Introduction
While learning about switches, there are two important concepts that one should look into:
- Pole: The number of poles on a switch defines how many separate circuits the switch can control. E.g. switch with one pole, can control only one single circuit.
- Throw: A switch’s throw-count defines how many different positions each of the switch’s poles can be connected to. E.g. if a switch has two throws, each circuit (pole) in the switch can be connected to one of two terminals.
Switches are commonly are defined as single-pole, single-throw, such as a tactile switch, and single-pole, double-throw, such as a slide switch.
Single-Pole, Single-Throw (SPST)
This is the simplest switch. It has one output and one input. The switch will either be closed or completely disconnected. SPST switches are perfect for on-off switching. They’re also a very common form of momentary switches. SPST switches require two terminals only.
Single-Pole, Double-Throw (SPDT)
SPDTs have three terminals: one common pin and two pins which for connection to the common.
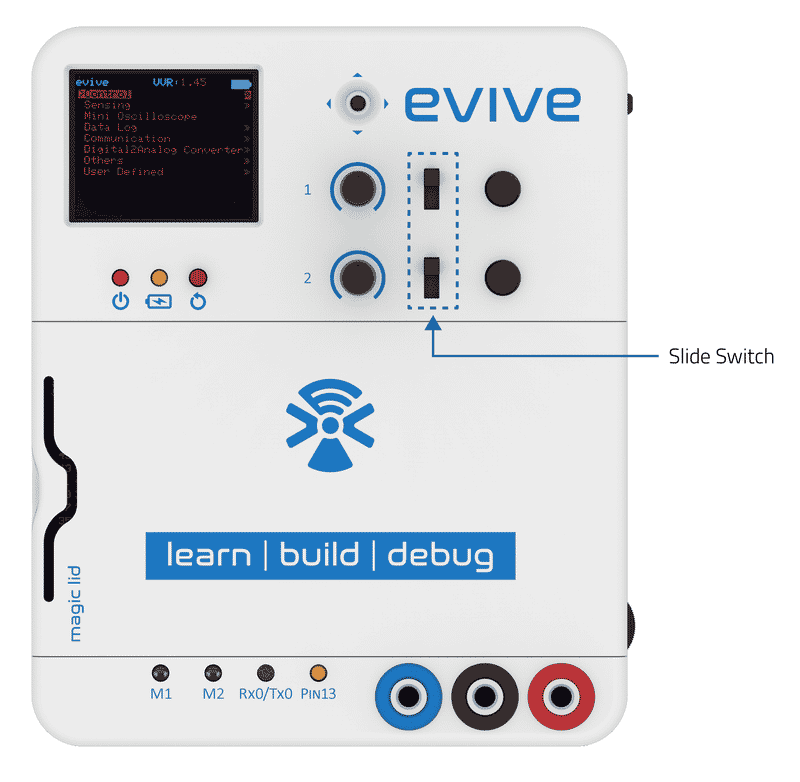
evive has two inbuilt 3-way slide switches. Slide switch 1 is connected to Arduino pins 40 and 41, both active high. This means that when the switch is slid up, pin 40 is high. When it slides down, pin 41 is high while both are low when the switch is in the middle. Slide switch 2 is connected to pins 42 and 43, and works in a similar manner as slide switch 1.
Example: Displaying the state of evive’s Slide Switch on TFT
In this example, we will read the state of evive’s slide switch 1 and display it on the TFT Screen.
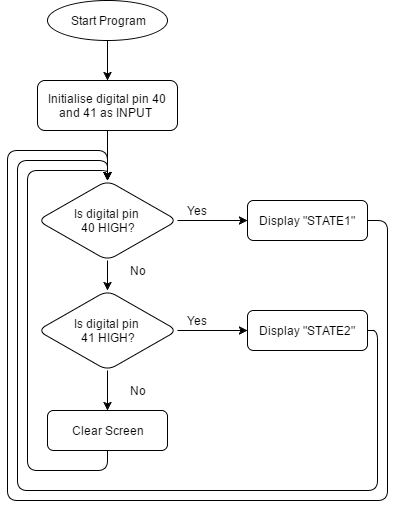
Flow Chart
Below is the flow chart on which the sketch will be based:
Arduino IDE Sketch
Below is the sketch:
/*
evive Slide Switch

This code demonstrates how to use slide switch in Aruino IDE and display state on TFT Screen.
Use following keys words for accessing digital pins connected to slide switch:

SLIDESW1_D1 for digital pin 40 (Slide switch 1 in upper direction)
SLIDESW1_D2 for digital pin 41 (Slide switch 1 in down direction)
SLIDESW2_D1 for digital pin 42 (Slide switch 2 in upper direction)
SLIDESW2_D2 for digital pin 43(Slide switch 2 in down direction)

Created by Pankaj Kumar Verma
On 13 Mar, 2017

Explore more on: Explore more on: https://thestempedia.com/tutorials/slide-switch/
*/

#include <evive.h>
int buttonState1 = 0; // variable for reading the pushbutton pin 1 status
int buttonState2 = 0; // variable for reading the pushbutton pin 2 status

void setup() {
Serial.begin(9600);
tft_init(INITR_GREENTAB); // initialize a ST7735S chip, black tab
Serial.println("Initialized");
tft.fillScreen(ST7735_BLACK);
// initialize the slideswitch pins as an input:
pinMode(SLIDESW1_D1, INPUT);
pinMode(SLIDESW1_D2, INPUT);

}

void loop() {
// read the state of the pushbutton value:
buttonState1 = digitalRead(SLIDESW1_D1);
buttonState2 = digitalRead(SLIDESW1_D2);

tft.drawRoundRect(20, 30, 120, 68, 10, ST7735_WHITE);
tft.setTextColor(ST7735_WHITE);
tft.setTextSize(2);
tft.setCursor(50, 40);
tft.println("STATE");
tft.setCursor(40, 70);
tft.setTextColor(ST7735_WHITE, ST7735_BLACK);

// check if the slideswitch is in state 1.
// if it is, the buttonState1 is HIGH:
if (buttonState1 == HIGH) {
tft.setCursor(40, 70);
tft.setTextColor(ST7735_BLUE, ST7735_BLACK);
tft.println("STATE 1");
}

// check if the slideswitch is in state 2.
// if it is, the buttonState2 is HIGH:
else if (buttonState2 == HIGH) {
tft.setCursor(40, 70);
tft.setTextColor(ST7735_GREEN, ST7735_BLACK);
tft.println("STATE 2");
}

else {
tft.setCursor(40, 70);
tft.println("       ");
}

delay(100);
}
Conclusion
In this lesson, we learned about the different kinds of switches, with a focus on SPST and SPDT switches. We also learned how to use evive’s slide switches with Arduino IDE and display the state of the switch on the TFT Screen. Switches have a range of different uses, from controlling electric circuits to being used as user inputs. By understanding the different types of switches and their uses, we can better understand how to use them in our projects.