Introduction
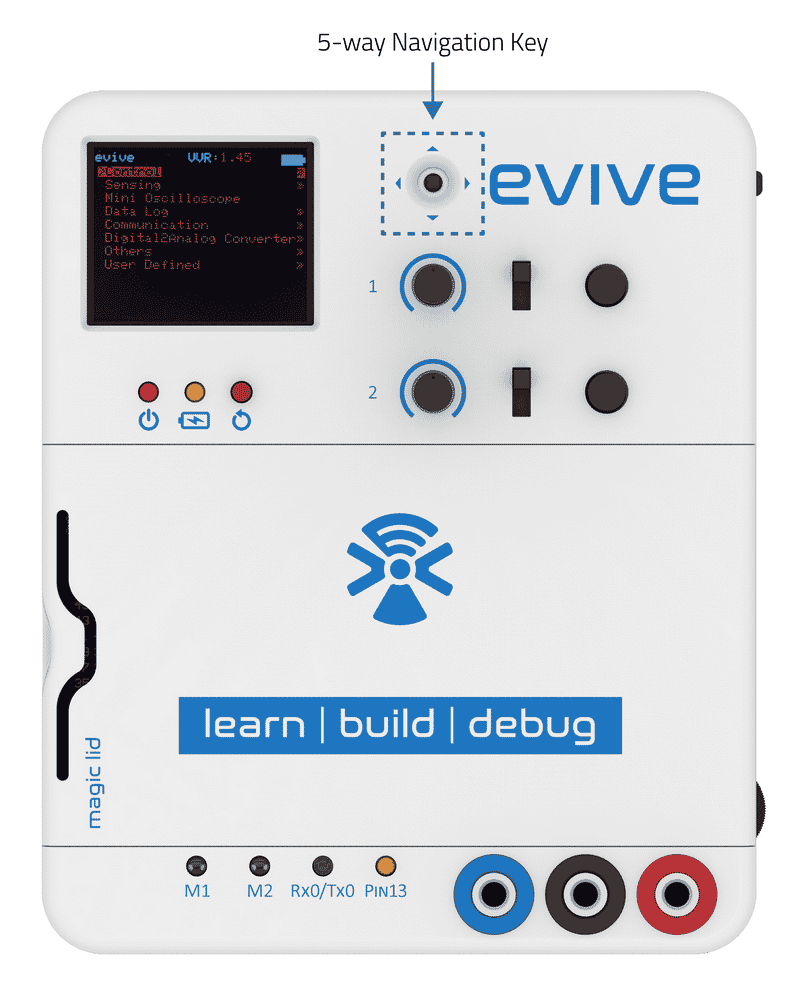
evive has an inbuilt 5-way navigation key, which is used to navigate through the evive menu-based system. The navigational key has 4 directions:
- Left
- Right
- Up
- Down.
This information is provided by the analog pin A11.
The 5th direction is the center press. The center switch is connected to the digital pin 19 in active HIGH mode. This means that if the switch is pressed, then pin 19 is HIGH; otherwise, the pin is LOW.
The table below shows the values for their corresponding directions:
| DIRECTION | ANALOG VALUE RANGE |
| Up | 205-215 |
| Right | 405-415 |
| Down | 605-615 |
| Left | 835-845 |
Example
In this example, we will read the state of the 5-way navigation key and display it on the TFT Screen.
Below is the Arduino sketch:
/*
   evive Digital Read TFT Display

   This code demonstrates how to display Navigation Key state on TFT Screen.

   Created by Pankaj Kumar Verma
   On 13 Mar, 2017
*/
#include <evive.h>

int navKeyAnalog = A11; // select the analog input pin
int navKeyDigital = 19; // select the digital input pin

void setup() {
  Serial.begin(9600);
  tft.init(INITR_GREENTAB); // initialize a ST7735S chip, green tab
  tft.setRotation(1);
  Serial.println("Initialized");
  tft.fillScreen(ST7735_BLACK);

  pinMode(navKeyAnalog, INPUT);
  pinMode(navKeyDigital, INPUT);
}

void loop() {
  tft.drawRoundRect(20, 30, 120, 68, 10, ST7735_WHITE);
  tft.setTextColor(ST7735_WHITE);
  tft.setTextSize(2);
  tft.setCursor(50, 40);
  tft.println("STATE");
  tft.setCursor(40, 70);
  tft.setTextColor(ST7735_WHITE, ST7735_BLACK);

  // read the input
  int x = analogRead(navKeyAnalog);

  if (digitalRead(navKeyDigital) == HIGH) {
    tft.setCursor(40, 70);
    tft.setTextColor(ST7735_WHITE, ST7735_BLACK);
    tft.println("PRESSED");
  }

  // if the key is in up direction
  else if (x > 150 && x < 250) {
    tft.setCursor(70, 70);  // if the key is in left direction else if (x > 800 && x < 900)
    tft.println("UP");
  }

  // if the key is in right direction
  else if (x > 400 && x < 500) {
    tft.setCursor(50,70);
    tft.println("RIGHT");
  }

  // if the key is in down direction
  else if (x > 600 && x < 700) {
    tft.setCursor(55,70);
    tft.println("DOWN");
  }

  // if the key is in left direction
  else if (x > 800 && x < 900) {
    tft.setCursor(55, 70);
    tft.println("LEFT");
  }
  else
  {
    tft.setCursor(40, 70);
    tft.println("       ");
  }

  delay(100);
}
Conclusion
This lesson has demonstrated how to use the 5-way navigation key on evive and display its state on the TFT screen. The navigational key is connected to both the analog and the digital pins of evive and the analog values are used to determine the direction. The digital pin is used to determine whether the key is pressed or not. We can use this information to interact with other components connected to evive.