Introduction
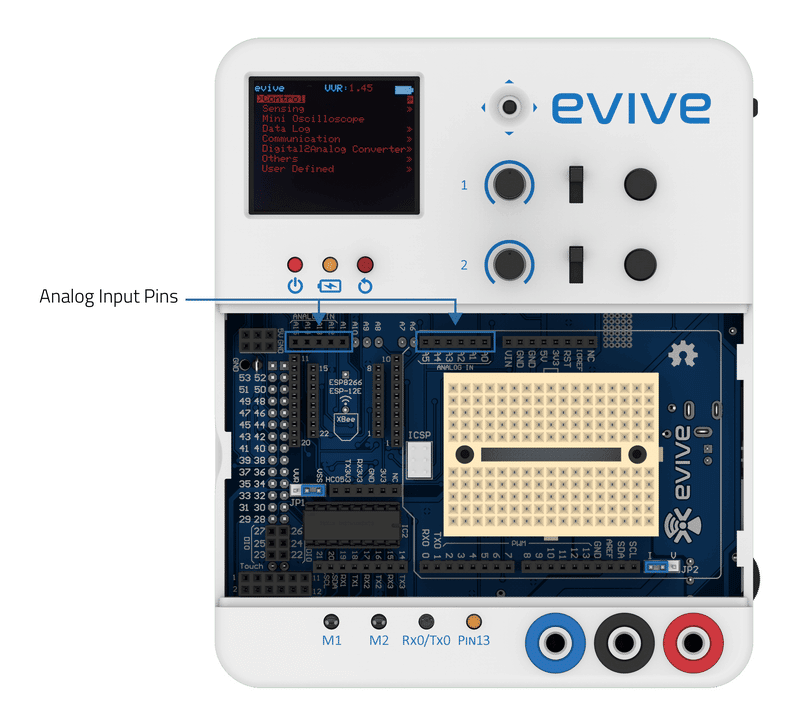
evive has 10 analog input pins under its magic lid. The Atmega controllers used in evive contain a total of 16 channel analog-to-digital (A/D) converter; out of these 16 channels, i.e. pins, only 10 analog inputs are available to the user. The converter has 10 bit resolution; therefore, it returns 210, i.e. 1024 values, these values being integers from 0 to 1023. The main function of the analog pins for most Arduino users is to read analog input from analog sensors.
analogRead()
analogRead(pin) function reads the value from the specified analog pin. The input can range from 0V to 5V; The output is an integer value between 0 and 1023 (be to a 10 bit analog to digital converter), where 0 = oV, and 1023 = 5V in terms of input voltage. This process of mapping analog values to their corresponding digital values is known as scaling.In our case, scaling yields a resolution between readings of
5 volts / 1024
= .0049 V per unit
= 4.9 mV per unit

Example: Displaying analog input on TFT Screen
In this example, we will read the analog pin A9 and display the value on TFT Screen.
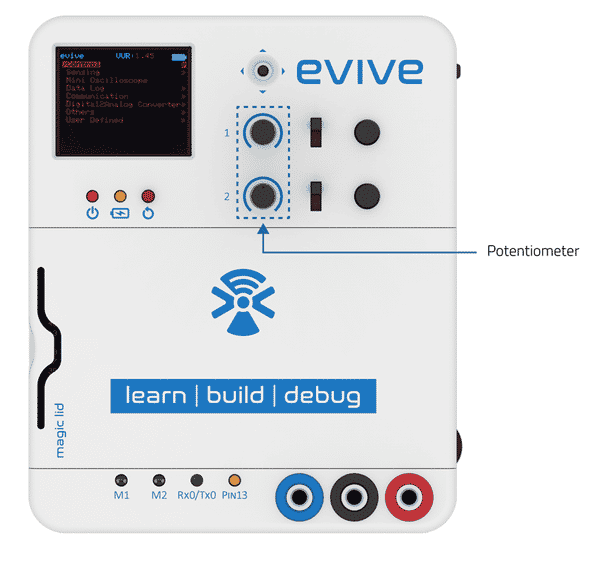
evive has two inbuilt 10kΩ knob potentiometers connected to Arduino Mega pins A9 and A10, respectively.
Example Codes
Below is the Arduino IDE sketch that reads the analog value of the potentiometer and displays it on TFT screen:
/* Analog Data Read
 * Read analog data of Potentiometer 1 (A9) on evive and publish it Tft screen.
 *
 * Explore more on: https://thestempedia.com/tutorials/evive-analog-input/
 */

#include <evive.h>          //include evive library

void setup() {
tft.init(INITR_BLACKTAB);
tft.setRotation(1);
tft.fillScreen(ST7735_BLACK);
pinMode(POT1,INPUT);        //Set pin as input mode (POT1 = A9)
}

int potData;                //variable to store analog reading of potentiometer 1

void loop() {
//print text "Analog Read Value:" on tft screen
tft.drawRoundRect(20, 30, 120, 68, 10, ST7735_WHITE);
tft.setTextColor(ST7735_WHITE);
tft.setTextSize(1);
tft.setCursor(25, 40);
tft.println("Analog Read Value: ");
//read analog data of potentiometer on Pin A9
potData = analogRead(POT1);
tft.setTextColor(ST7735_WHITE, ST7735_BLACK);
tft.setTextSize(2);
tft.setCursor(55, 70);
//To prevent overwrite problem the analogvalues are printed in the following manner
if(potData < 10)
{
 tft.print(potData);
 tft.print("   ");      //3 spaces
}
else if(potData < 100)
{
 tft.print(potData);
 tft.print("  ");      //2 spaces
}
else if(potData < 1000)
{
 tft.print(potData);
 tft.print(" ");      //1 spaces
}
else
{
  tft.print(potData);
}
delay(100);                 //delay of 100 milli seconds in each loop
}
Output
In the second example, we will convert the scaled value back to its original analog value, i.e. the input voltage and then display in on the TFT screen. The voltage and the analog reading conversion relation are given by
Voltage = (5*A)/1023 ( where A represent the analog value of an analog Pin)
Arduino Sketch:
/*
evive Analog Value TFT Display

This code displays analog voltage correseponding to analog value read from analog pin A9 (POT1) of evive
on TFT Screen.
Explore more on: https://thestempedia.com/tutorials/evive-analog-input/
*/


#include <evive.h>
float voltageOutput = 0;
int analogReadValue = 0;

void setup() {
tft_init(INITR_BLACKTAB); // initialize a ST7735S chip, black tab
tft.fillScreen(ST7735_BLACK);
pinMode(POT1, INPUT);
}

void loop() {
tft.drawRoundRect(20, 30, 120, 68, 10, ST7735_WHITE);
tft.setTextColor(ST7735_WHITE);
tft.setTextSize(1);
tft.setCursor(35, 40);
tft.println("Voltage Value: ");
analogReadValue = analogRead(POT1);
voltageOutput = (analogReadValue / 1023.0) * 5.0;

tft.setTextColor(ST7735_WHITE, ST7735_BLACK);
tft.setTextSize(2);
tft.setCursor(45, 70);
tft.print(voltageOutput);
tft.print(" V");
}
Output
Conclusion
In this lesson, we learned about evive’s 10 analog input pins, how to read the analog data from the pins using the analogRead() function, and how to display the analog value or the corresponding voltage on a TFT screen. We also learned about the resolution between readings and how to scale the values for accurate readings. With all this information, you can now use your evive’s analog input pins to read data from analog sensors and use it for various projects.