Introduction
Arduino IDE is an open-source software for writing code and uploading it to the Arduino board. It runs on different operating systems such as Windows, Mac OS X, and Linux. The environment is written in Java and is based on Processing and other open-source software.

Arduino Sketch
Arduino sketch is the name that Arduino uses for a program. It’s the unit of code that is uploaded to and run on an Arduino board. A basic Arduino sketch consists of two functions:
- setup()
- loop()
The purpose of these functions will be explained later in the tutorial.
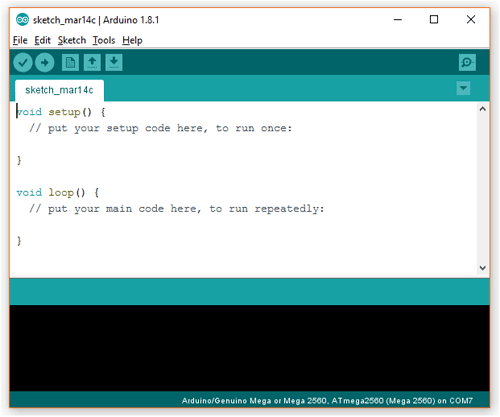
For now, open the Arduino IDE and click on the File tab. Then, click on New (or press Control + N on your keyboard) to have a look at the two functions.

void setup()
{

}

void loop()
{

}
Writing a Sketch
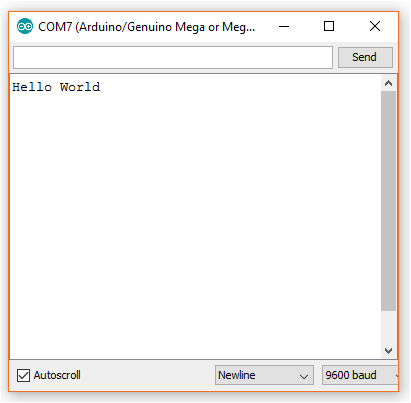
In this example, we will write a sketch, i.e. create a program in Arduino IDE that will display the text Hello World on the screen. We will use the serial monitor window to write our message.

To write in the serial monitor, you must first initialize the serial monitor, you can do it with the help of the following statement:
Serial.begin(9600);
Here 9600 is the baud rate at which you are communicating over USB with your device.
The statement to write on Serial Monitor is:
Serial.println(“Your Message”);
Now, modify the code by initializing the serial monitor and writing the print statement inside the setup() function. You will end with this code:
// Hello World Program

void setup() {
  // put your setup code here, to run once:
  Serial.begin(9600);
  Serial.println("Hello World");
}

void loop() {
  // put your main code here, to run repeatedly:

}
Save your sketch by going to the File tab and then clicking on Save.
How to Run the Sketch
Follow the steps below to run the sketch:
- Connect your evive to your computer using a USB cable.
- Click the Upload button to load the program to the Arduino.
- Now open the Arduino IDE Serial Monitor Window to see the sketch run and print the text message. The text that the program shows should be visible in the serial monitor window.


Arduino Sketch Program Flow
In an Arduino sketch, program statements (individual lines of code) are executed, i.e. run from top to bottom. This top-to-bottom execution of statements can be altered only by flow control statements.
There are a few things to notice in your sketch:
- void setup(): It is the function initialization/declaration process of the function named setup(). As the function does not return any value, it is initialized with the keyword void, meaning empty.
- Serial.begin(9600);
Serial.println(“Hello World”);
These statements are present in the setup function’s body. - { is the opening brace of the functions that tells that all statements starting from here are inside the functions.
- } is the closing brace of the function.
- ; is used to terminate the statement.
In the Hello World sketch, statements in the setup() function will run first, from top to bottom. The statement Serial.begin(9600); is the first statement in the setup() function, so it is the first to run. This statement sets up the speed of the serial port to 9600 baud. The baud setting in the serial monitor window must match this value so that the evive and serial monitor window can communicate at the same speed.
The second statement to run in the setup() function is Serial.println(“Hello, world!”);, which sends the text Hello World out for display in the serial monitor window. In this statement, any text can be put between the opening and closing quotes (” “) and it will be displayed in the serial monitor window.
The setup() Function
Statements in the setup() function are executed only once when the sketch is run (which you must have noticed in the Hello World sketch).
The loop() Function
Statements in the loop() function will run continuously from top to bottom and then back to the top.
If the loop() function contains two statements, the first statement will be executed first, then the second statement, then the first statement again and so on. Hence, the statements in the main loop will be executed continuously until the Arduino is switched off or reset.
In our Hello World sketch, since there are no statements in the loop() function, program execution ends up in the loop and gets stuck there, doing nothing.
It is important to have the loop() function in the sketch, even if it is empty because without it the microcontroller on the Arduino board will try to execute whatever it finds next in memory after the statements in the setup() function have been executed. But the loop() function prevents it from doing so by keeping the program execution in the loop.
Below is an example sketch that demonstrates the main loop execution. Copy the code to your Arduino IDE, upload the code to your evive, and start Serial Monitor.
void setup() {
 // put your setup code here, to run once:
 Serial.begin(9600);
 Serial.println("I am in the setup() function");
}

void loop() {
 // put your main code here, to run repeatedly:
 Serial.println("I am executing the first statement in the loop() function");
 delay(1000);
 Serial.println("I am in the loop() function");
 delay(1000);
 Serial.println("I am executing the last the statement in the setup() function");
}
This is what you’ll get in the serial monitor:

The text in the setup() function is displayed only once when the serial monitor window is first opened and then the Arduino is reset. After this, program execution enters the loop() function and repeatedly executes the statements in the loop from top to bottom and back to the top again in a never-ending loop.
Conclusion
In this lesson, we learned about the Arduino IDE and how to write a sketch. We also learned about the setup and loop functions, and how to use the serial monitor to write a message. Finally, we discussed the program flow of an Arduino sketch and saw how it is executed in the loop.


