
Introduction
LEDs are like tiny lightbulbs. However, LEDs require a lot less power to light up by comparison.
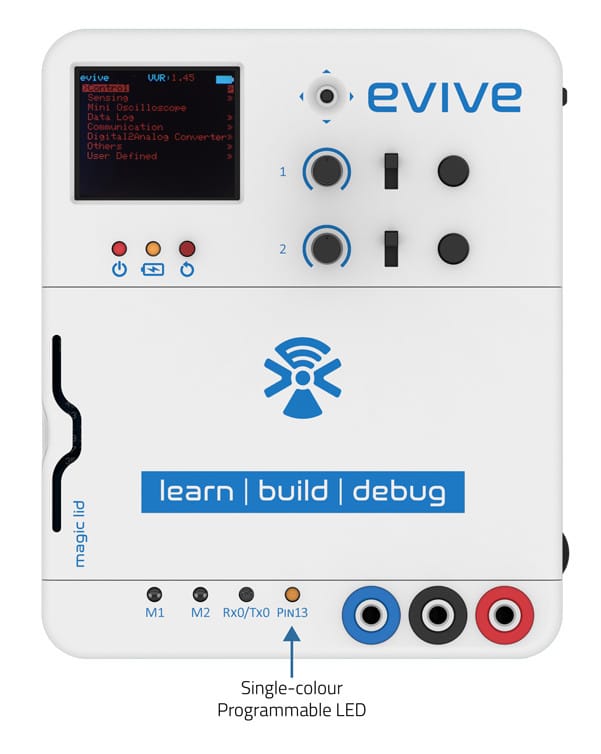
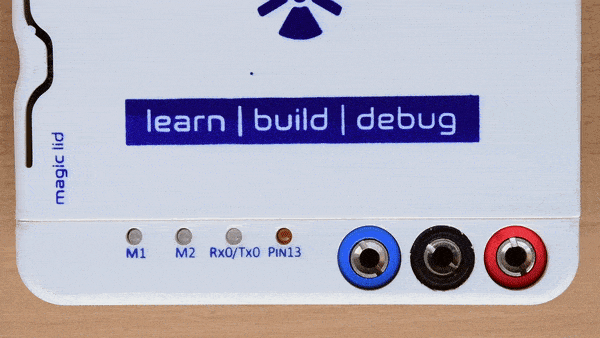
In this project, we will turn ON LED when the space key is pressed and turn it OFF when released. There is a programmable LED in evive which is connected to the digital pin 13. We will use the same LED for the project.
What is LED?
Given below are some facts about the LEDs you should know before using one:
- Polarity Matters: In electronics, polarity indicates whether a circuit component is symmetric or not. LEDs only allows current to flow in one direction. And when there’s no current-flow, there’s no light.

The positive side of the LED is called the “anode” and is marked by having a longer “lead,” or leg. The other, negative side of the LED is called the “cathode.” Current flows from the anode to the cathode and never the opposite direction. A reversed LED can keep an entire circuit from operating properly by blocking current flow. - More current equals more brightness: The brightness of an LED is directly dependent on how much current it draws. That means two things. The first being that super bright LEDs drain batteries more quickly, because the extra brightness comes from the extra power being used. The second is that you can control the brightness of an LED by controlling the amount of current through it.
- If you connect an LED directly to a current source it will try to dissipate as much power as it’s allowed to draw, and it will destroy itself. That’s why it’s important to limit the amount of current flowing across the LED. Resistors limit the flow of electrons in the circuit and protect the LED from trying to draw too much current.
Circuit Diagram
There is no circuit required in this project
You just have to use your evive inbuilt LED.
How to control the LED?
The LED is connected to digital pin 13 internally. So, when the state of digital pin is:
- HIGH: The LED turns ON, because there is some voltage across its leg, which make current to flow through it.
- LOW: The LED turns OFF, because there is no voltage difference between the legs. No voltage no current, right.
We know, we can control the digital pin 13 using programming, hence we can control LED.
Getting Started with Scratch Programming
PictoBlox is a graphical programming software based on Scratch 3.0 that makes learning how to code easy and fun. It allows you to interface and control evive with your computer and even uploads code to it.
You can download PictoBlox from here.
PictoBlox has the following extensions that contain special blocks using which you can control evive:
- evive extension: The blocks in this extension allow you to control the inbuilt functionalities of evive such as the tactile switches, slide switches, potentiometer, motors, a 5-way navigation key, touch inputs, and Real Time Clock.
- Dabble extension: This extension has all the blocks that enable evive to communicate with Dabble.
- Actuators extension: The blocks in this extension enable you to control the actuators such as DC motors and servos connected to evive.
- Sensors extension: This extension allows you to control sensors connected to evive.
- evive Display extension: This extension allows you to control the display on evive screen (change color, font size, and font color), draw shapes, write text, and display values on the screen.
- IoT extension: The blocks in this extension allow you to make IoT-based projects such as home automation, monitoring temperature, etc.
- Lighting extension: This extension enables you to manipulate colors of an RGB LED strip.
- Communication extension: The blocks in this extension allow serial communication.
PictoBlox has two modes in which you can work:
- Stage Mode: In this mode, you can write scripts for the sprite and board and control it in real time. If you disconnect the board, you cannot control it anymore.
- Upload Mode: This mode allows you to write scripts and upload them to your board so that you can control even when it is not connected t your PC/laptop.
In this project, we will work in Stage mode.
Logic Diagram
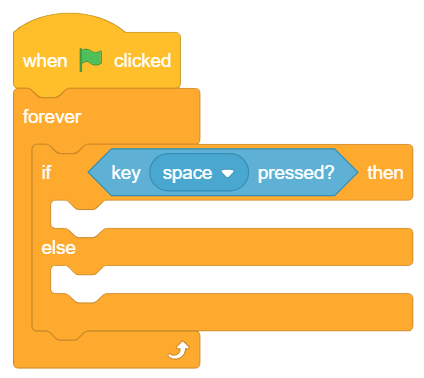
We will be continuously checking if the Space key is pressed. This will be either true or false. Now, we will use conditional statements, which will take decision to execute particular statements according to the result. In our case, this is if-else, where if the result is true (i.e. Space key is pressed), LED will be ON, else LED will be OFF.
The next step is to express your logic in a way so that the computer can understand it. This is easy if one uses Scratch since it has built in blocks for basic functions and one does not have to write stuff every time.

Scratch Scripts
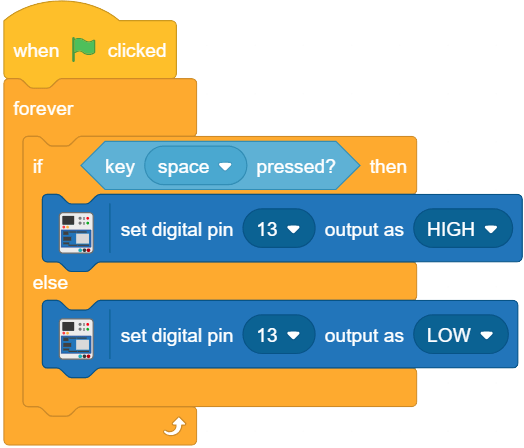
- Whenever you want to run a code, you have to start with a Hat block which is present in the Event category. As told above, there is a block named ‘when flag key is pressed’. We will use this block to start our program. Drag the block and drop the block in the script using the mouse.
- Now, we want to run the code forever. For these type of functions, there is a C block named ‘Forever’, which runs the code inside it continuously in the loop. Drag the block and snap it below the hat block.
- To check the condition drag-drop ‘If – Else’ block and place it inside forever block.
- To check if the key is pressed or not we will use ‘is key pressed’ from Sensing palette. It gives true when Space key is pressed and false if the Space is not pressed. Place it inside the if else block.
- Now we have to select the board as evive from the Menu bar.
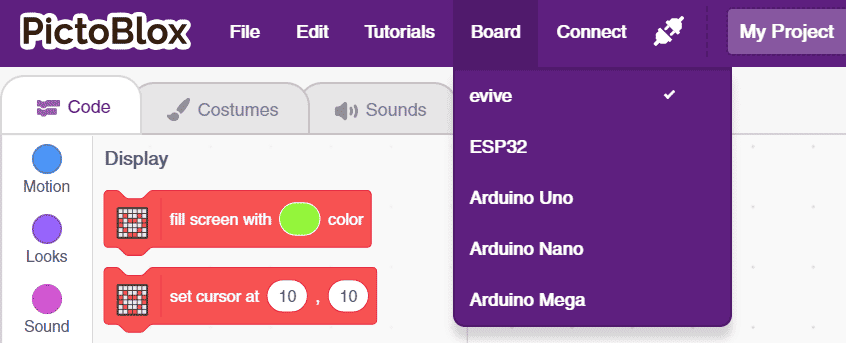
- Connect evive to the computer using USB cable and connect the appropriate port from the menu bar.

- Upload the firmware onto evive to enable communication.
 Now you are ready to use evive extensions.
 - If want to turn ON the LED, digital pin 13 should be HIGH, which can be done using set digital pin () output as () block. Drag and snap the block inside if block. Next, to the pin inside the block, you can see white space where you have to input the pin number (13 in this case). To turn the pin HIGH, select the option at the end of the block.
Similarly, turn off the LED in the else block. The final script is given below.
It’s Ready
Your program is ready now and you can press ‘space’ to start it. The whole script will start glowing indicating that the program is running. To stop it press ‘Esc’ on keyboard.