Introduction
The Motor Control module allows you to control actuators such as DC and Servo motors.
You can control 2 DC Motors and 2 Servo Motors using this module.
DC Motor Control
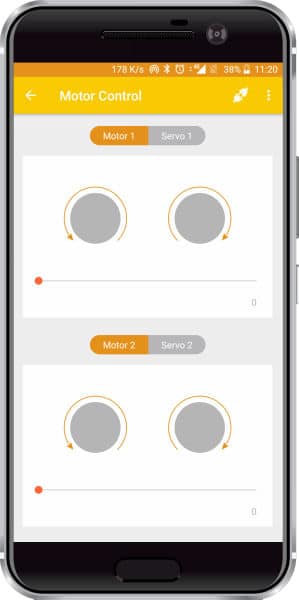
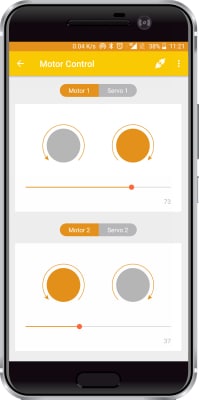
Using the DC Motor control you can control the direction in which the motor should rotate (clockwise or anti-clockwise) and the speed of rotation (adjustable from 0 to 100).

evive
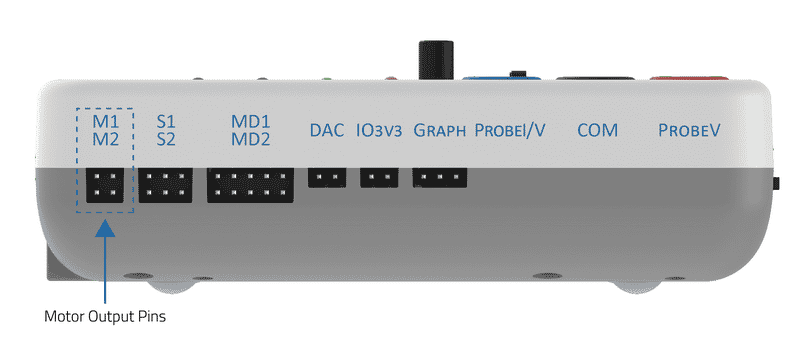
For evive, you can control the motors connected to motor channel 1 and motor channel 2.
Arduino Uno/Mega
For controlling motors using Arduino Uno or Mega, you have to use a motor driver having controls through these pins:
- Direction Pin 1 – Digital Pin
- Direction Pin 2 – Digital Pin
- PWM Pin – PWM Pin
You have to assign those pins in the Arduino Program to control the motor through this module. The example is given in the Arduino tab below.
Servo Motor Control
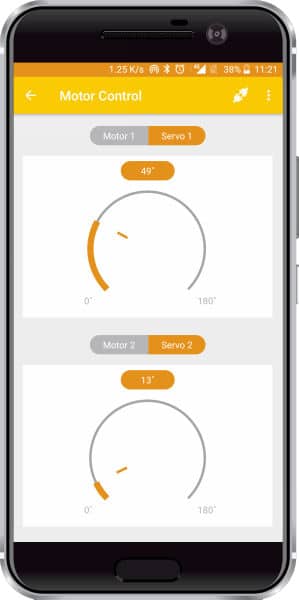
Using the Servo Motor control you can control the direction of the servo from 0 degrees to 180 degrees by changing the yellow bar in the clockwise direction.
evive
For evive, you can control the servo motors attached to the servo motor channel 1 and 2.
Arduino Uno/Mega
For controlling servo motors using Arduino Uno or Mega, you have to connect the signal pin to any digital pin on your board.
You have to assign those pins in the Arduino Program to control the servo motor through this module. The example is given in the Arduino tab below which will clear how to declare pins for motor and servos.
Arduino IDE Functions
Header
To include the Motor Control module in the Arduino program, you have to include the following header:
#define CUSTOM_SETTINGS
#define INCLUDE_MOTORCONTROL_MODULE
After defining the above mention headers, you have to include the dabble library:
#include <Dabble.h>
You can download the zip of Arduino Library for
- evive, Uno, Mega, and Nano – Dabble-Arduino
- ESP32 – Dabble-ESP32
depending on the board you are using.
Specify pins of DC motor in case of Mega, Uno, and Nano
For controlling one DC motor from the “Motor 1” block of Dabble app:
motorControls Control = motorControls(pwm,direction1,direction2);
In the above command PWM, direction1 and direction2 specify the pin that will be used to control the connected DC motor.
For controlling two DC motors from the “Motor 1” and “Motor 2” block of Dabble app:
motorControls Control = motorControls(pwm_m1,direction1_m1,direction2_m1,pwm_m2,direction1_m2,direction2_m2);
In above command parameters like pwm_m1, direction1_m1, etc specifies the pin that will be used to control the connected DC motor.
Enabling Bluetooth Communication
To enable Bluetooth communication, you have to initialize serial communication using the following code:
- For evive and Arduino Mega, Uno, and Nano
Dabble.begin(Baud_Rate);Here Baud_Rate is the baud rate set for the Bluetooth module. With evive, you normally get 115200 baud rate modules.
- For ESP32
Dabble.begin("Bluetooth_Name");In place of Bluetooth_Name enter the name that you want to keep for Bluetooth of ESP32. The default name given in the library is “MyEsp32”.
Refreshing the data
To refresh the data that the device has got from the mobile app, you have to use the following line of code:
Dabble.processInput();
Functions
The following functions can be used to get the DC motor and servo motor control:
For evive, Mega, Uno, and Nano
- Control.runMotor1(): This function runs the motor as per commands send from “Motor 1” block in Dabble. In the case of evive, this function always controls motor connected to channel M1 on evive. For other Arduino boards, a motor connected to the pins mentioned by the user will be controlled.
- Control.runMotor2(): This function runs the motor as per commands send from “Motor 2” block in Dabble. In the case of evive, this function always controls motor connected to channel M2 on evive. For other Arduino boards, a motor connected to the pins mentioned by the user will be controlled.
- Control.getangle_Servo1(): Returns the value of angle as per the position of knob in “Servo 1” block of the motor control module of app.
- Control.getangle_Servo2(): Returns the value of angle as per the position of knob in “Servo 2” block of the motor control module of app.
For ESP32
- Control.runMotor1(pwmMotor1,dir1Motor1,dir2Motor1): This function runs motor as per the commands send from “Motor 1” block in Dabble. Here parameters pwmMotor1, dir1Motor1, and dir2Motor1 specifies the pins of esp32 on which motor will be connected with the help of the motor driver.
- Control.runMotor2(pwmMotor2,dir1Motor2,dir2Motor2): This function runs motor as per the commands send from “Motor 2” block in Dabble. Here parameters pwmMotor2, dir1Motor2, and dir2Motor2 specifies the pins of esp32 on which motor will be connected with the help of the motor driver.
- Control.runServo1(pinServo1): This function runs motor as per the commands send from “Servo 1” block in Dabble. Parameter pinServo1 specifies the pin of ESP32 on which signal pin of servo motor will be connected.
- Control.runServo2(pinServo2): This function runs motor as per the commands send from “Servo 2” block in Dabble. Parameter pinServo2 specifies the pin of ESP32 on which signal pin of servo motor will be connected.
PictoBlox (Scratch) blocks
evive
There are two blocks available in PictoBlox for the Motor Control module. One is for running DC motors as per command sent from the motor control module of Dabble and one is for running Servo Motors.
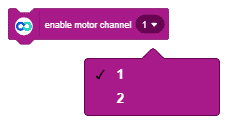
- “enable motor channel ()” is a stacked block with two options in its drop-down for selecting the motor channel and corresponding its corresponding control in Dabble. This means on selecting ‘1‘ from the drop-down you will be able to control motor channel M1 on evive with the “Motor 1” module of the motor control module. Similarly “Motor2” module runs motor channel M2 on evive.
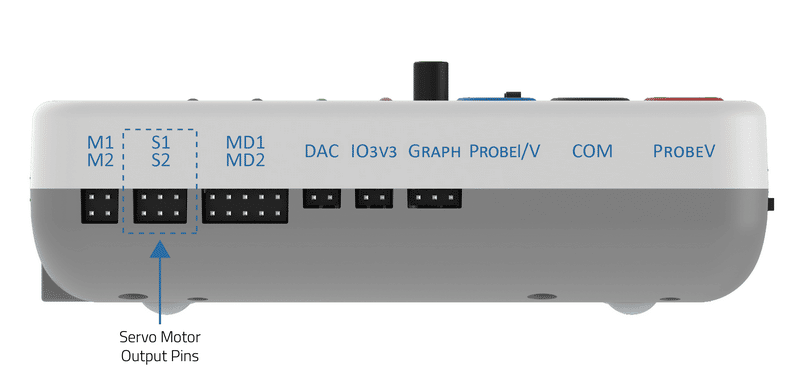
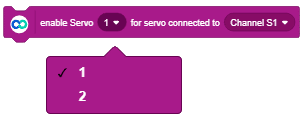
- “enable Servo () for servo connected to channel ()” is a stacked block with two dropdowns. The first drop-down is for selecting which servo module in the motor control module will be used for controlling a servo motor connected to the pin selected from the second drop-down. As per the pin number listed in the second drop-down, it is possible for the user to connect the servo to servo channels S1 and S2 as well as on digital pins 2 to 13.
Mega, Uno, and Nano
- “enable motor () connected to direction pin (), () and pwm pin ()” is a stacked block that has 4 dropdowns. The first drop-down is for selecting which motor module of Dabble will control the motor driver connected to digital pins selected from the other three dropdowns. In turn, the motor driver will control the DC motor connected to it. For example, if you select ‘2‘ in the first drop down then the “Motor 2” module of Dabble will control the motor connected to pins selected from the other three dropdowns.

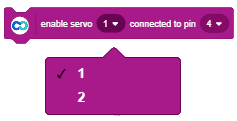
- “enable servo () connected to pin ()” is a stacked block with two dropdowns. The first drop-down is for selecting which servo module in the motor control module will be used for controlling a servo motor connected to the pin selected from the second drop-down. For example, if ‘2‘ is selected from the first drop-down and ‘5‘ is selected from the second drop-down, a servo connected to pin 5 will be controlled by the “Servo 2” module of Dabble.


Examples
Arduino IDE
You can either copy code stated below or navigate to “Files>>Examples>>Dabble>>” and select motor control code as per your board.
evive
In this example, a motor and servo connected on evive will be controlled through the Dabble app.
/*
   MotorControl Module is used to control actuators like DC motors and Servos.
   This is a code for running one motor in motor channel M1 and one Servo in
   servo channel S2 on evive.

   You can reduce the size of library compiled by enabling only those modules that you want to
   use. For this first define CUSTOM_SETTINGS followed by defining INCLUDE_modulename.

   Explore more on: https://thestempedia.com/docs/dabble/motor-control-module/
*/
#define CUSTOM_SETTINGS
#define INCLUDE_MOTORCONTROL_MODULE
#include <evive.h>
#include <Dabble.h>
motorControls Control;
Servo servo;

void setup() {
  Serial.begin(250000);              // make sure your Serial Monitor is also set at this baud rate.
  Dabble.begin(115200);              //Enter baudrate of your bluetooth.Connect bluetooth on Bluetooth port present on evive.
  servo.attach(SERVO2_ATTACH);
}

void loop() {
  Dabble.processInput();             //this function is used to refresh data obtained from smartphone.Hence calling this function is mandatory in order to get data properly from your mobile.              //this function is used to refresh data obtained from smartphone.Hence calling this function is mandatory in order to get data properly from your mobile.
  Control.runMotor1();		         //Connect motor to motor channel M1 on evive.
  servo.write(Control.getangle_Servo2());             //Connect servo to servo channel S2 on evive.
}
For other boards, you have to connect motors to the motor driver and mention the pins of your boards that you have used in with the motor driver. Below mentioned code controls two motors and two servos.
Mega, Uno, and Nano
/*
  MotorControl Module is used to control actuators like DC motors and Servos.
  NOTE:
  1)For Arduino Mega Connect Bluetooth on Serial3 pins.
  2)For Arduino Uno/Nano library uses SoftwareSerial,hence pin 2 and pin 3 are used
  as RX and TX pins respectively on SoftwareSerial.Hence with arduino Uno
  follow below connections for bluetooth.
  UNO  - BLUETOOTH
  2    - TX
  3    - RX

  3)For Uno/Nano keep bluetooth Baudrate below 38400.

   You can reduce the size of library compiled by enabling only those modules that you want
   to use. For this first define CUSTOM_SETTINGS followed by defining INCLUDE_modulename.

   Explore more: https://thestempedia.com/docs/dabble/motor-control-module/
*/

#define CUSTOM_SETTINGS
#define INCLUDE_MOTORCONTROL_MODULE
#include <Servo.h>
#include <Dabble.h>

uint8_t PWM_m1 = 6;    //Must be a PWM pin (PWM pins have ~ marked beside their number markings.)
uint8_t Dir1_m1 = 4;
uint8_t Dir2_m1 = 7;
uint8_t PWM_m2 = 5;    //Must be a PWM pin
uint8_t Dir1_m2 = 8;
uint8_t Dir2_m2 = 12;

Servo servo1;
Servo servo2;
motorControls Control = motorControls(PWM_m1, Dir1_m1, Dir2_m1, PWM_m2, Dir1_m2, Dir2_m2);

uint8_t servo1_pin = 10;
uint8_t servo2_pin = 11;

void setup() {
  Serial.begin(9600);       // make sure your Serial Monitor is also set at this baud rate.
  Dabble.begin(9600);     //Change this baudrate as per your bluetooth baudrate. Connect bluetooth on digital pin 2(RX) and 3(TX) for Uno/Nano and on Serial3 pins for Mega.
  servo1.attach(servo1_pin);
  servo2.attach(servo2_pin);
}

void loop() {
  Dabble.processInput();             //this function is used to refresh data obtained from smartphone.Hence calling this function is mandatory in order to get data properly from your mobile.             //this function is used to refresh data obtained from smartphone.Hence calling this function is mandatory in order to get data properly from your mobile.
  servo1.write(Control.getangle_Servo1());
  servo2.write(Control.getangle_Servo2());
  Control.runMotor1();
  Control.runMotor2();
}
ESP32
/*
   MotorControl Module is used to control actuators like DC motors and Servos.

   NOTE: If you are interested in using any other pin as PWM pin then use led channels
   from channel 4 onwards on ESP32.Because first four channels are for controlling motor and servo from
   Motor control module of Dabble.


   You can reduce the size of library compiled by enabling only those modules that you want to
   use. For this first define CUSTOM_SETTINGS followed by defining INCLUDE_modulename.

   Explore more on: https://thestempedia.com/docs/dabble/motor-control-module/

*/
#define CUSTOM_SETTINGS
#define INCLUDE_MOTORCONTROL_MODULE
#include <DabbleESP32.h>


uint8_t pinServo1 =  4;
uint8_t pinServo2 =  5;
uint8_t pwmMotor1 =  12;
uint8_t dir1Motor1 = 13;
uint8_t dir2Motor1 = 14;
uint8_t pwmMotor2 =  21;
uint8_t dir1Motor2 = 22;
uint8_t dir2Motor2 = 23;

void setup() {
  Serial.begin(115200);         // make sure your Serial Monitor is also set at this baud rate.
  Dabble.begin("MyEsp32");      //set bluetooth name of your device
}

void loop() {
  Dabble.processInput();             //this function is used to refresh data obtained from smartphone.Hence calling this function is mandatory in order to get data properly from your mobile.              //this function is used to refresh data obtained from smartphone.Hence calling this function is mandatory in order to get data properly from your mobile.
  Controls.runServo1(pinServo1);
  Controls.runServo2(pinServo2);
  Controls.runMotor1(pwmMotor1,dir1Motor1,dir2Motor1);
  Controls.runMotor2(pwmMotor2,dir1Motor2,dir2Motor2);
}
PictoBlox
To enable the Motor Control feature, you have to make the following script in Upload mode. 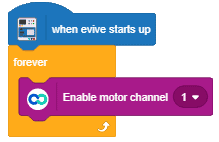
Change the head block as per the selected board. PictoBlox does not support ESP32 but its support will be added soon.