
Artificial Intelligence is the study and design of intelligent agents (computers) that can analyze the environments and produce actions that maximize success.
A computer is called intelligent if it can gather information, analyze it to make decisions, and act to complete a task automatically with very little to no human intervention.
In this tutorial, we are going to create an AI that can detect the expressions of the face using Python in PictoBlox.

Face Detection
In the past few years, face recognition has become one of the most promising applications of computer vision. Face detection can be considered to be a substantial part of face recognition operations.
The method of face detection in pictures is complicated because, well, human faces are widely different from one another! They can have different poses, expressions, positions, orientations, skin color, glasses or facial hair or not, etc. Then, there are also differences in camera gain, lighting conditions, and image resolution.
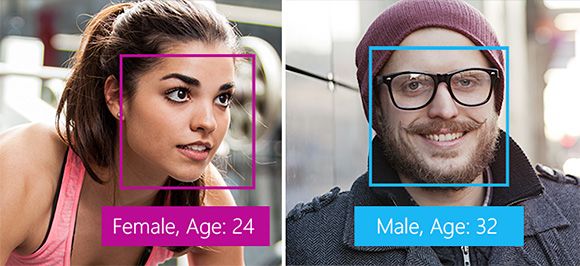
Face detection is the action of locating human faces in an image and optionally returning different kinds of face-related data.
Feature-Based Detection
Feature-based detection uses what is known as face landmarks to detect faces.
Face landmarks are a set of easy-to-find points on a face, such as the pupils or the tip of the nose.
By default, there are 68 predefined landmark points. The following image shows all landmark points:

The feature-based method detects faces by extracting the face landmarks of the face.
Pros
- Features are invariant to pose and orientation change.
- This method has a higher chance of face detection.
Cons
- Difficult to locate facial features due to noise in the images.
- Difficult to detect features in complex backgrounds.
Python Functions for Face Detection in PictoBlox
In order to use the Face Detection functions for python in PictoBlox, we must first build the face detection object. For this follow the steps:
- First, create a new project in PictoBlox and select Python Coding as your coding environment.
- Now write the below code in the scripting area. This code builds a face detection object and stores it in the variable ‘fd‘.
- Now, we will use the variable ‘fd‘ that contains the face detection object to build the Face Detection functions.
Facial Detection Function
To execute face detection, we can use two different functions, one to detect faces from the camera and another to detect faces from the stage.
- To detect a face from the camera use:
- To detect face from the stage use:
The above two functions analyze the image (from camera or stage) and save the face information locally, which can be accessed using other functions, similar to computer vision.
You have to run these functions every time you want to analyze a new image from the camera or stage.
Controlling Camera Feed
You can control the camera feed on the stage using the following function:
fd.video("on", 0)This function has two parameters, which you can change as follows:
- Camera state:
- off – The video feed on the stage will stop.
- on – The video feed on the stage will start.
- on flipped – The video feed on the stage will start with the video mirrored. So, your right hand will be shown as left hand and vice versa.
- Transparency: This parameter makes the video translucent. You can give any value from 0 to 100.
- At value ‘0’, the camera feed will be shown as it is on the stage.
- At value ’50’, the camera feed will be semi-transparent.
- At value ‘100’ the camera feed will fade out completely from the stage.
Edit the parameter and try out this block yourself.
Example – Analyzing Image on Stage
In this topic, we will analyze the following image:

- Download the image from here: https://ai.thestempedia.com/wp-content/uploads/2022/02/Boy-and-Girl.jpg
- In PictoBlox, turn off the camera by running the function fd.video(), and choosing the first parameter ‘off’ as shown.
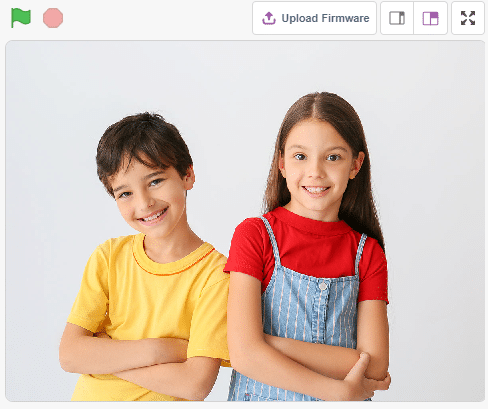
fd.video("off", 0) - Next upload the downloaded image as a backdrop, by clicking the Upload Backdrop button.

- Select Tobi sprite and hide it.
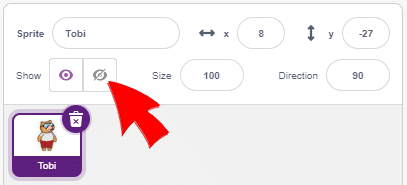
- You will find the stage like this:
- Now, to analyze images from the stage area, we use the function analysestage().
fd.analysestage() - Now we will see what things we get when we analyze images in face detection.
Get the Number (#) of faces
Once you have analyzed the images, you can use the function count() to get the number of faces recognized from the image.
fd.count()If we want to output the number of faces detected, in the terminal of PictoBlox, we need to first convert the output of fd.count() to string. We do this by using the inbuilt function str() of python. Finally, we use print() function on it to output it in the terminal, as shown.
print(str(fd.count()))Get expression on face ()
In order to get the expression of face from the camera, we can use expression() function. This function reports the recognized expression of the selected face. If the face selected is not detected then it reports NULL.
fd.expression()We can make the sprite say the emotion that is detected from the camera using the sprite function say().
sprite.say()The entire code must include the following code as shown:
sprite = Sprite('Stage')
isexpression(face_number, emotion)
In order to check whether a particular face has a particular emotion or not, we can use the function isexpression(). If the emotion matches, then the block returns the value true, otherwise it returns the value false.
This function has two parameters as isexpression(face_number, emotion). The first parameter denotes the face number that you want to analyze and the second parameter denotes the serial number of emotion that needs to be checked on the face.
Example:
If we want to check whether for face 1 in the image, the emotion is Happy or not, we code:
fd.isexpression(1, 4)Similarly, if we want to check whether for face 1 in the image, the emotion is angry or not, we code:
fd.isexpression(1, 1)Getting positions on the face
In order to get various attributes of the face that is detected, like its x-coordinate, y-coordinate, width and height we use a bunch of face detection functions:
- X position: fd.x(1)
- Y position: fd.y(1)
- Width: fd.width(1)
- Height: fd.height(1)
All 4 functions above have a single parameter that denotes the face number.

Using these functions you can make the bounding box for the face like this:

We will learn how to do the same in the next topic by making a face detector.
Get the position of landmarks on the face
Each face that is detected in PictoBlox using the face detection module has landmarks (from 1 to 68), as shown in the image below.
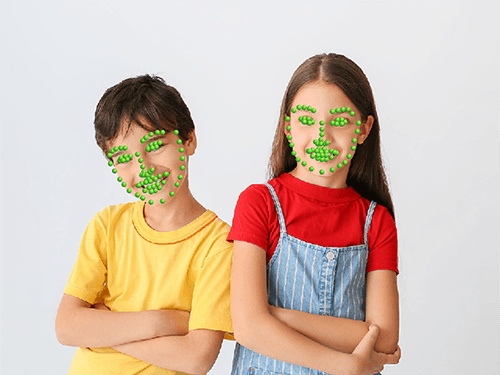
We can get the x and y position of any of these landmarks for any face using the below two functions:
- For getting the x-position:
- For getting the y-position:
Example:
To get the x-position of the 1st image, 20th landmark, we code:
fd.landmarkx(1, 20)To get the y-position of the 2nd image, and 1st landmark, we code:
fd.landmarky(2, 1)Face Expression Detector
In this project, we will make a script that detects the face using the camera and reports the expression of the faces detected on the stage.
Let’s Code!
The code is pretty simple, let’s get straight into it, follow the below steps:
- Open Pictoblox and choose the Python (beta) coding interface. Now, select the Tobi.py file from the Project Files section and by default, the syntax will be written in sprite as an object.
sprite = Sprite('Tobi') - Now create an object named fd to get access to the Face Detection extension and its methods.
fd = FaceDetection() - Next, we will use the various face detection function to turn on the video, enable the bounding box, and set the threshold.
fd.video("on", 0) #to turn on video with 0% transparency fd.enablebox() #to enable bounding box fd.setthreshold(0.4) #to set the threshold at 0.4 - Now we will code to check the condition to get the expression of the face detected and if none is detected then print “No face detected”. We will use an if-else conditional statement under a while loop. To check if the count of face detected is more than 0 then Tobi sprite will say the expression detected.
while True:
  fd.analysecamera()

  if fd.count() > 0:
    sprite.say(fd.expression())

  else:
sprite.say("No Face Detected")- Here is the complete code:
sprite = Sprite('Tobi')

fd = FaceDetection()

fd.video("on", 0)
fd.enablebox()
fd.setthreshold(0.4)

while True:
  fd.analysecamera()
  if fd.count() > 0:
    sprite.say(fd.expression())
  else:
    sprite.say("No Face Detected")
Conclusion
In conclusion, Artificial Intelligence (AI) can be used to detect facial expressions. We have seen how to create a face detector in PictoBlox using Python and the Face Detection extension. This included how to turn on and off the camera feed, how to check for expressions on faces, and how to get positions for face landmarks. This tutorial also walks us through making a face expression detector in PictoBlox. With this AI tool, you can detect facial expressions from the camera feed and report them on the stage.