Introduction
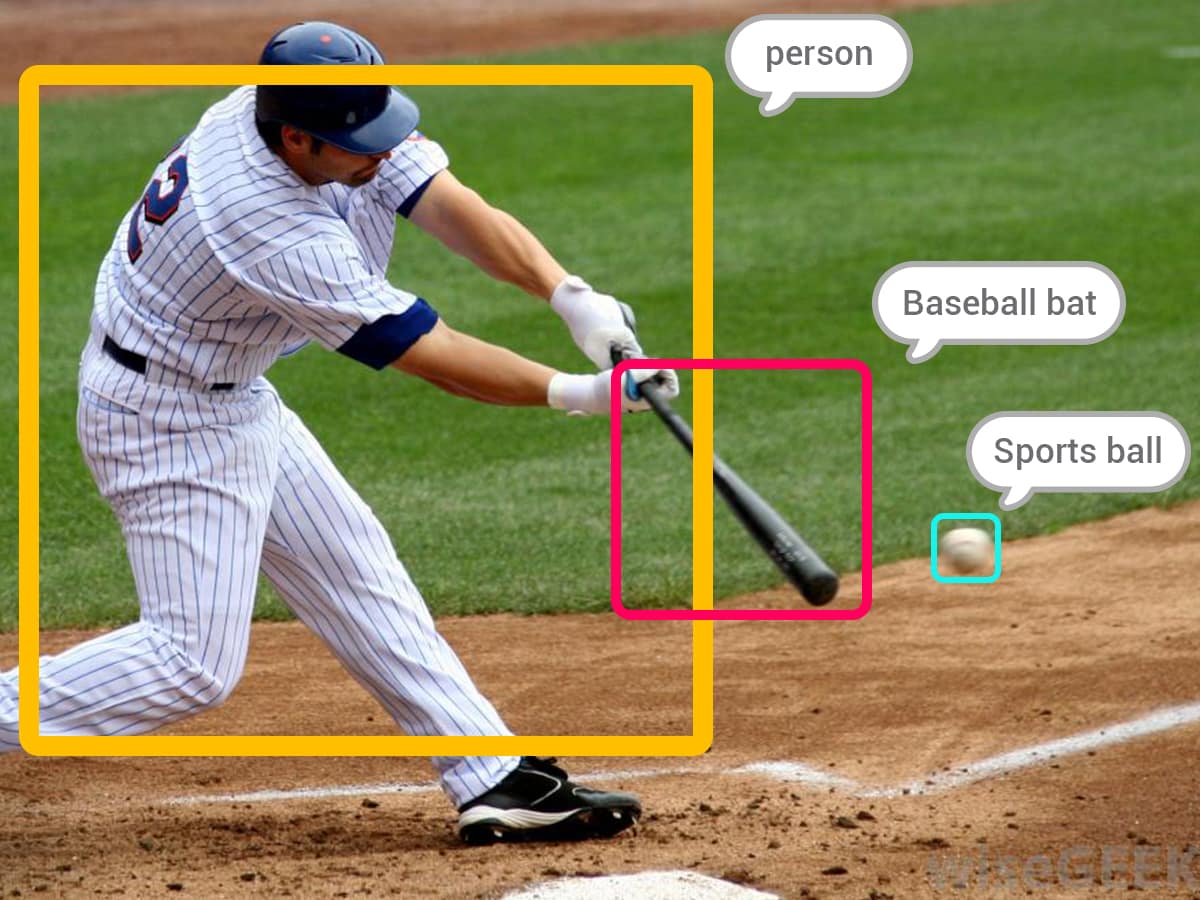
In the future ahead us, the words AI, ML, and robots are going to be the common thing to be heard, they will be used everywhere from shopping malls to your home, so have you ever wonder how they will able to recognize the millions of different man-made objects, and millions of things that pre-exist in nature, the algorithms used for recognizing things already exist and the technology behind it is called are object detection.
So with the new object detection extension inside PictoBlox, we will be able to make scripts in which you can recognize objects from images as well as from the cameras, and with information associated with each of those objects, we will be able to make lots of cool projects.
Let’s begin.
Working with PictoBlox
As the title of the tutorial itself suggests, we will be making this project in PictoBlox- a scratch-based graphical programming software. Follow these steps and make your own object recognition machine.
Setting up the Software
As you like to be up-to-date, so does the software. To use the face detection extension of PictoBlox, you need to update PictoBlox to its latest version. You can download it from here.
Adding Up the Extension
Now that we have the latest version, let’s add the Face Recognition.
- First, select the board as evive.
- Next, click on the add extension button
- Once clicked you will be able to see all the extension available,
- Select Object Detection
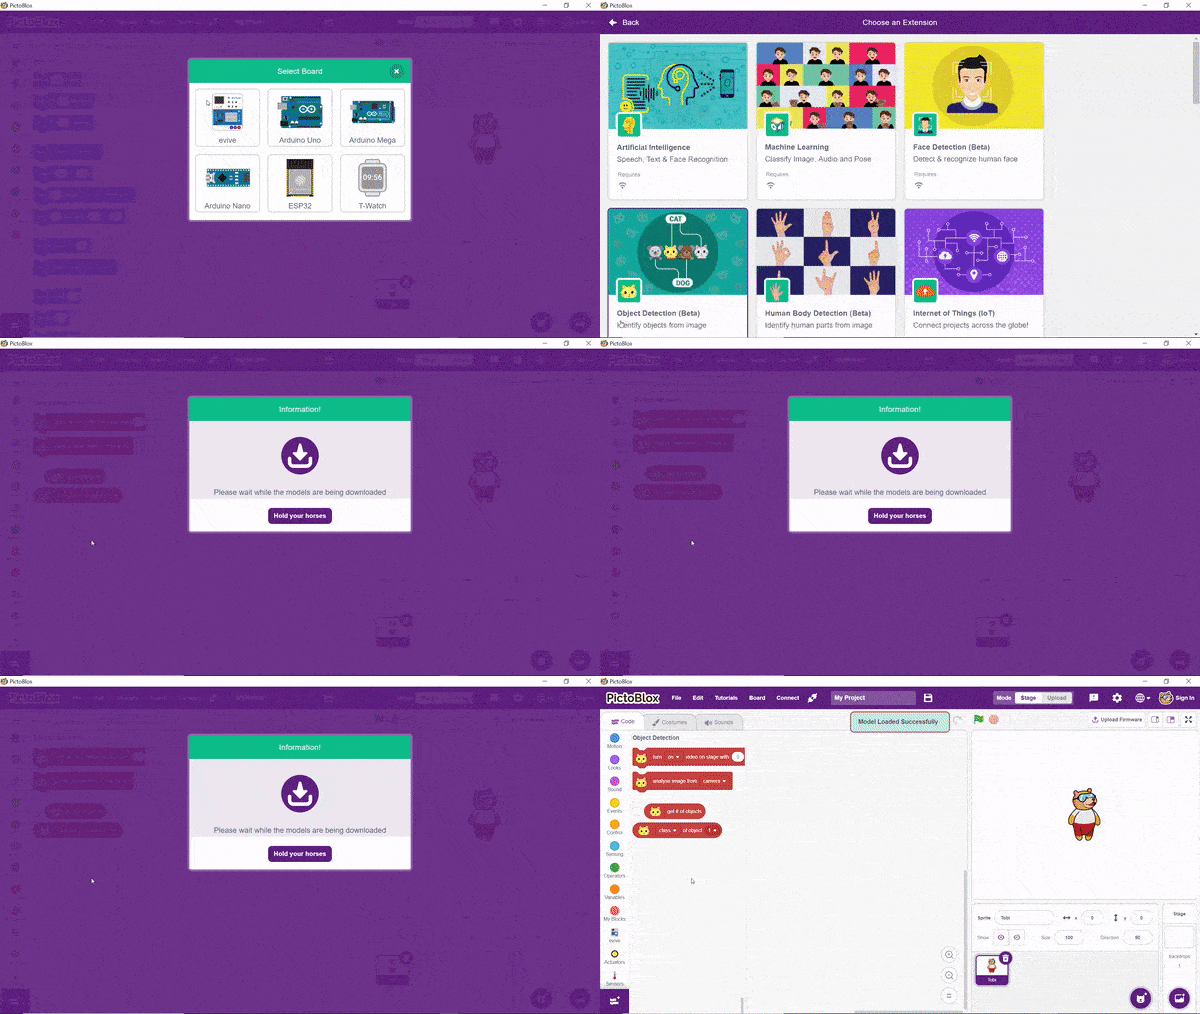
You will notice new blocks are being added under the same extension
Please remember that this extension requires an Internet connection in order to process images. Also, wait till models get loaded it might take a few moments to load.
What will you need
- A pc/laptop.
- PictoBlox.
- Internet connection.
- A sample image(You can download the sample image from here).

Writing the Script in PictoBlox
Now, that everything is ready. let’s start writing the script.
Adding sprite
Before we begin, let’s add our sprite into the project first.
- Click on add sprite button
- Add the square box sprite
- You can delete The Tobi sprit, simply right click on it and select delete from the drop-down.
Completing the script
Now select the Square box sprite to write the script.
- Turn off the camera using the turn () video on stage with () transparency block. Choose OFF from the first drop-down.

- Let’s set up the Stage. Click on the upload backdrop option and select the baseball image which you have downloaded and place it on the stage.
- Next, select the Square box sprite, and let’s start making the script.
- First, drag and drop the when flag clicked hat block to execute the program every time the green flag is clicked.
- Next, let’s process the imagery stage. Add the analyze image from () the block below the when the flag is clicked block. Select Stage from the dropdown menu.

- Now, let’s create a variable to store the object count. Click on the Make a variable button inside the Variables palette. Make a variable with the name “Object” and click on ok.
- Add the set variable () as () block and set Object as 0.

- Now, as we need to detect all the objects, add a repeat until () block. Drag and drop an equal to block from the Operator Palette inside the hexagonal space of the repeat until block.
- Now to acquire the no of objects from the image use get # of objects block inside the first space of the equal to block and place the variable Object into the second empty space. The block get # of objects contains information on the number of objects that are detected from the image that has been processed.

- Next, let’s display the recognized objects. To display the properties of all detected objects one by one, we need to increment our variable by 1 each time we execute our control logic. Thus place change () to () block into the repeat until block.

- Next, set the size of the square box to accommodate the object detected, drag and drop the set size to () % block from Looks palette. To detect the width, add the () of object block inside it and choose width from the drop-down. This block contains all the information like x,y position, width, height class of the given object.

- Add the Object variable into the space given.
- Then we need to move our Square box to the location of the object, thus add go to x() y() block from Motion palette. Next, insert two () of object block and choose x position and y position from the respective blocks to obtain the X value and Y value of the object respectively.

- Finally, to display the class of recognized object, get the say () for () seconds block from the Looks palette and make it say the class of the detected object.

With this, the script is ready.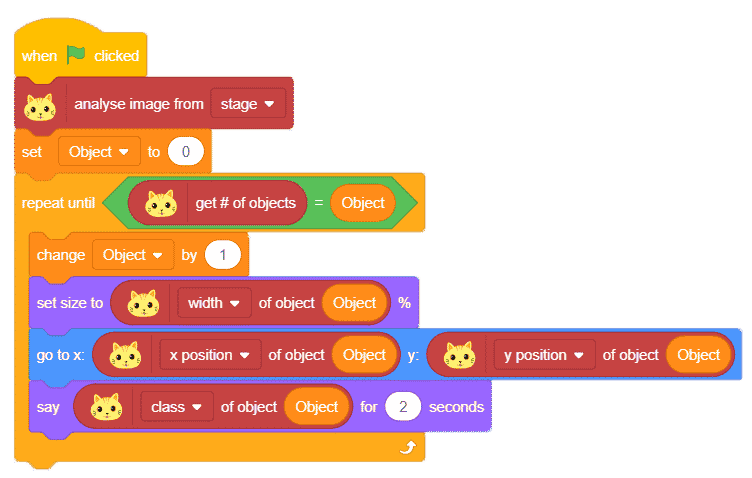 You can download the script from here.
Click on the flag button and let the script work its magic on image.
You will observe that two objects are detected from this particular image first one being obviously a person and the other one being the sports ball. You can change the image on the backdrop and recognize objects from lots of different images.
Conclusion
This tutorial was about making an object recognition machine with PictoBlox. We saw how to use PictoBlox‘s Object Detection extension to recognize objects from images and from the camera with the help of the when flag-clicked block and set variable block. We also learned how to set up the software, add the extension, and write the script using PictoBlox. With this tutorial, you have now learned how to make an expression recognition machine with PictoBlox. With the help of this tutorial, you can now recognize objects from images or cameras and make lots of cool projects.

