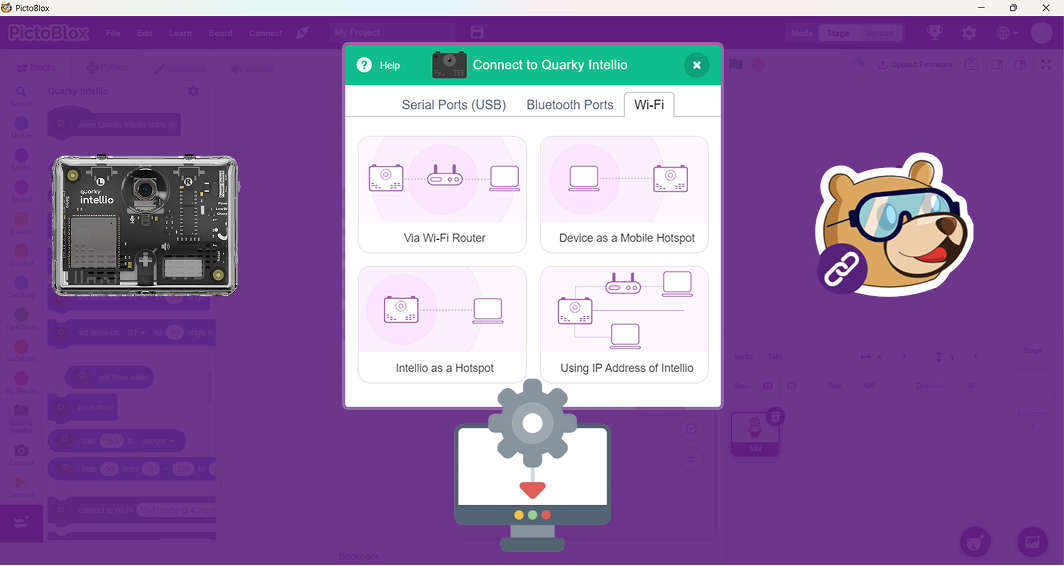
Quarky Intellio connects to PictoBlox wirelessly over 2.4 GHz Wi-Fi. Depending on your setup, you can connect it through a Wi-Fi router, a device hotspot, an Intellio-created hotspot, or an IP address.
If Quarky Intellio is not connecting, does not appear in PictoBlox, gets stuck during connection, or shows an IP or network error, the issue is usually related to the connection setup, firmware, network configuration, device discovery, or computer settings.
Use the relevant section below to identify the problem and follow the recommended steps.
Connection Methods at a Glance
| Connection Method | What You Need |
| Wi-Fi Router | Quarky Intellio and computer on the same 2.4 GHz Wi-Fi network |
| Device as a Mobile Hotspot | A 2.4 GHz hotspot created by Windows, macOS, or Linux |
| Intellio as a Hotspot | Computer connected directly to the Wi-Fi network created by Intellio |
| Using IP Address | Intellio must have been previously connected using one of the other methods |
The Intellio as a Hotspot method does not provide internet access. The Mobile Hotspot method provides internet access only when the hotspot device itself has an active internet connection.
Before You Start Troubleshooting
Complete these basic checks before moving to a specific problem. The troubleshooting sections below refer back to these checks instead of repeating the same steps.
Install and update PictoBlox
- Use PictoBlox 9.1.0 or later.

- To check for updates: go to Download PictoBlox and confirm you have the latest version.
- Web browser support for Quarky Intellio on pictoblox.ai is currently under development — use the desktop app.
Note: Web browser support for Quarky Intellio on pictoblox.ai is currently under development.
Make Sure Quarky Intellio Is Powered On
- Slide the Power Switch to turn on Quarky Intellio before starting the connection process.
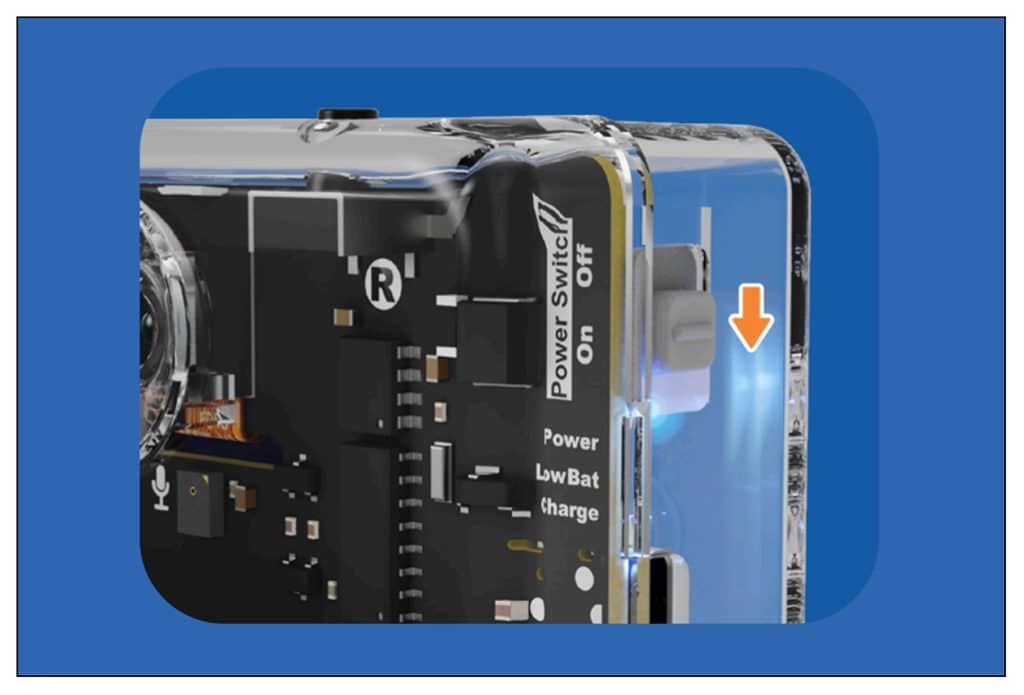
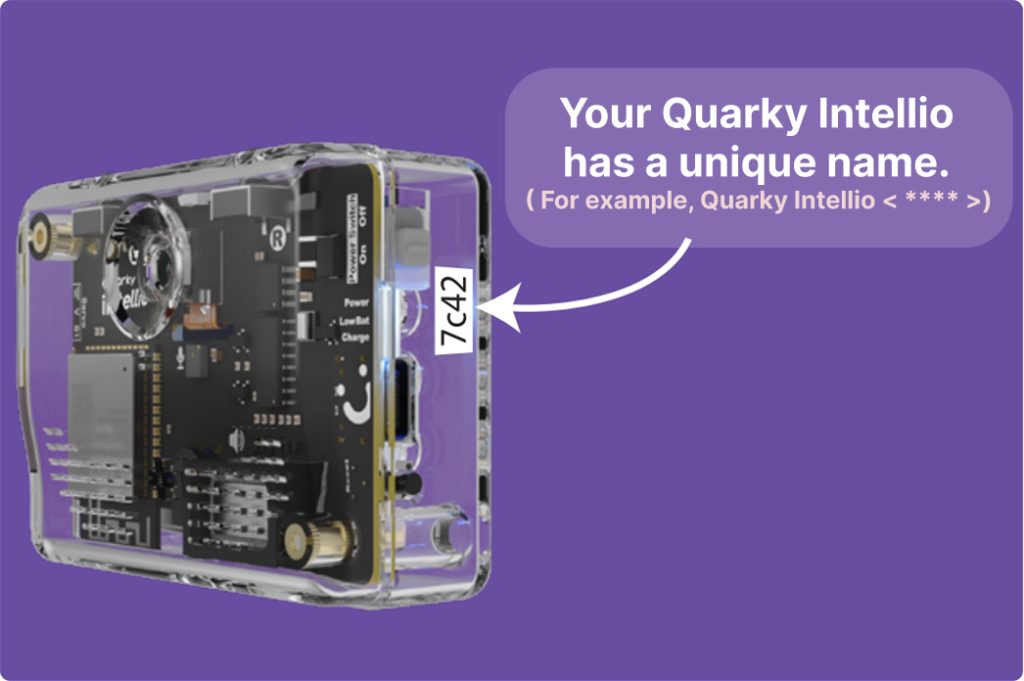
- You can find your Quarky Intellio Name printed on the right side of the device, as shown below.
Update the Quarky Intellio firmware
Outdated firmware often causes Intellio not to respond, not connect, or behave unexpectedly.
For this, please refer to the How to Update Firmware on Quarky Intellio? section in the Quarky Intellio Firmware Troubleshooting guide.
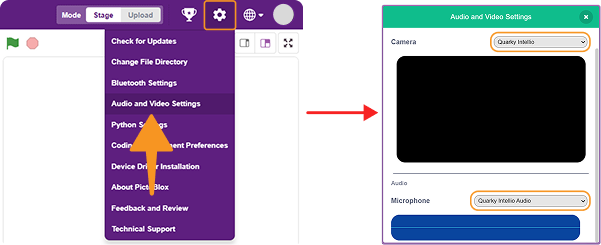
Select the correct Camera and Audio device
If the camera feed or audio does not work in a project, PictoBlox may be using the wrong device.
- Go to Settings → Audio & Video Settings.
- Set Camera → Quarky Intellio.
- Set Audio Microphone → Quarky Intellio Audio.
Confirm Wi-Fi and Bluetooth are available on your computer
Quarky Intellio needs both Wi-Fi (2.4 GHz) and Bluetooth on your computer for setup.
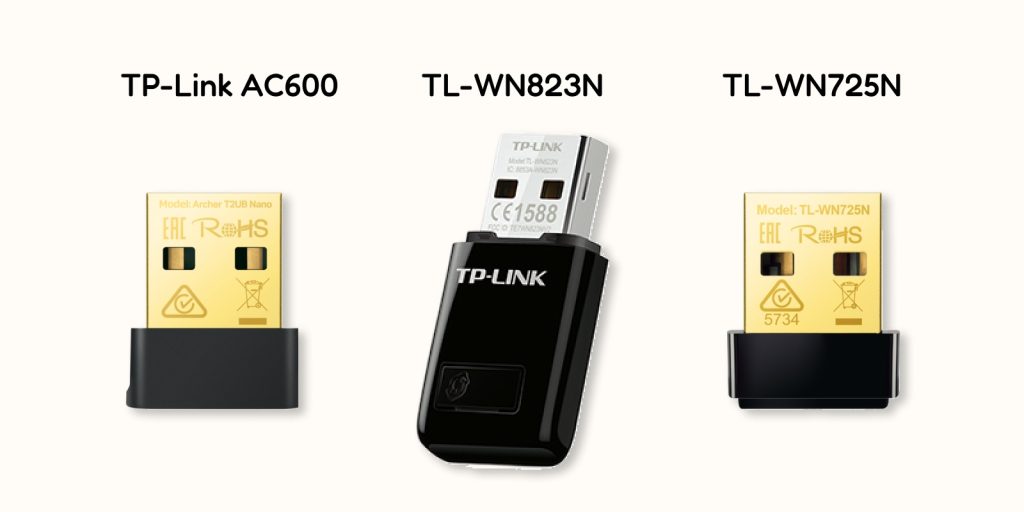
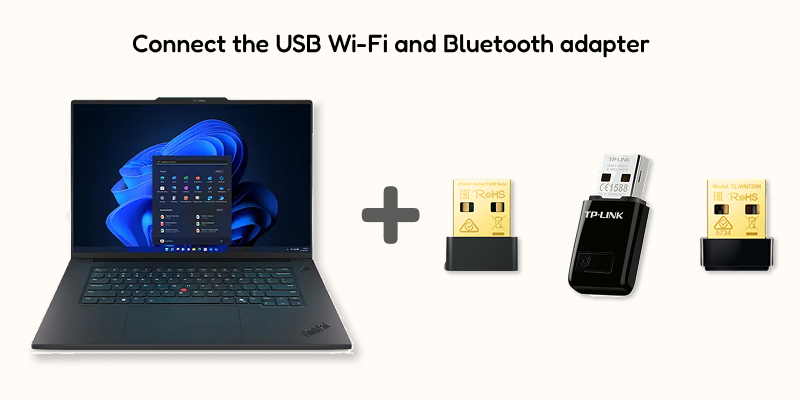
If your computer has no built-in Wi-Fi or Bluetooth, and no Ethernet option either, use a compatible external USB Wi-Fi + Bluetooth adapter that supports:
- 2.4 GHz Wi-Fi
- Bluetooth
The following Wi-Fi adapters were tested:
- TP-Link TL-WN823N – 300 Mbps, 2.4 GHz
- TP-Link AC600 – Supports 2.4 GHz and 5 GHz
- TP-Link TL-WN725N – 150 Mbps, 2.4 GHz
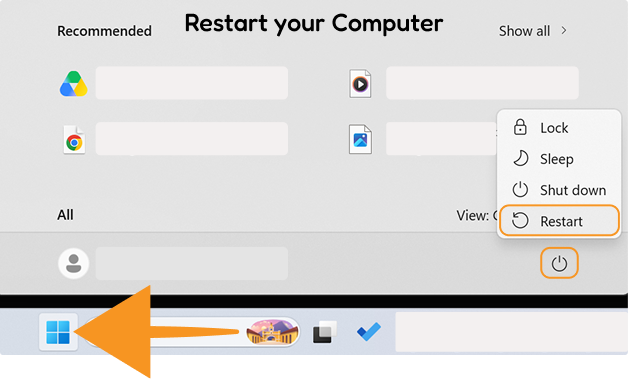
To enable it: plug in the adapter, let Windows install the drivers, restart the computer if required, then confirm that Wi-Fi and Bluetooth now appear in your settings.
Turn On Wi-Fi and Bluetooth on Your Device
Quarky Intellio connects to PictoBlox over Wi-Fi to enable features such as camera streaming and real-time project communication. During setup, PictoBlox uses Bluetooth or the USB Serial Port to securely transfer the Wi-Fi network details to Intellio. Once the credentials are shared, Intellio joins the Wi-Fi network and connects to PictoBlox.
Follow the steps for your operating system.
For Windows
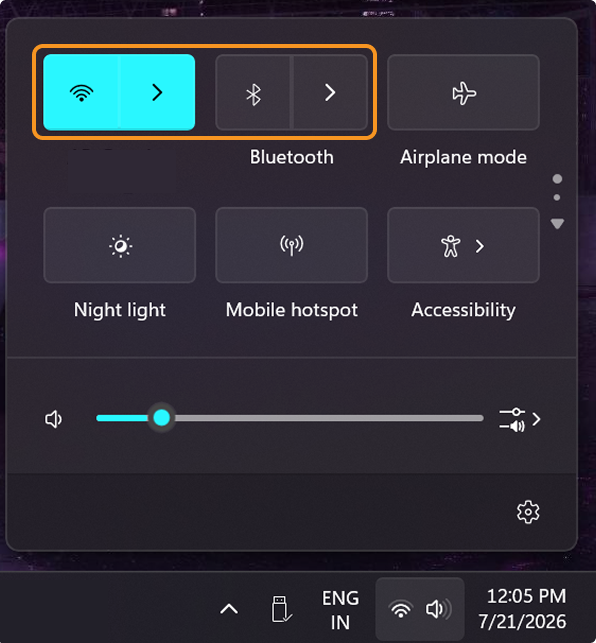
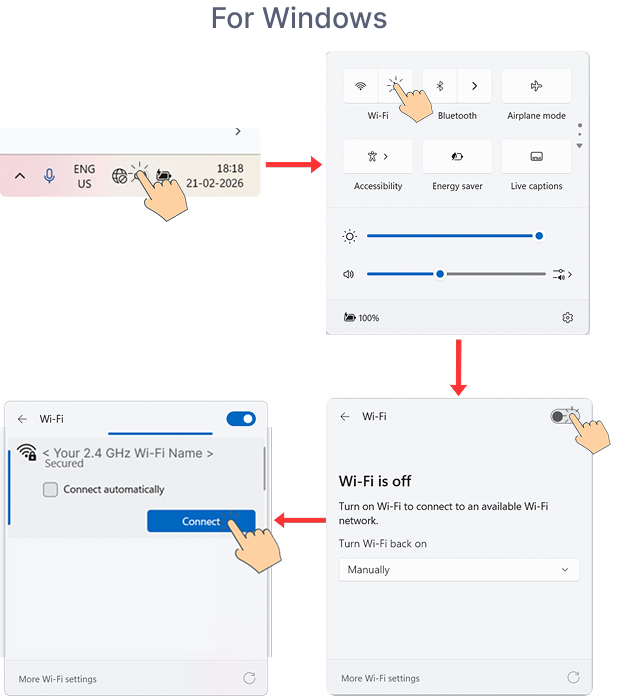
- Open Quick Settings from the bottom-right corner of your taskbar, turn on Wi-Fi, and connect to a 2.4 GHz network.
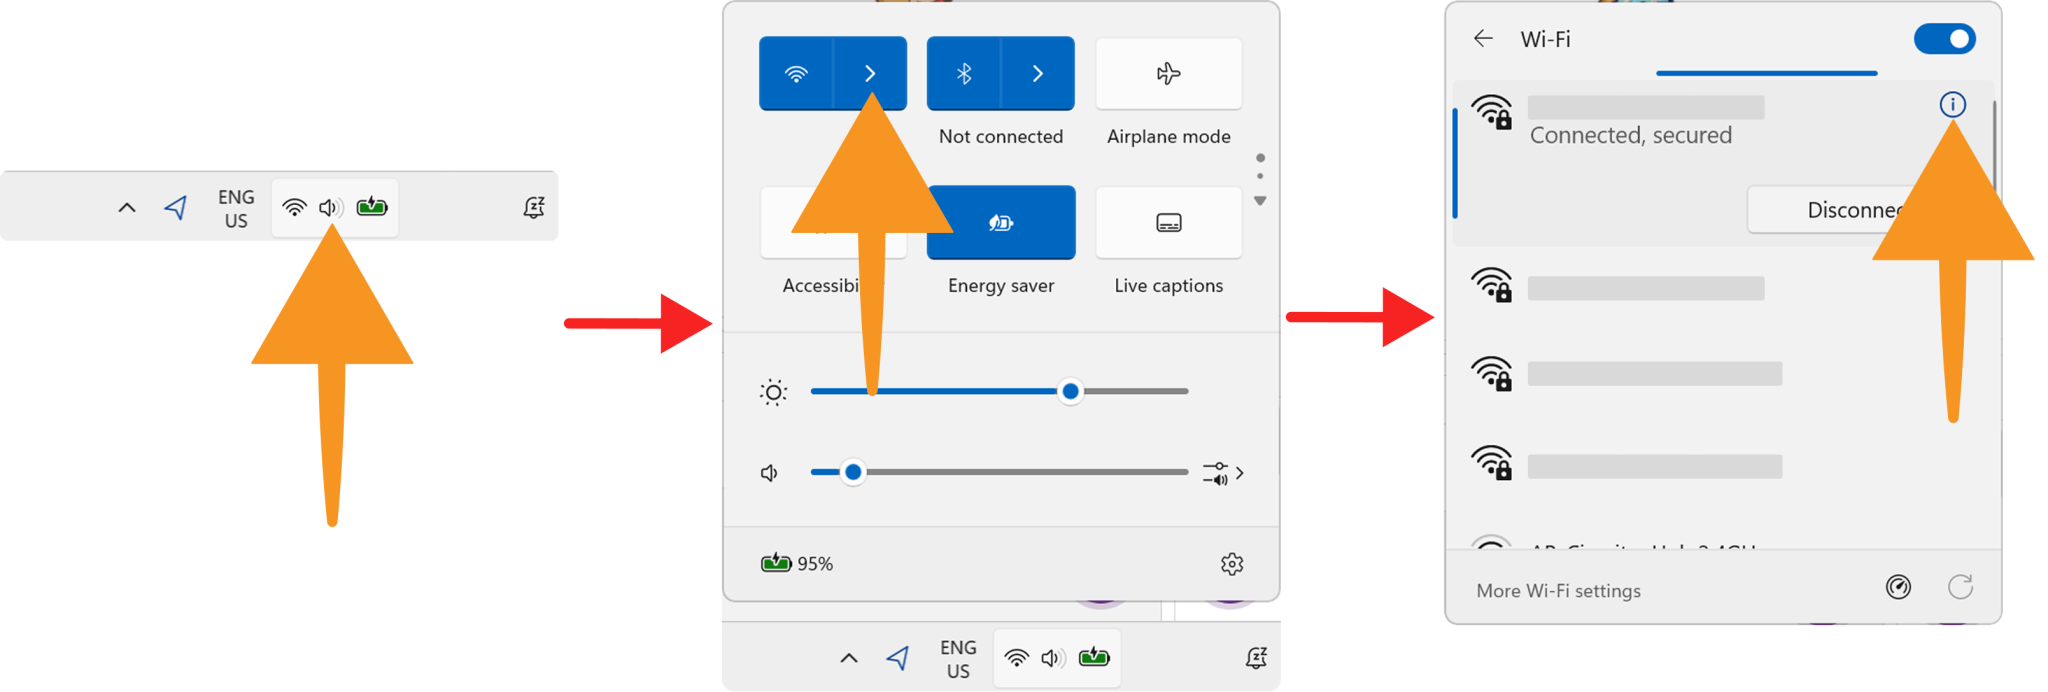
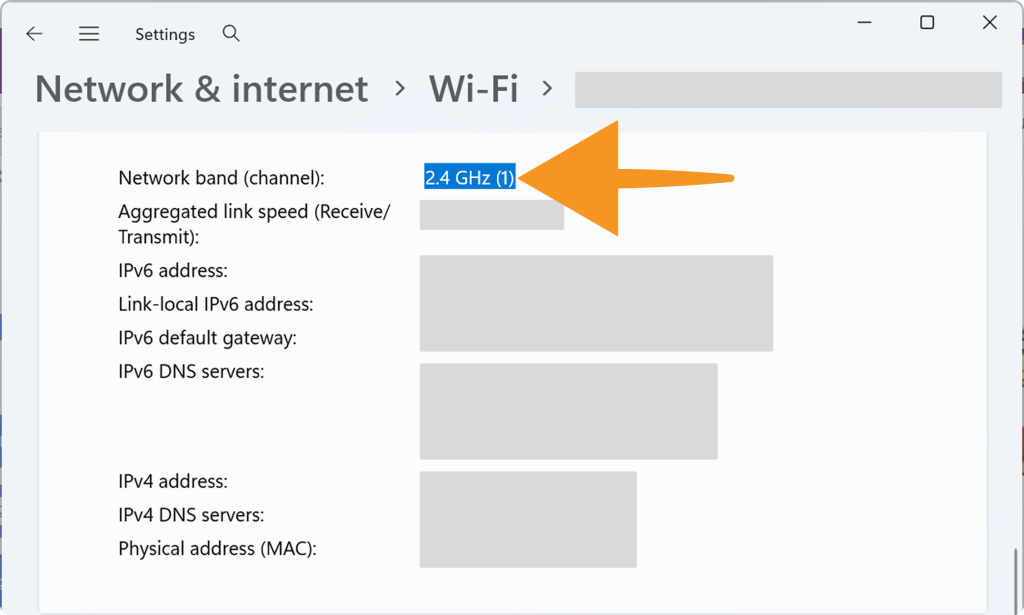
- Check whether the Wi-Fi is 2.4 GHz.
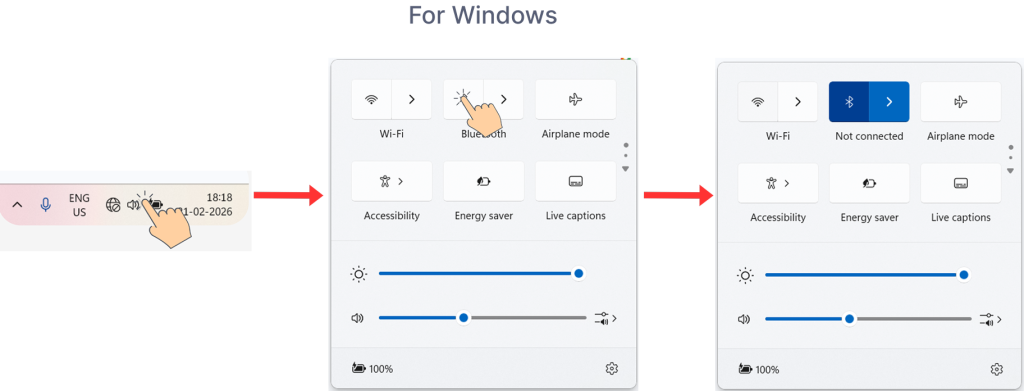
- Open Quick Settings from the bottom-right corner of your taskbar and turn on Bluetooth.
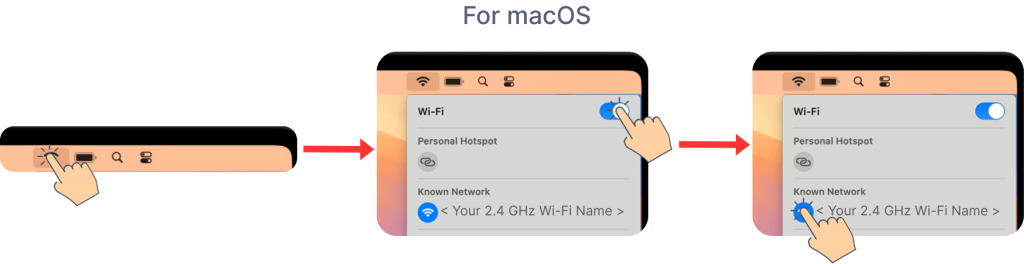
For macOS
- Click the Wi-Fi icon in the top-right corner of your macOS screen, turn on Wi-Fi, and connect to a 2.4 GHz network.
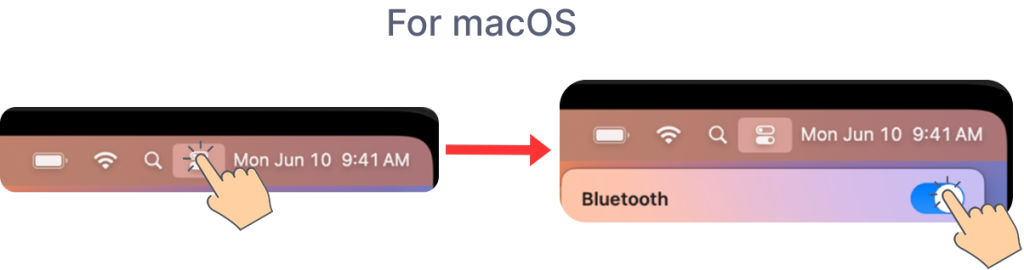
- Open the Control Center from the top-right corner of your macOS screen, then turn on Bluetooth.
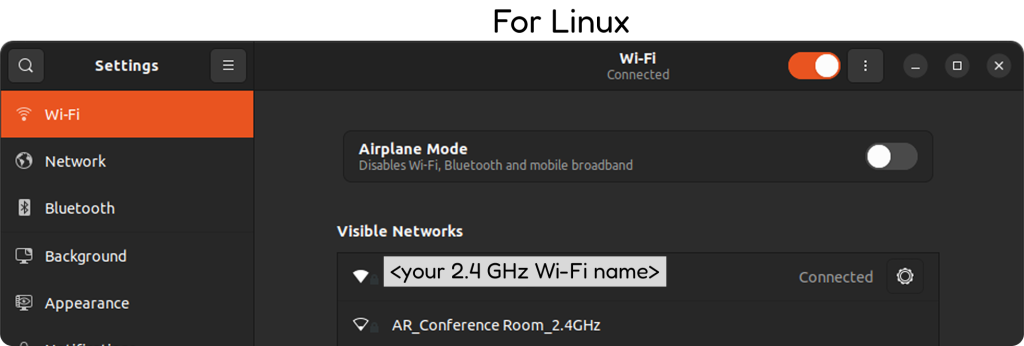
For Linux
- Open Settings and turn on Wi-Fi, then connect to a 2.4 GHz Wi-Fi network.
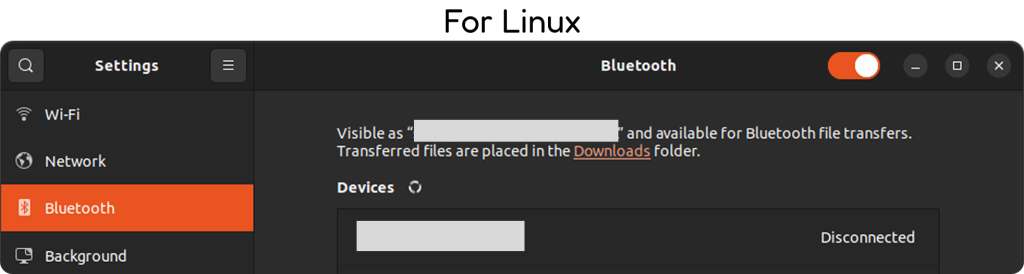
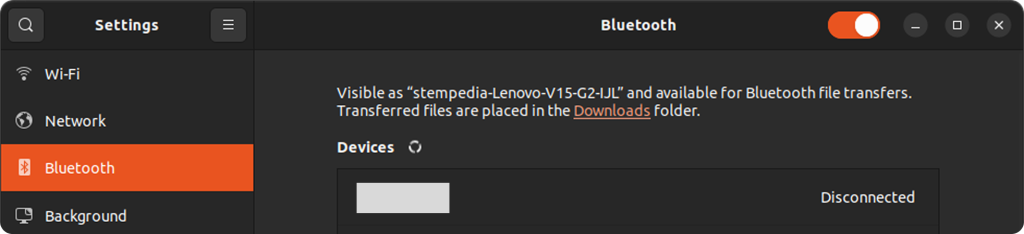
- Open Settings → Bluetooth (or use the system menu), and turn on Bluetooth.
Check Your Connection Method
Quarky Intellio supports these connection methods:
- Via Wi-Fi Router
- Device as a Mobile Hotspot / Internet Sharing / Wi-Fi Hotspot
- Intellio as a Hotspot
- Using IP Address of Intellio
Choose the troubleshooting section that matches your connection method.
Common Fixes
These issues can occur with multiple connection methods. Where the solution differs by connection method, the relevant steps are provided under the same issue.
Quarky Intellio Is Not Connecting to PictoBlox
Problem: “My Quarky Intellio is not connecting to PictoBlox.”
Why Does This Happen?
The connection may fail because of an outdated PictoBlox version or firmware, incorrect network settings, disabled Bluetooth, an unsuitable connection method, or a network configuration that does not meet Quarky Intellio requirements.
How to Fix It
First, complete the checks under Before You Start Troubleshooting.
Then follow the solution for your connection method.
Via Wi-Fi Router
- Make sure the router provides a 2.4 GHz Wi-Fi network. See Before You Start Troubleshooting, Step 6.
- Connect your computer to the same 2.4 GHz network.
- Make sure the Wi-Fi name and password entered in PictoBlox are correct.
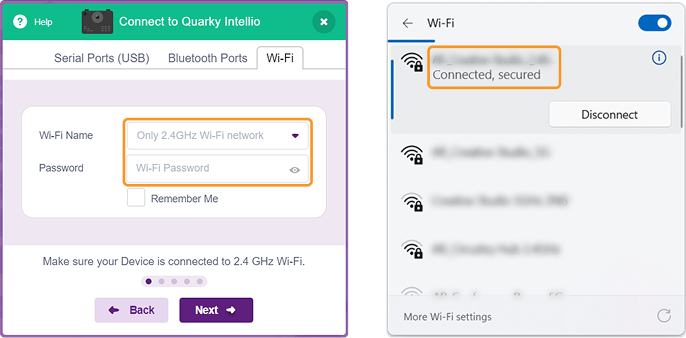
- Try connecting again.
Device as a Mobile Hotspot (Windows), Using Internet Sharing (macOS), and Device as a Wi-Fi Hotspot (Linux)
Step 1: To create a hotspot on your operating system, please refer to the Quarky Intellio Connection Guide.
Step 2: Refer to the following sections:
Create a Mobile Hotspot in Windows
Enable Internet Sharing on macOS
Create a Wi-Fi Hotspot on Linux
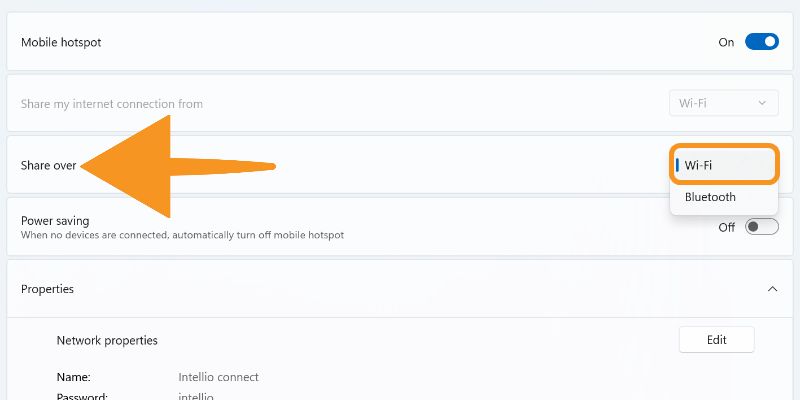
Step 3: Make sure the hotspot is shared through Wi-Fi, not Bluetooth.
 Step 4: Keep the hotspot active while connecting.
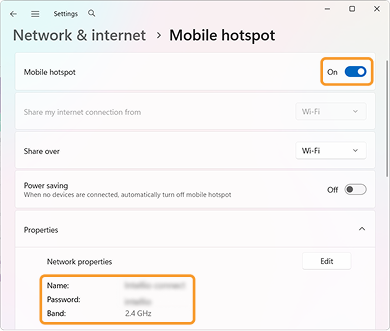 Step 5: Check that the hotspot name and password are correct. Try connecting again.
Intellio as a Hotspot
Follow the steps below based on your operating system to connect to a previously created Intellio Hotspot.
For Windows
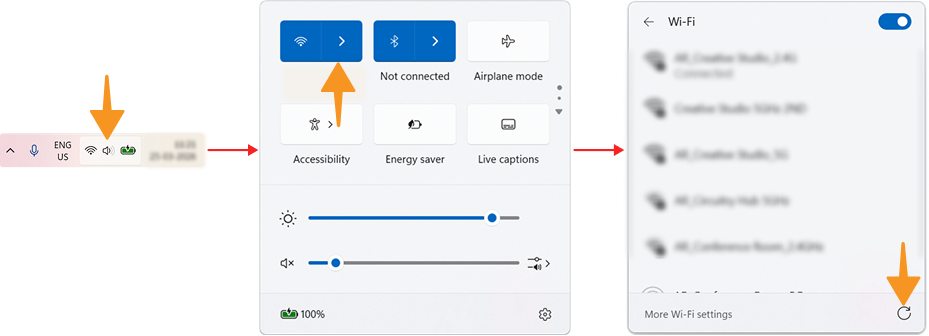
- Open Quick Settings from the bottom-right corner of your taskbar and connect to the Intellio hotspot network created previously.
- Open Quick Settings from the bottom-right corner of your taskbar and turn on Bluetooth.
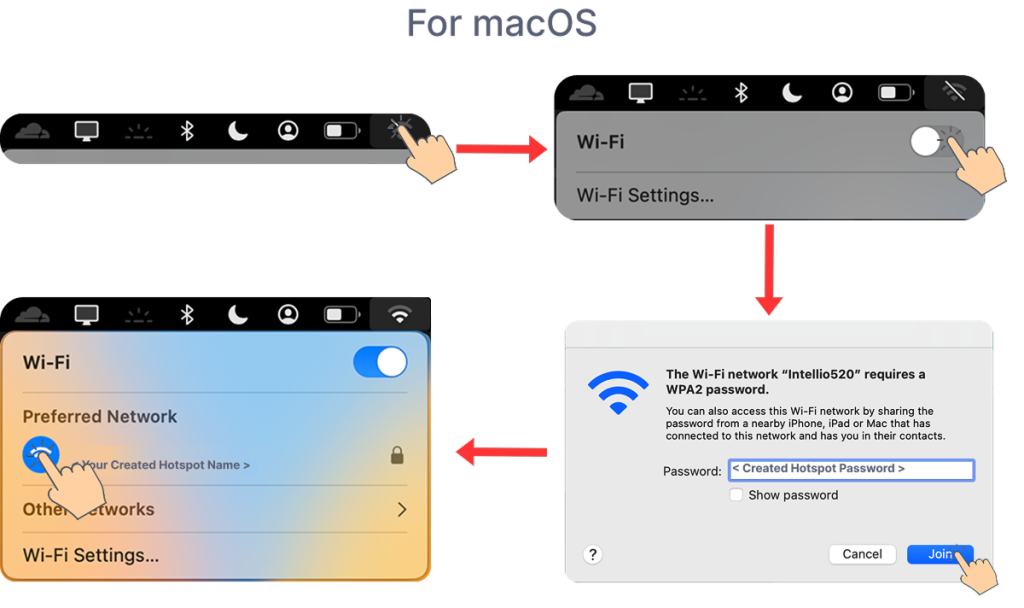
For macOS
- Click on Wi-Fi from the top-right corner of your menu bar, turn on Wi-Fi, and select your Intellio hotspot network created previously.
- Enter the Password created previously and click Join.
For Linux
Note: The user interface (UI) may vary depending on your Linux distribution and desktop environment (such as Ubuntu, Fedora, Linux Mint, GNOME, KDE Plasma, etc.). Please follow the corresponding options and settings available on your system.
Step 1: Open Settings → Wi-Fi and turn on Wi-Fi. Select the previously created Intellio hotspot network from the list of available Wi-Fi networks. Enter the hotspot password created earlier and click Connect.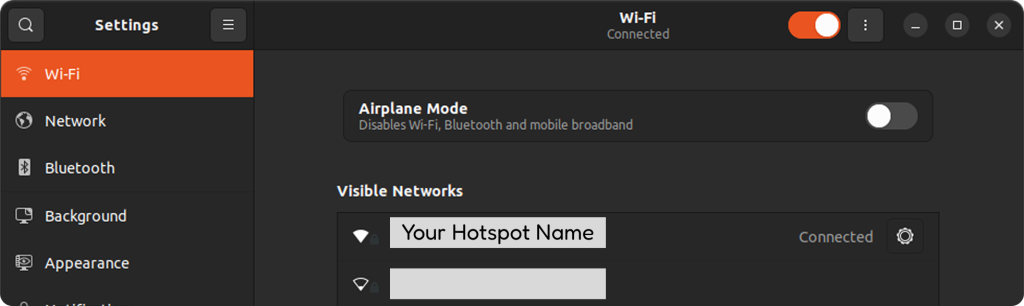 Step 2: Open Settings → Bluetooth (or use the system menu) and ensure Bluetooth is turned ON.
 Step 3: Connect your computer to the hotspot created by Quarky Intellio.
Step 4: Try connecting again.
Using IP Address of Quarky Intellio
Step 1: Make sure Quarky Intellio was previously connected using one of the other connection methods. (Via Wi-Fi Router, Device as a Mobile Hotspot, or Intellio as a Hotspot). See Before You Start Troubleshooting, Step 7.
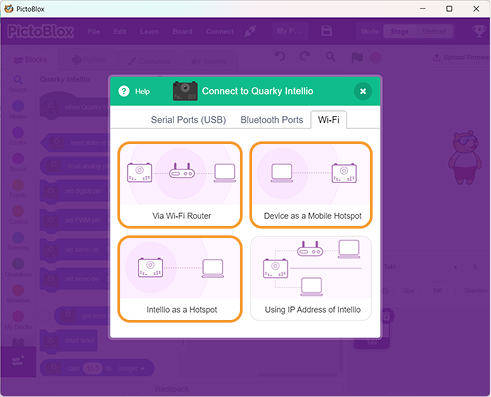
Step 2: Connect your computer to the same network used previously.
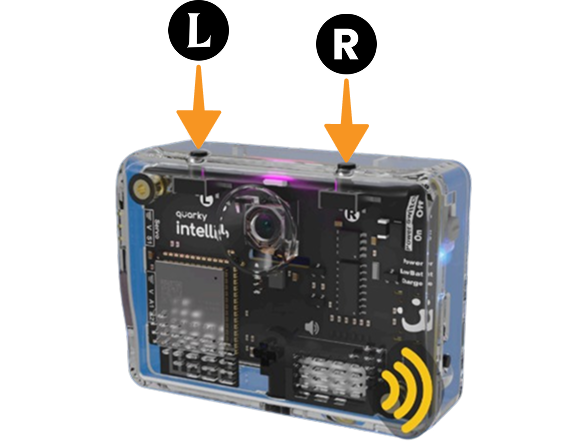
Step 3: Reconnect Intellio to its saved network using the appropriate L or R button.
 Step 3: Click Refresh and try the IP connection again.
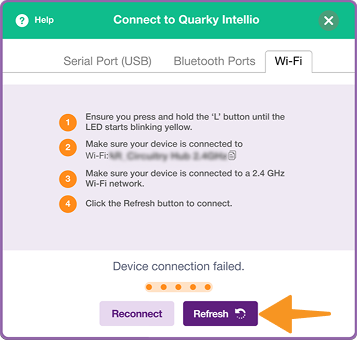 Step 4: If the connection still fails, identify the message or screen displayed by PictoBlox and continue to the relevant troubleshooting issue.
Windows Firewall Blocking the Connection (IP Detection Fails)
Why this happens: PictoBlox uses UDP for device discovery and network communication. Windows Firewall can silently block this, so PictoBlox can’t find or connect to Intellio even though the network itself is fine.
How to fix it:
To fix this issue, allow PictoBlox through the Windows Firewall, especially for the blocked TCP or UDP rules.
Follow these steps:
Step 1: Press Win + R, type wf.msc, and press Enter or click on OK.
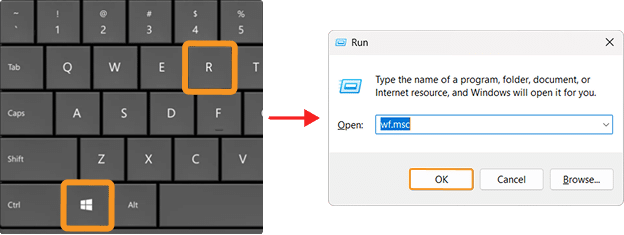
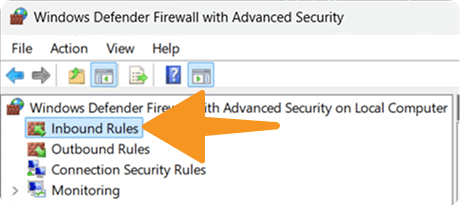
Step 2: Click on Inbound Rules.
Step 3: Find PictoBlox in the list.
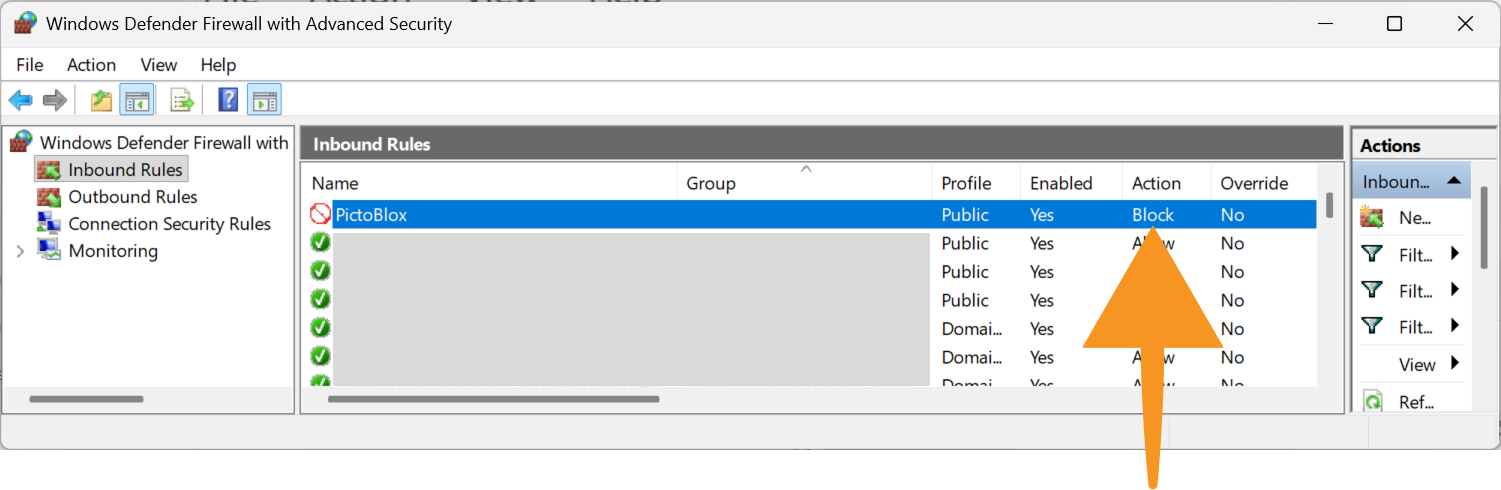
Step 4: If a red cross icon is visible → the connection is blocked. You may see both TCP and UDP rules.
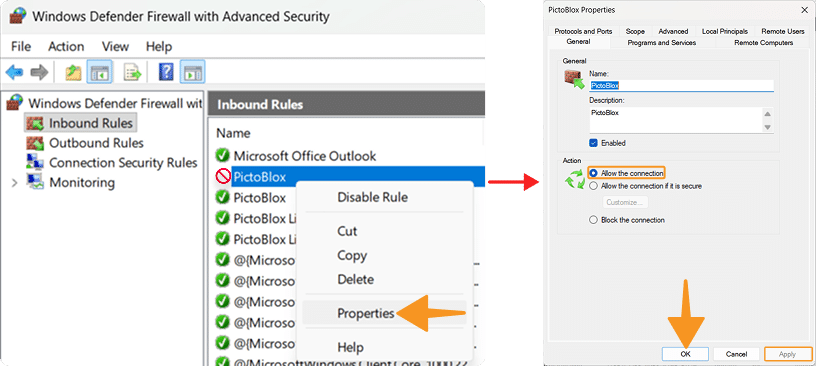
Step 5: Right-click → Properties, select Allow the connection, and click Apply → OK.
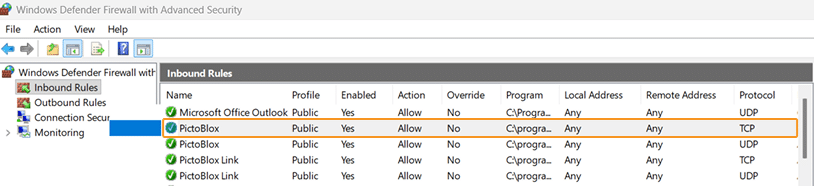
Step 6: The issue has been resolved.
If PictoBlox is not listed:
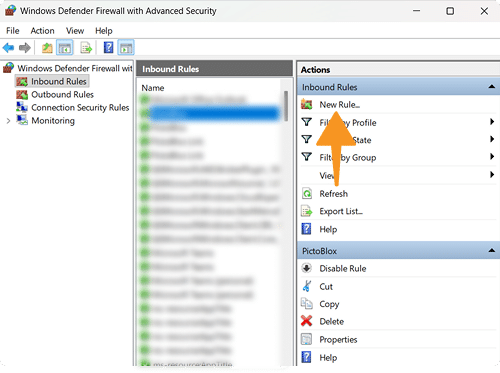
Step 1: Click New Rule (right panel).
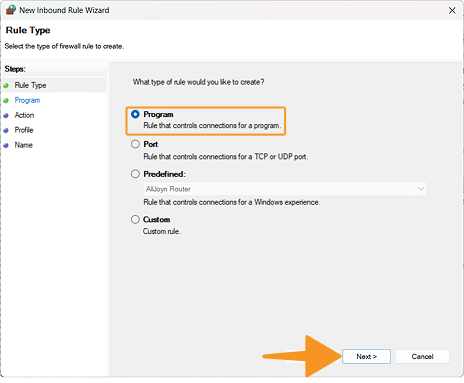
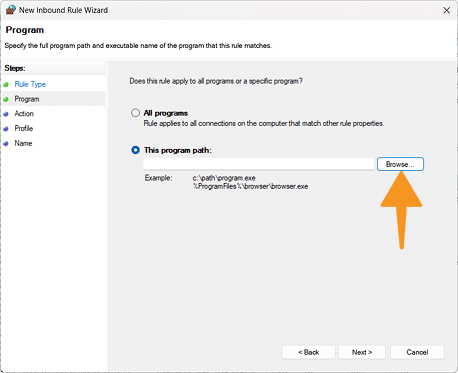
Step 2: Select Program → Next → Browse.
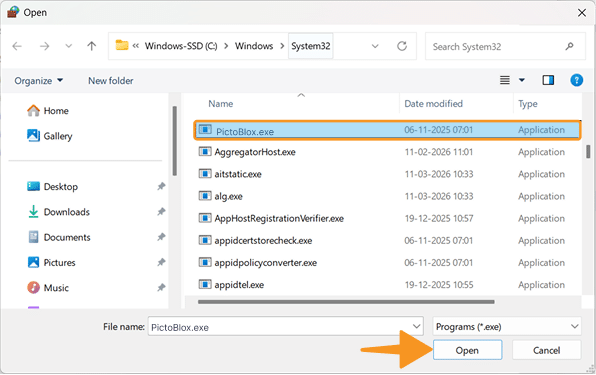
Step 3: Select PictoBlox.exe
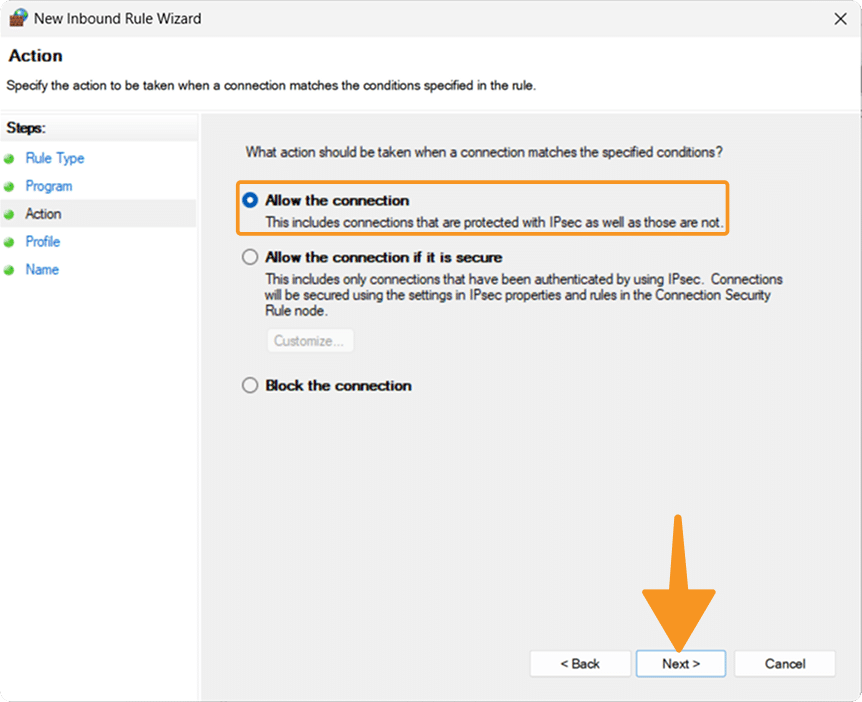
Step 4: Allow TCP and UDP, select Allow the connection, and click Next.
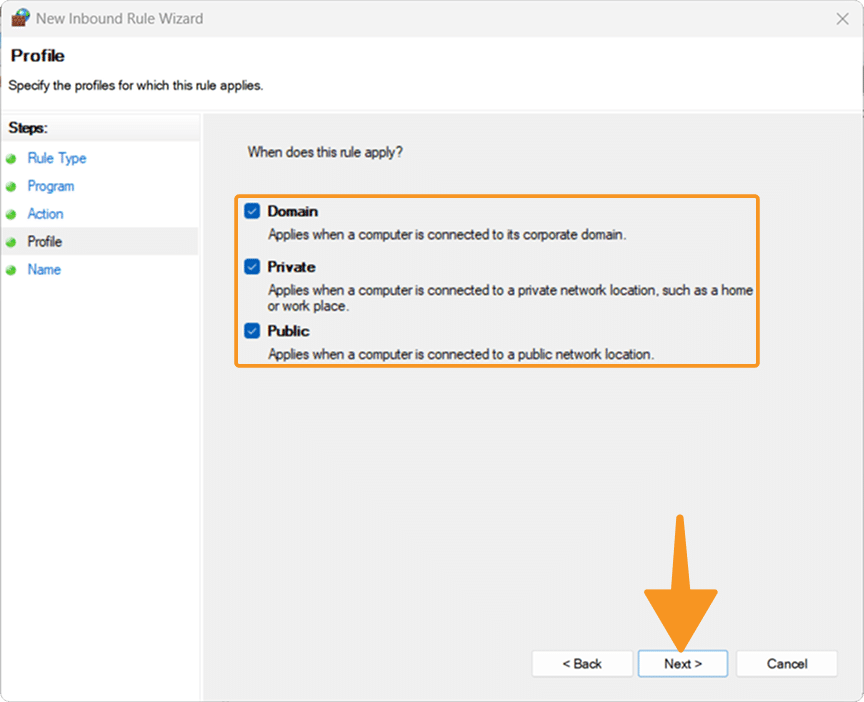
Step 5: Apply to Domain / Private / Public and click Next.
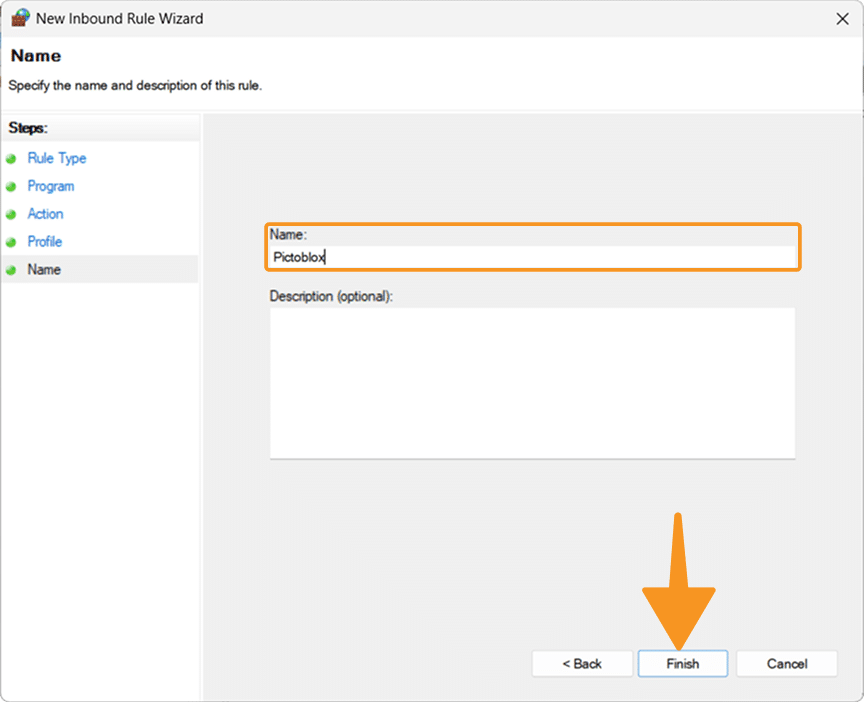
Step 6:Add PictoBlox and click Finish.
Quarky Intellio Is Not Showing in the “Looking for Devices” Screen?
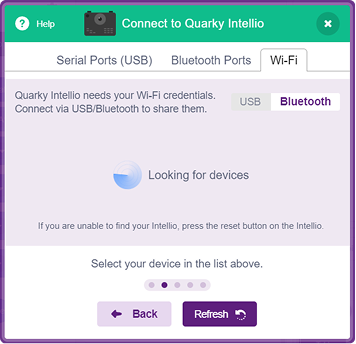
Problem: “Quarky Intellio is not appearing in the device list in PictoBlox.”
Why Does This Happen?
PictoBlox uses Bluetooth during device discovery. Intellio may not appear if Bluetooth is disabled, the device is not in the required discovery state, or the device list has not been refreshed.
How to Fix It
First, complete the checks under Before You Start Troubleshooting.
These steps apply to all connection methods.
- Make sure Bluetooth is turned ON on your computer. See Before You Start Troubleshooting, Step 6.
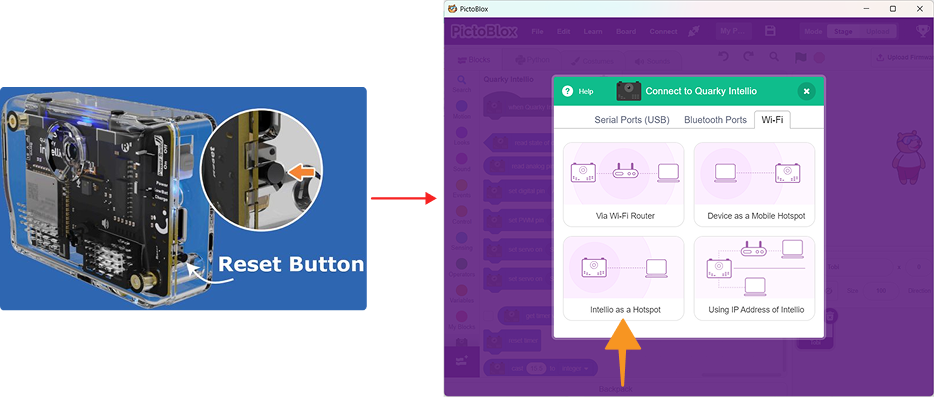
- Press the Reset button on Quarky Intellio.
- Wait until the blue LED turns ON. Click Refresh in PictoBlox and check the device list again.
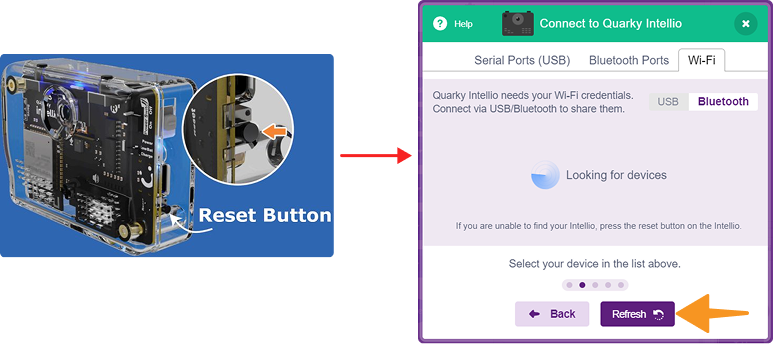
- If Intellio still does not appear, check the requirements for your selected connection method.
Quarky Intellio Shows “Device Connection Failed”
Problem: “PictoBlox shows ‘Device Connection Failed’ when I try to connect Quarky Intellio.”
Why Does This Happen?
The cause depends on the connection method. Incorrect network details, an unsupported Wi-Fi frequency, an inactive hotspot, an incorrect network connection, or an incomplete device reset can prevent Intellio from completing the connection.
How to Fix It
First, complete the checks under Before You Start Troubleshooting.
Then follow the solution for your connection method.
Via Wi-Fi Router
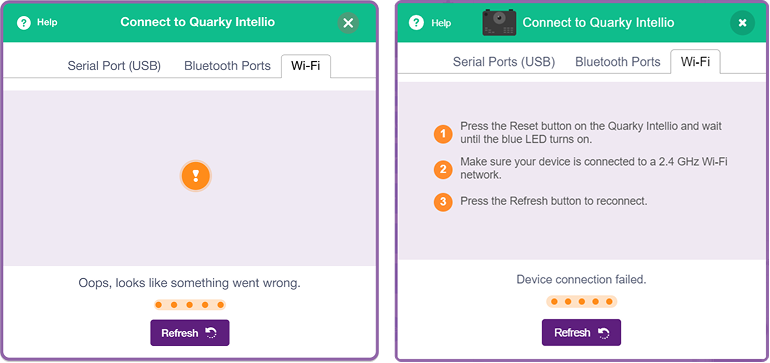
- Confirm that the router is using 2.4 GHz Wi-Fi. See Before You Start Troubleshooting, Step 6.
- Re-enter the Wi-Fi name and password carefully. Check for spelling mistakes, extra spaces, or incorrect capitalisation.
- Press the Reset button on Intellio and wait until the blue LED turns ON.
- Click Refresh and try connecting again.
Device as a Mobile Hotspot
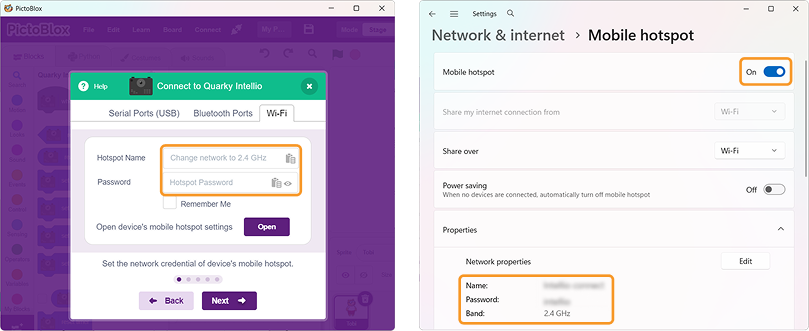
The “Device Connection Failed” screen may appear if the hotspot name, hotspot password, or hotspot band is incorrect. Quarky Intellio must connect to the correct 2.4 GHz hotspot using the exact hotspot details.
- Make sure the Mobile Hotspot is ON.
- Confirm that the hotspot is configured for 2.4 GHz. See Before You Start Troubleshooting, Step 6.
- Keep the hotspot active during the connection process.
- Make sure the hotspot is shared through Wi-Fi, not Bluetooth.
- Check that the hotspot name and password match exactly.
- Press the Reset button on Intellio and wait until the blue LED turns ON.
- Click Refresh and try connecting again.
Intellio as a Hotspot
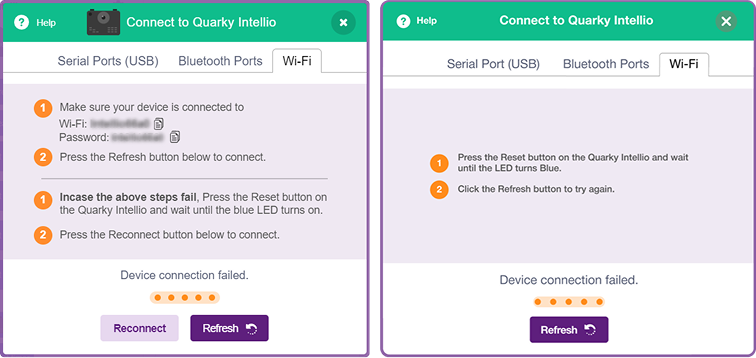
The “Device Connection Failed” screen in the Intellio hotspot method may appear if your device is connected to the wrong network, the Intellio hotspot password is incorrect, or Bluetooth is disabled during discovery.
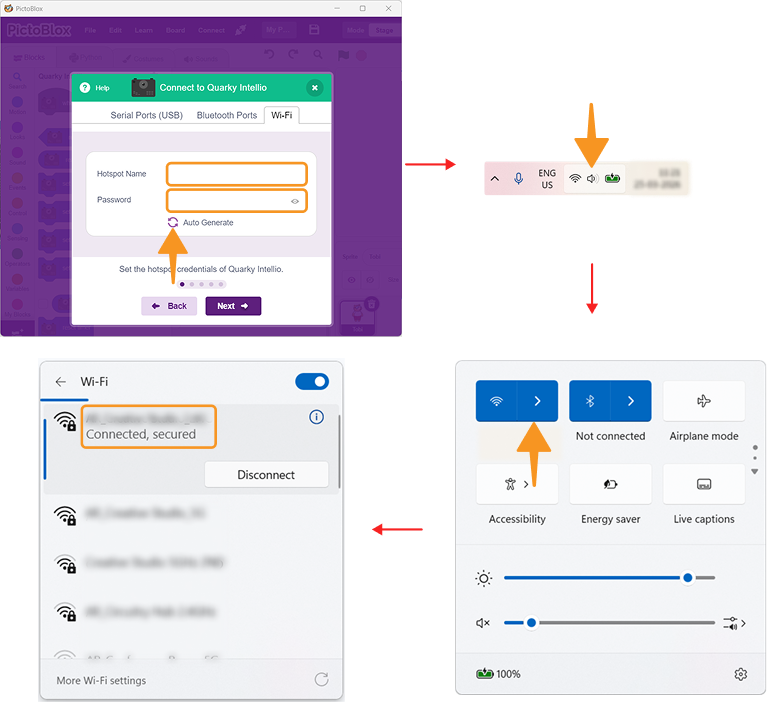
- Make sure your computer is connected to the Intellio hotspot.
- Check the hotspot name and password carefully.
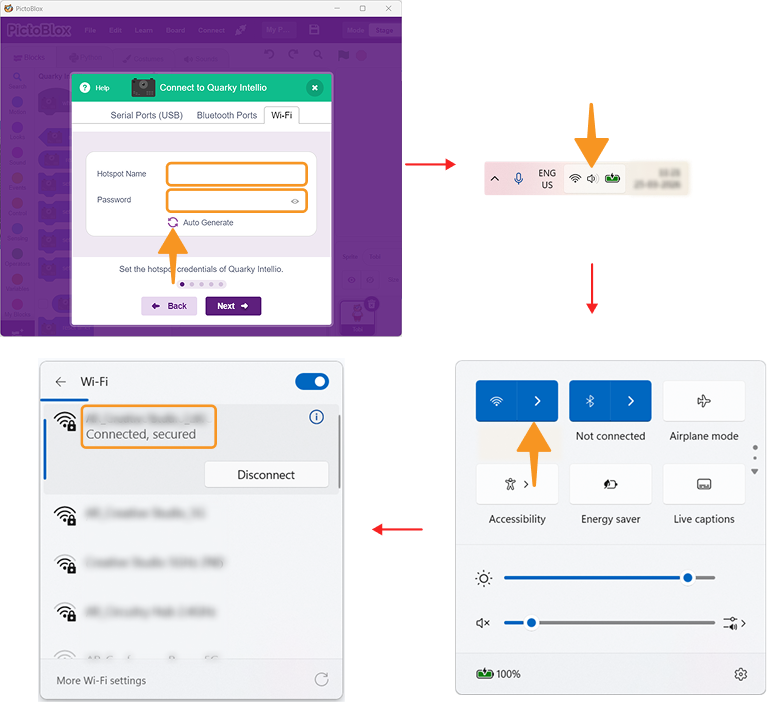
- Make sure Bluetooth is enabled. See Before You Start Troubleshooting, Step 6.
- Click Reconnect and then Refresh.
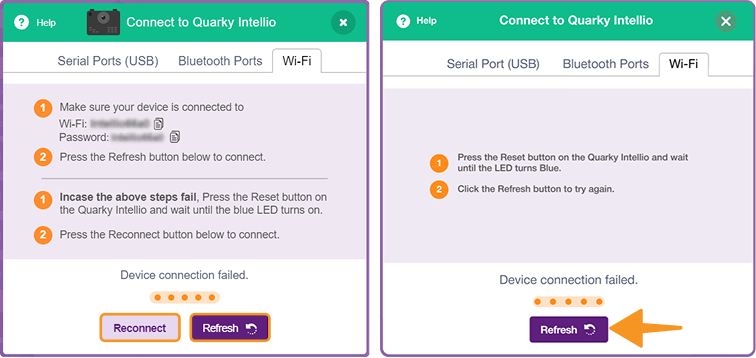
- If the issue continues, press the Reset button on Intellio and wait until the blue LED turns ON.
- Click Refresh and try again.
Using IP Address
If you see the “Device Connection Failed” message while using the IP address method, Intellio may not be connected to the correct previously used network. The fix depends on the connection method used earlier.
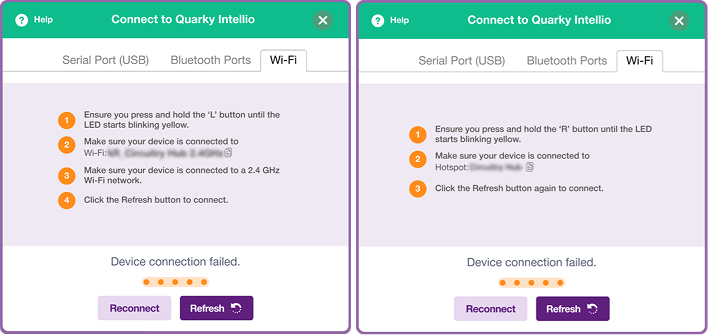 The solution depends on the connection method previously used.
If you previously used Via Wi-Fi Router or Device as a Mobile Hotspot:
- Press and hold the L button until the LED starts blinking yellow.
- Make sure your computer is connected to the correct 2.4 GHz Wi-Fi network. See Before You Start Troubleshooting, Step 6.
- Click Refresh.
If you previously used Intellio as a Hotspot:
- Press and hold the R button until the LED starts blinking yellow.
- Connect your computer to the Intellio hotspot.
- Click Refresh again.
Quarky Intellio Is Stuck on “Checking Your Router”
Problem: “PictoBlox is stuck on the ‘Checking your router’ screen.”
Why Does This Happen?
PictoBlox may be unable to verify the current network connection. The computer may be connected to the wrong network, the network may not be responding correctly, or the connection process may have been interrupted.
How to Fix It
First, complete the checks under Before You Start Troubleshooting.
Then follow the solution for your connection method.
Via Wi-Fi Router
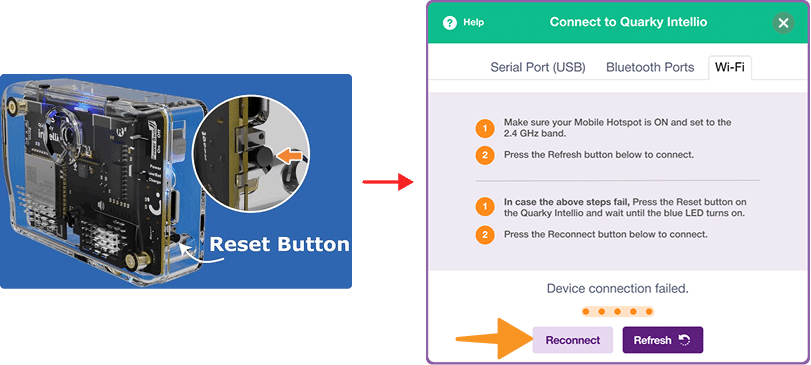
If PictoBlox is stuck on the “Checking your router” screen, Quarky Intellio may be unable to verify the Wi-Fi connection. This can happen if the device is connected to the wrong network, the router is not responding, or the connection process is interrupted.
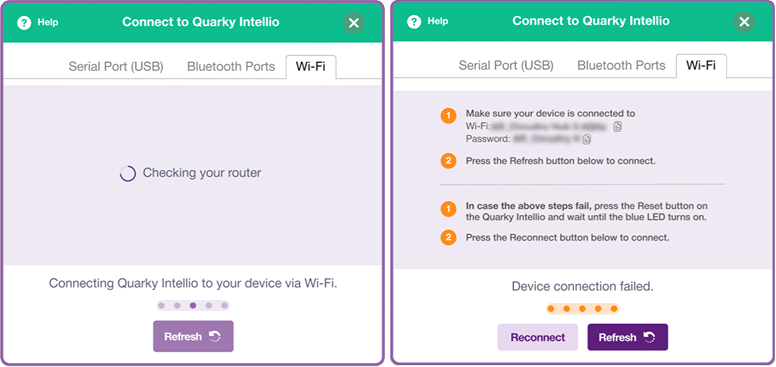
- Make sure your computer is connected to the correct 2.4 GHz Wi-Fi network. See Before You Start Troubleshooting, Step 6.
- Click Refresh or Reconnect.
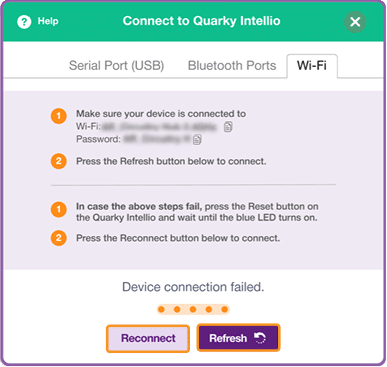
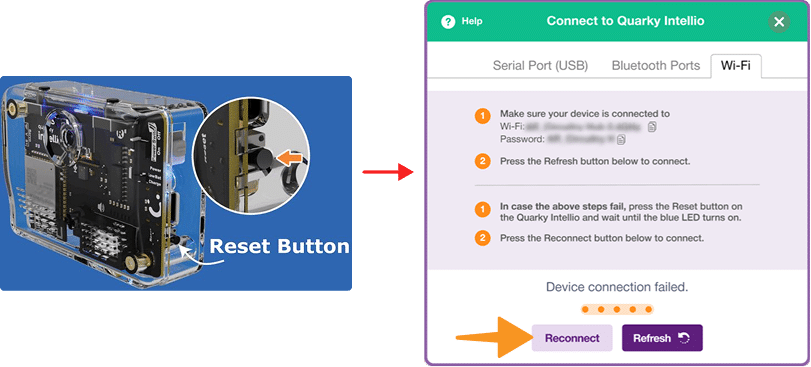
- If the issue continues, press the Reset button on Intellio.
- Wait until the blue LED turns ON.
- Click Reconnect and try again.
Device as a Mobile Hotspot
If the connection gets stuck on “Checking your router” while using a mobile hotspot, PictoBlox may be unable to verify the hotspot network. This can happen if the hotspot is inactive, set to the wrong band, or temporarily disconnected.
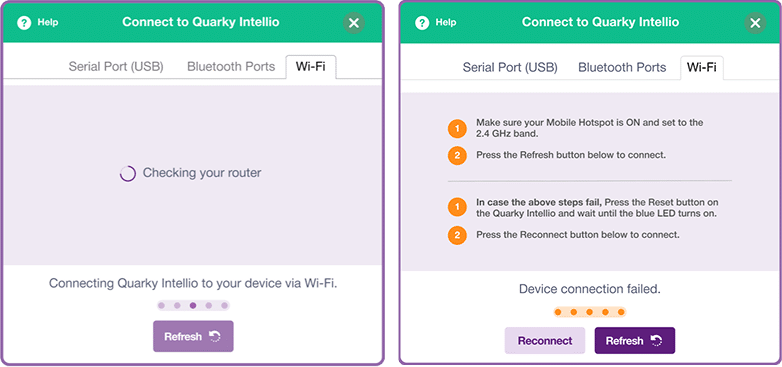
- Make sure the Mobile Hotspot is ON.
- Confirm that the hotspot is set to 2.4 GHz. See Before You Start Troubleshooting, Step 6.
- Click Refresh.
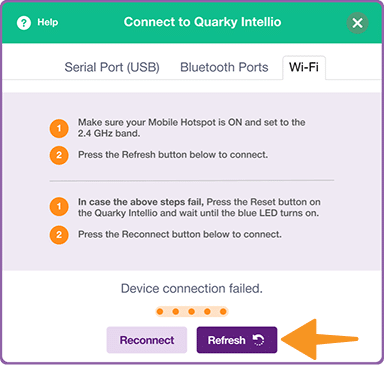
- If the issue continues, press the Reset button on Intellio.
Intellio as a hotspot
- Make sure your computer is connected to the Intellio hotspot.
- Confirm that the hotspot connection is active.
- If required, press the Reset button on Intellio.
Using IP Address of Quarky Intellio
- The IP Address connection method does not use the “Checking your router” step in the same way. If the IP connection stops during setup, see Quarky Intellio IP Address Is Not Fetching.
Quarky Intellio Connection Gets Stuck During Setup
Problem: “The Quarky Intellio connection process stops or gets stuck before the connection is completed.”
Why Does This Happen?
The connection may be interrupted by a temporary network delay, an incomplete device reset, a hotspot disconnecting, or a temporary communication problem between PictoBlox and Intellio.
How to Fix It
Via Wi-Fi Router
- Press the Reset button on Intellio and wait until the blue LED turns ON.
- Restart the connection process from PictoBlox.
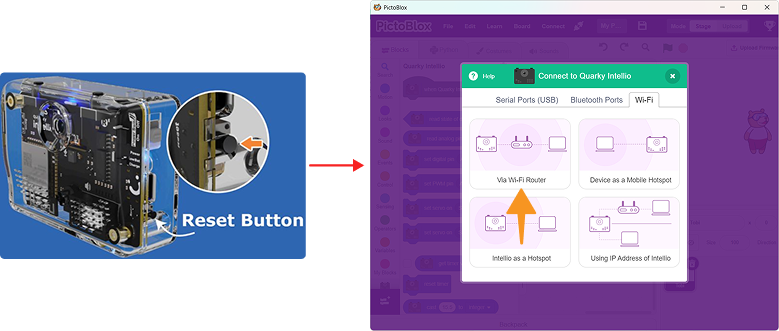
- Make sure the computer remains connected to the correct 2.4 GHz network. See Before You Start Troubleshooting, Step 6.
Device as a Mobile Hotspot
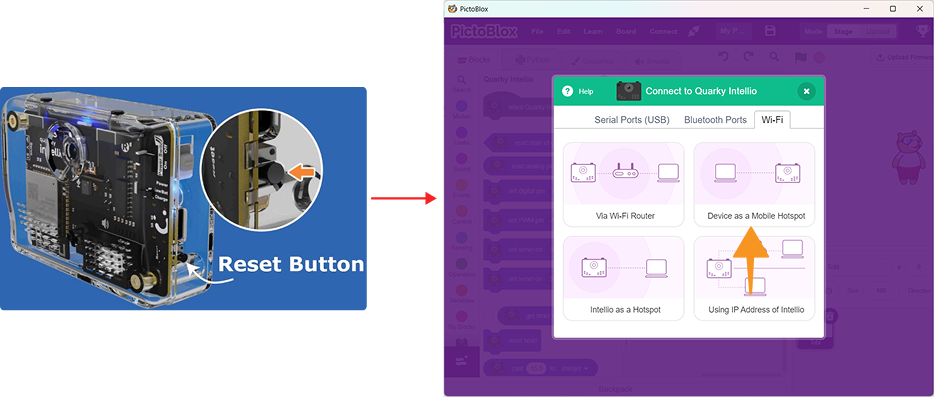
If the mobile hotspot connection process stops in between, the hotspot may have disconnected, the device may not have reset correctly, or PictoBlox may have lost communication with Intellio.
- Make sure the hotspot remains ON.
- Confirm that it is configured for 2.4 GHz. See Before You Start Troubleshooting, Step 6.
- Make sure sharing is through Wi-Fi.
- Press the Reset button on Intellio.
- Restart the connection process from PictoBlox.
Intellio as a Hotspot
If the Intellio hotspot connection gets stuck, the connection process may have stopped due to a temporary network issue, a device reset issue, or an incorrect hotspot connection.
- Make sure the computer remains connected to the Intellio hotspot.
- Confirm that the correct hotspot is selected.
- Reset Intellio if necessary and restart the connection process.
Using IP Address of Quarky Intellio
- Make sure Intellio is connected to the previously saved network.
- Confirm that the computer is connected to the same network.
- Reconnect Intellio using the appropriate L or R button.
- Click Refresh and try again.
Quarky Intellio IP Address Is Not Fetching
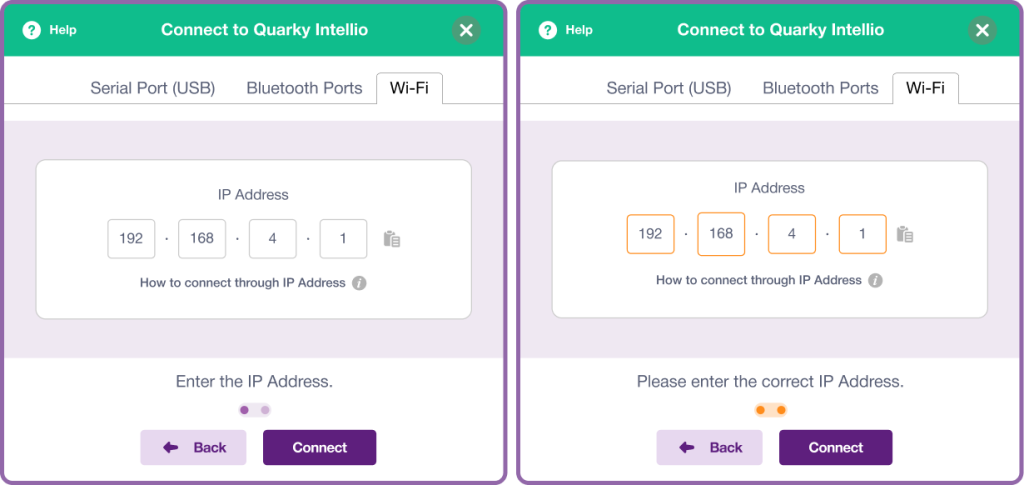
Problem: “The Quarky Intellio IP address is not appearing when I use the IP Address connection method.”
Why Does This Happen?
The Using IP Address of Quarky Intellio method works only after Intellio has previously connected successfully using:
- Via Wi-Fi Router
- Device as a Mobile Hotspot
- Intellio as a Hotspot
Your computer must also be connected to the same network used during the previous connection.
How to Fix It
- Make sure Intellio was previously connected using one of the three supported connection methods.
- Connect your computer to the same network used during the previous connection.
- Select Using IP Address of Quarky Intellio in the Wi-Fi tab.
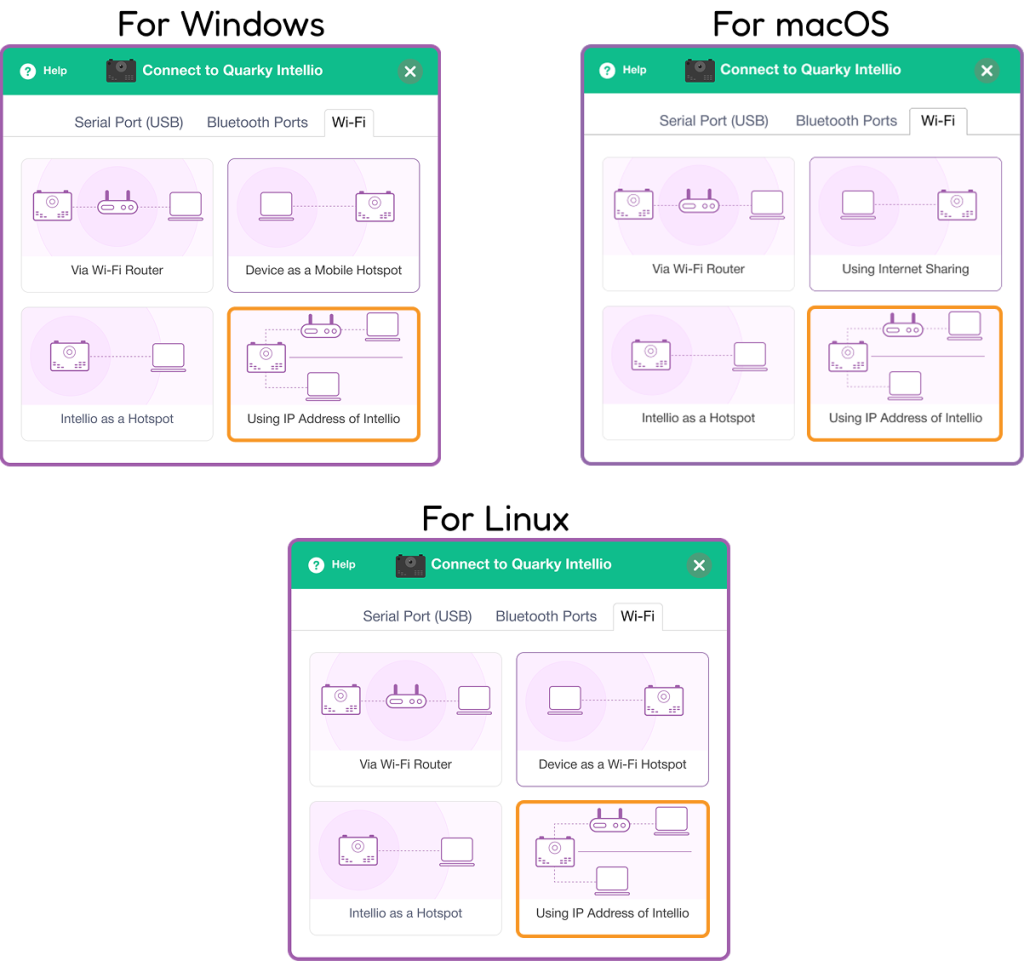
- If the previous connection used Wi-Fi Router or Device as a Mobile Hotspot, press and hold the L button.
- If the previous connection used Intellio as a Hotspot, press and hold the R button.
- Wait for Intellio to reconnect.
- Click Refresh and try the IP connection again.
Need Assistance?
If Quarky Intellio is still not connecting after completing the relevant troubleshooting steps, contact STEMpedia Support with details about:
- Your operating system
- PictoBlox version
- Connection method being used
- The error message or screen shown
- Whether Quarky Intellio appears in the device list
For detailed support, visit the Contact Us page.