Understanding Your Wizbot: A Screen-Free Learning Companion
In this module, we’re going to explore the exciting world of Wizbot, a screen-free educational toy designed to make learning fun and effective. Wizbot actively supports the development of crucial foundational skills in literacy, numeracy, and computational thinking for children through engaging, play-based activities.
Wizbot facilitates computational thinking and logic through hands-on, button-based coding. It operates in two key modes: Grid Mode, which involves navigating paths on arenas to enhance logic and sequencing abilities, and Draw Mode, where a brush pen is attached to create shapes and patterns, fostering creativity and visual design. The program also integrates story-based learning and the Concrete-Pictorial-Abstract (CPA) approach to ensure a tangible and meaningful understanding of complex concepts.
Let’s dive in and get to know your Wizbot better!
What is Wizbot?

Wizbot is a special educational robot designed for children aged 4 to 10. It’s a screen-free, button-based toy that makes learning about Computational Thinking, Foundational Literacy, and Numeracy interactive and enjoyable.
Getting to Know Your Wizbot
Let’s examine the different parts of your Wizbot.
Top Side Features
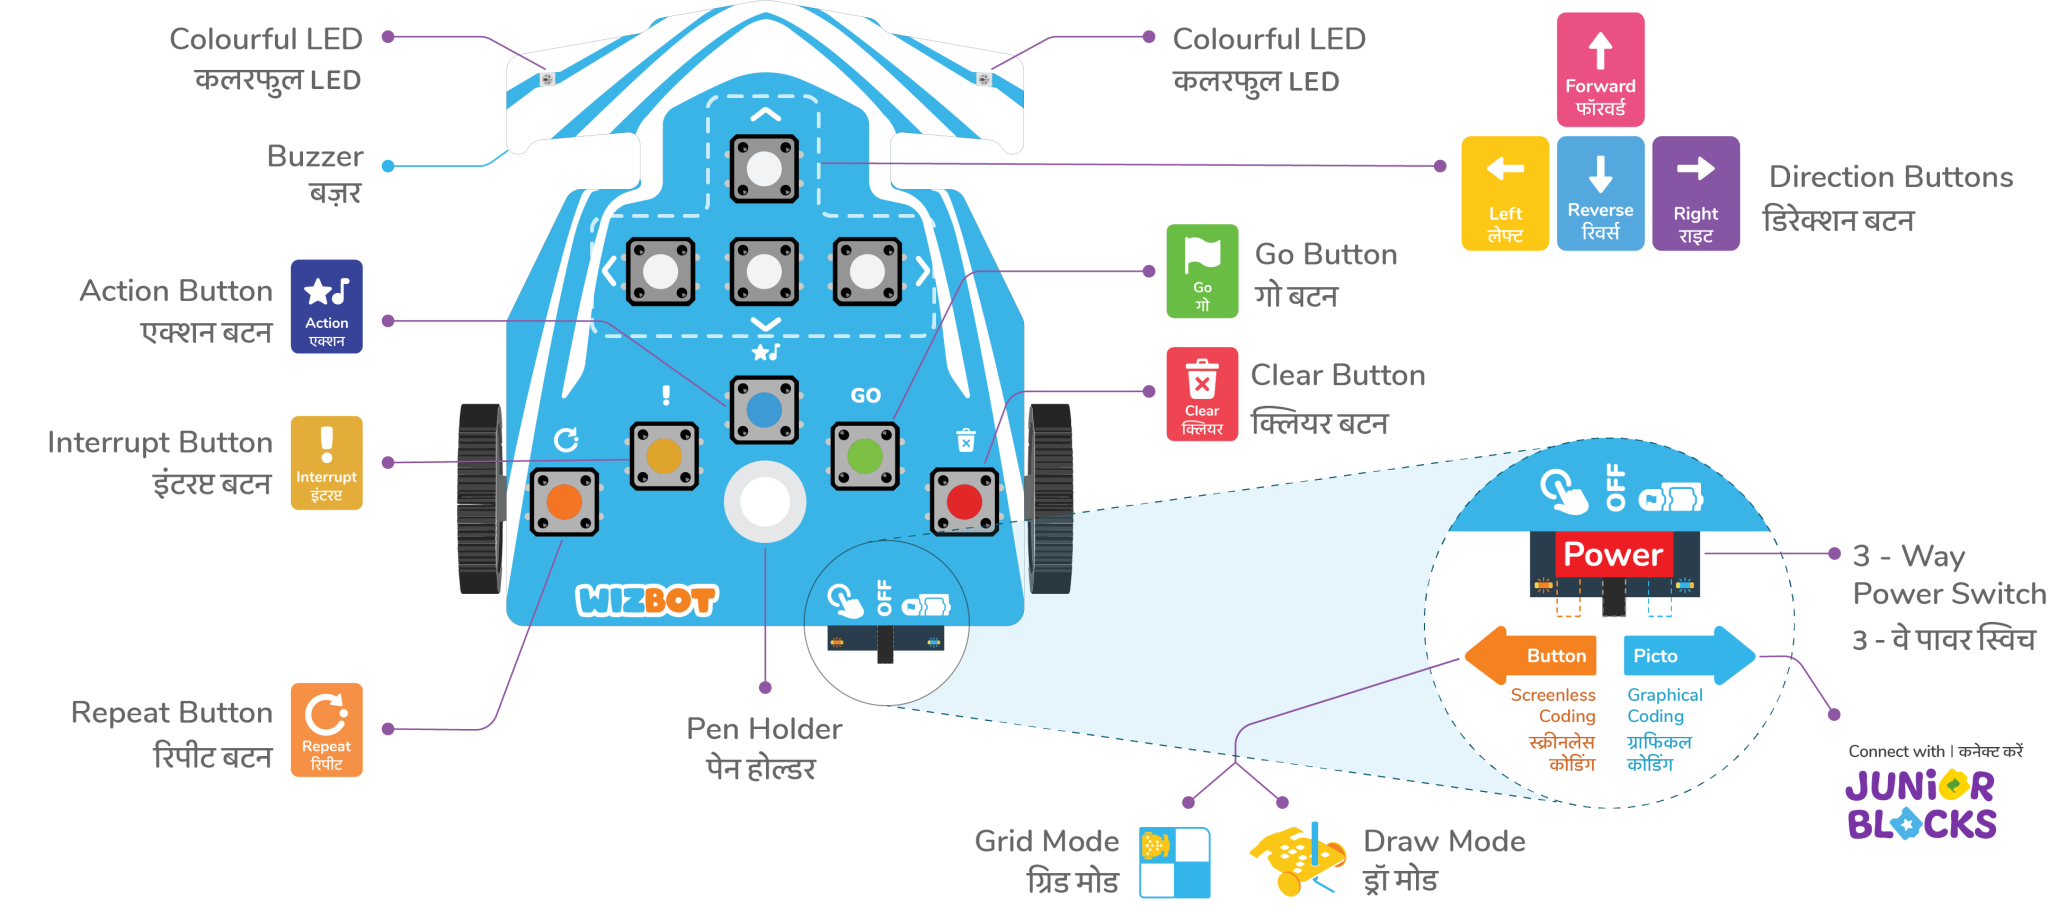
On the top side of your Wizbot, you’ll find:

- Nine Command Buttons: These buttons are used to input instructions for Wizbot.
- Two Colorful LED Lights: These lights provide visual feedback on Wizbot’s actions.
- Pen Holder: This slot is designed to hold a brush pen marker, enabling Wizbot to draw.
Back Side Features
Now, let’s turn Wizbot around. On its back, you’ll see:
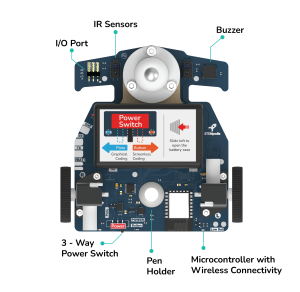
- Two IR Sensors: These sensors enable Wizbot to detect black and white surfaces and follow black lines.
- Buzzer: This component emits a sound after each command, providing audio feedback.
- Castor Wheel: This small wheel facilitates smooth turns for Wizbot.
- Battery Case: This is where the batteries are inserted. (Please note: some Wizbots use AAA batteries, while others have a built-in rechargeable battery.)
- Motor with Wheels: These are the primary wheels responsible for Wizbot’s movement.
- Three-Way Power Switch: This switch controls Wizbot’s power (on/off) and changes its operational mode.
- Low Battery Indicator: A light that illuminates when Wizbot requires new batteries or a recharge.
Powering On Your Wizbot and Modes
Your Wizbot features a dedicated Power switch at the bottom, which allows you to turn it on and select the desired mode of operation.
Slide the power switch to:
- The right for Button Coding Mode: An orange light will illuminate, indicating this mode is active. This mode is used for directly inputting commands onto Wizbot using its buttons.
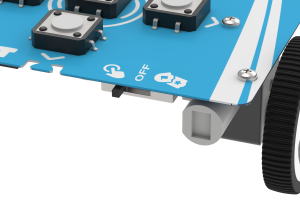
- The left for Junior Blocks Mode: A blue light will illuminate, indicating this mode is active. In this mode, Wizbot can connect to an application for block-based coding (which will be covered in a later module).
Your First Commands: Making Wizbot Move!
The buttons on Wizbot’s top surface are your primary tools for programming its actions. Let’s learn to use them through an activity: guiding Wizbot from a “Red Farm” to a “Blue Farm.”
The Clear Button: Starting Fresh
Before entering new commands, always press the Clear button. This action erases any previously stored instructions, providing a clean slate for new programming.
Directional Buttons and the Go Button
You will find four white directional buttons for movement control:
- Forward
- Reverse
- Left (for turning)
- Right (for turning)
To execute the commands you have pressed, you must press the green Go button.
Give it a try!
- Move Forward:
- Press the Clear button.
- Press the Forward button.
- Press the Go button. Observe Wizbot moving one step forward.
- Turn Right:
- Press the Clear button.
- Press the Right button.
- Press the Go button. Wizbot will turn 90 degrees to the right.
- Move Reverse:
- Press the Clear button.
- Press the Reverse button.
- Press the Go button. Wizbot will move backward.
Wizbot can move in all four directions using these white buttons in conjunction with the Go button.
The Action Button
There is also an Action button. This button instructs Wizbot to activate its lights and produce sounds, adding an interactive element to your programs.
- Press the Action button.
- Press the Go button. Observe and listen.
Stopping Wizbot in Motion
To immediately stop Wizbot while it is in motion, simply press the Clear button. Wizbot will halt, but this action does not delete the previously entered code. If you press the Go button again, Wizbot will resume execution from where it stopped.
![]()
What’s Next?
We have now learned the fundamental operations of Wizbot and its button commands. Two additional buttons, Repeat and Interrupt, will be explored in upcoming sections.
Ready to practice what you’ve learned? Try programming your Wizbot to move in different patterns.


